parkingSpace
Description
parkingSpace objects define the parking spaces to add to parking
lots in a driving scenario. You can define the dimensions and angle of the parking space, the
type of parking space, and the color, width, and strength of the parking lane markings. To
visualize a parking space before adding it to a parking lot, use the plot function.
To populate a parking lot with the parking spaces that you create, use the parkingLot or
insertParkingSpaces functions.
Creation
Description
space = parkingSpace creates a straight parking space that is 2.6
meters wide, 5.5 meters long, and has white lane markings.
space = parkingSpace( sets
properties using name-value arguments. For example, Name=Value)space =
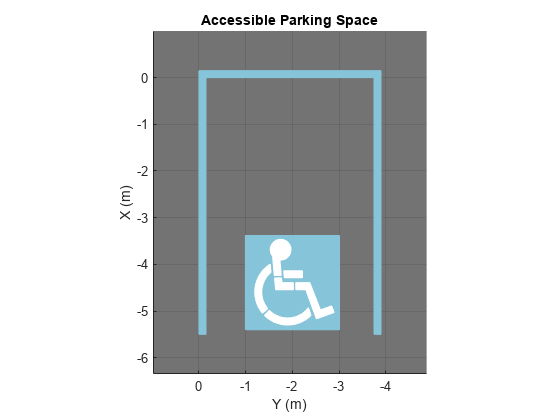
parkingSpace(Type="Accessible",Width=3,Angle=60) creates an accessible parking
space that is 3 meters wide and has an angle of 60 degrees.
Properties
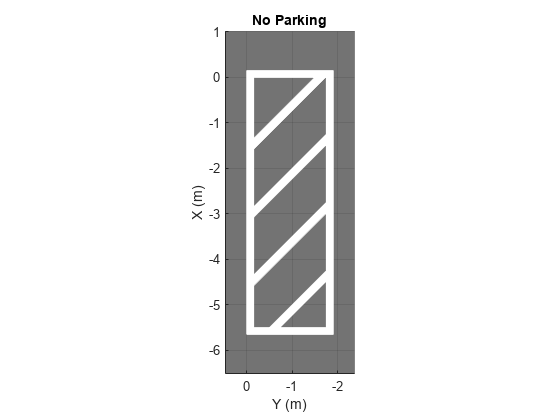
Type of parking space, specified as "Parking",
"NoParking", or "Accessible". This table shows
the default parking space for each type.
"Parking" | "NoParking" | "Accessible" |
|---|---|---|
|
|
|
|


Width of parking space, in meters, specified as a real scalar in the range [0.5, 100].
Example: 3.6
Length of parking space, in meters, specified as a real scalar in the range [0.5, 100].
Example: 7.0
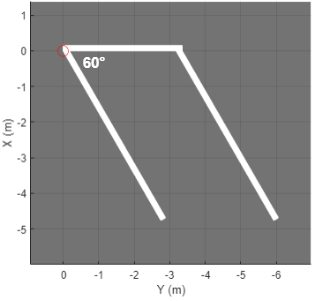
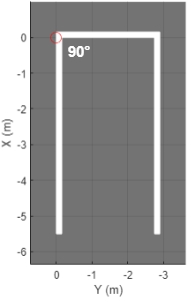
Angle of parking space, in degrees, specified as a real scalar in the range [20,
160]. Angle is measured clockwise from the top edge to the left
edge of the parking space. This table shows sample Angle values and
their corresponding plots.
Angle=60 | Angle=90 | Angle=120 |
|---|---|---|
|
|
|
|

Example: 45
Color of parking space lane markings, specified as an RGB triplet, a hexadecimal color code, a color name, or a short color name. The same color applies to all markings in the space.
For a custom color, specify an RGB triplet or a hexadecimal color code.
An RGB triplet is a three-element row vector whose elements specify the intensities of the red, green, and blue components of the color. The intensities must be in the range
[0,1], for example,[0.4 0.6 0.7].A hexadecimal color code is a string scalar or character vector that starts with a hash symbol (
#) followed by three or six hexadecimal digits, which can range from0toF. The values are not case sensitive. Therefore, the color codes"#FF8800","#ff8800","#F80", and"#f80"are equivalent.
Alternatively, you can specify some common colors by name. This table lists the named color options, the equivalent RGB triplets, and the hexadecimal color codes.
| Color Name | Short Name | RGB Triplet | Hexadecimal Color Code | Appearance |
|---|---|---|---|---|
"red" | "r" | [1 0 0] | "#FF0000" |
|
"green" | "g" | [0 1 0] | "#00FF00" |
|
"blue" | "b" | [0.5234 0.7695 0.8516] | "#85C4D9" |
|
"cyan"
| "c" | [0 1 1] | "#00FFFF" |
|
"magenta" | "m" | [1 0 1] | "#FF00FF" |
|
"yellow" | "y" | [0.98 0.86 0.36] | "#FADB5C" |
|
"black" | "k" | [0 0 0] | "#000000" |
|
"white" | "w" | [1 1 1] | "#FFFFFF" |
|
The default marking color depends on the parking space type specified by
Type.
Type | MarkingColor Default |
|---|---|
"Parking" | [1 1 1] (white) |
"NoParking" | [0.98 0.86 0.36] (yellow) |
"Accessible" | [0.5234 0.7695 0.8516] (blue) |
Example: [0.8 0.8 0.8]
Width of parking space lane markings, in meters, specified as a positive real scalar. The same width applies to all markings in the space.
MarkingWidth must be less than or equal to the parking space
width specified by Width.
Example: 0.2
Saturation strength of the parking lane marking color, specified as a real scalar in
the range [0, 1]. A value of 0 corresponds to a marking color that is
fully unsaturated. The marking is the color of the underlying lot. A value of
1 corresponds to a marking color that is fully saturated.
Example: 0.75
Object Functions
plot | Plot parking space |
Examples
Create a parking lot that contains a mixture of parking spaces, no-parking areas, and accessible spaces.
Define the parking space to use in the parking lot. Use the default settings. Plot the space.
space = parkingSpace;
plot(space,Origin="off")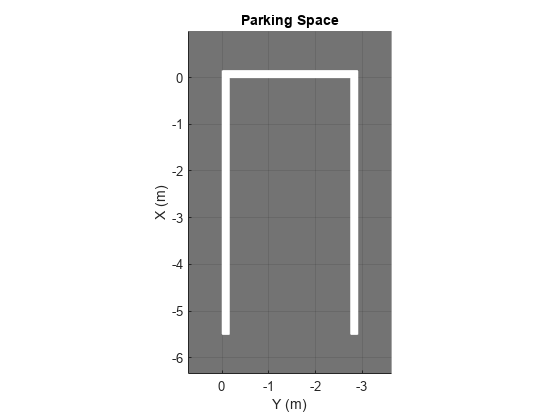
Define the no-parking areas to use in the parking lot. Specify a color of white and a width that is one meter less than the width of the default parking space. Plot the space.
noSpace = parkingSpace(Type="NoParking",Width=(space.Width - 1),MarkingColor="White");
plot(noSpace,Origin="off")
Define the accessible parking space to use in the parking lot. Specify a width that is one meter more than the width of the default parking space. Plot the space.
accessibleSpace = parkingSpace(Type="Accessible",Width=(space.Width + 1));
plot(accessibleSpace,Origin="off")
Create a driving scenario containing a parking lot with a nonrectangular layout. Plot the parking lot and display the edge numbers along which you can add parking spaces.
scenario = drivingScenario;
vertices = [0 0; 32 -10.5; 32 -50.5; 25 -57.5; 0 -57.5];
lot = parkingLot(scenario,vertices);
plot(scenario,ParkingLotEdges="on")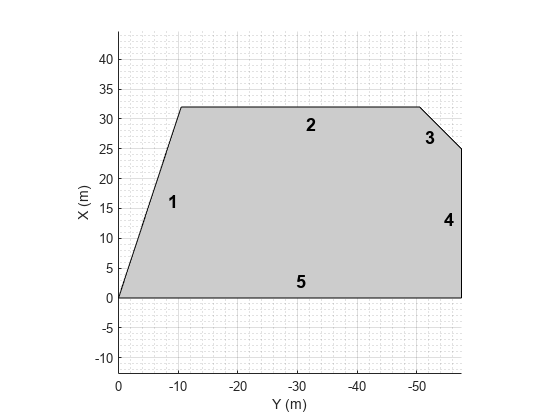
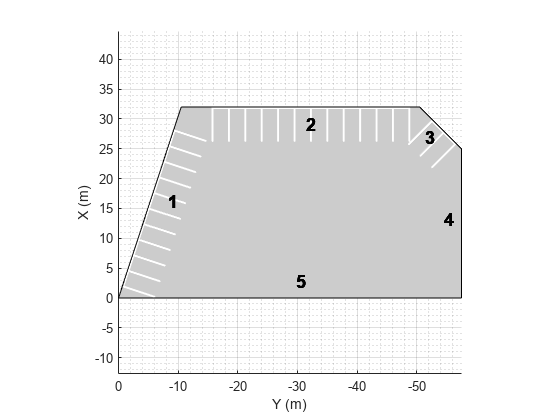
Insert default parking spaces along the first three edges of the parking lot. To avoid overlapping parking spaces, make these adjustments to the insertions:
Along edge 1, insert only 10 spaces.
Along edge 2, offset the spaces by 5 meters from the first vertex of the edge.
Along edge 3, offset the spaces by 3 meters from the first vertex of the edge.
numSpaces = 10;
insertParkingSpaces(lot,space,numSpaces,Edge=1)
insertParkingSpaces(lot,space,Edge=2,Offset=5)
insertParkingSpaces(lot,space,Edge=3,Offset=3)
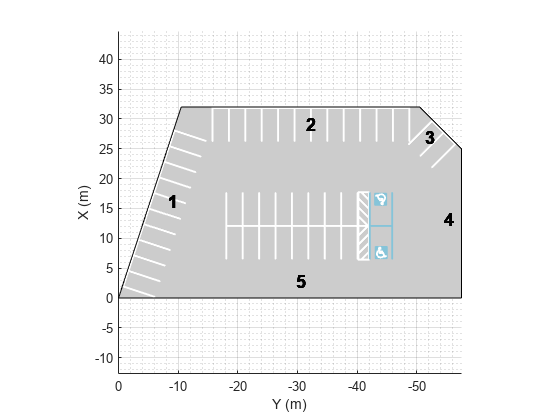
In the center of the parking lot, insert a 2-by-10 grid of parking spaces containing 8 columns of default spaces, 1 column of no-parking areas, and 1 column of accessible spaces.
insertParkingSpaces(lot,[space noSpace accessibleSpace],[8 1 1],Position=[12 -18],Rows=2)
Explore the various parking lots that you can create by using predefined layouts as well as the options for configuring those layouts.
Define the parking space used to populate the parking lot. Modify the width, length, or angle of the space and the width and strength of its lane markings. Plot the parking space.
width =2.6; % m length =
5.5; % m angle =
90; % deg markingWidth =
0.15; markingStrength =
1; space = parkingSpace(Width=width, ... Length=length, ... Angle=angle, ... MarkingWidth=markingWidth, ... MarkingStrength=markingStrength); plot(space)

Create a driving scenario containing a 50-by-50 meter parking lot. Specify a predefined parking lot layout and a minimum driving lane width. The generated parking lot fills with as many parking spaces that fit the layout as possible given the minimum driving lane width constraint. Modify the parking space, layout type, and driving lane width, and observe the effects on the parking lot. For example:
As you increase the size of the parking space or the minimum driving lane width, the number of parking grids that fit in the middle of the parking lot decreases.
If you select the
HorizontalWithEdgesorVerticalWithEdgeslayout, one edge has fewer spaces than the others. This edge contains a driving lane of widthDrivingLaneWidththat enables vehicles to enter the parking lot.
scenario = drivingScenario; vertices = [0 0; 50 0; 50 -50; 0 -50]; parkingLayout ="Vertical"; drivingLaneWidth =
2.6; % m parkingLot(scenario,vertices, ... ParkingSpace=space, ... ParkingLayout=parkingLayout, ... DrivingLaneWidth=drivingLaneWidth); plot(scenario)

Version History
Introduced in R2021b