vehicle
Add vehicle to driving scenario
Description
vc = vehicle(scenario)Vehicle object, vc, to the driving scenario,
scenario. The vehicle has default property values.
Vehicles are a specialized type of actor cuboid (box-shaped) object that has four wheels. For more details about how vehicles are defined, see Actor and Vehicle Positions and Dimensions.
vc = vehicle(scenario,Name,Value)
Note
You can configure the vehicles in a driving scenario to spawn and despawn, and then
import the associated drivingScenario object into the Driving Scenario
Designer app. The app considers the first vehicle created in the driving
scenario to be the ego vehicle and does not allow the ego vehicle to either spawn or
despawn in the scenario.
Examples
Create a driving scenario containing a curved road, two straight roads, and two actors: a car and a bicycle. Both actors move along the road for 60 seconds.
Create the driving scenario object.
scenario = drivingScenario('SampleTime',0.1','StopTime',60);
Create the curved road using road center points following the arc of a circle with an 800-meter radius. The arc starts at 0°, ends at 90°, and is sampled at 5° increments.
angs = [0:5:90]';
R = 800;
roadcenters = R*[cosd(angs) sind(angs) zeros(size(angs))];
roadwidth = 10;
cr = road(scenario,roadcenters,roadwidth);
Add two straight roads with the default width, using road center points at each end. To the first straight road add barriers on both road edges.
roadcenters = [700 0 0; 100 0 0];
sr1 = road(scenario,roadcenters);
barrier(scenario,sr1)
barrier(scenario,sr1,'RoadEdge','left')
roadcenters = [400 400 0; 0 0 0];
road(scenario,roadcenters);
Get the road boundaries.
rbdry = roadBoundaries(scenario);
Add a car and a bicycle to the scenario. Position the car at the beginning of the first straight road.
car = vehicle(scenario,'ClassID',1,'Position',[700 0 0], ...
    'Length',3,'Width',2,'Height',1.6);
Position the bicycle farther down the road.
bicycle = actor(scenario,'ClassID',3,'Position',[706 376 0]', ...
    'Length',2,'Width',0.45,'Height',1.5);
Plot the scenario.
plot(scenario,'Centerline','on','RoadCenters','on');
title('Scenario');

Display the actor poses and profiles.
allActorPoses = actorPoses(scenario)
allActorPoses=242×1 struct array with fields:
    ActorID
    Position
    Velocity
    Roll
    Pitch
    Yaw
    AngularVelocity
allActorProfiles = actorProfiles(scenario)
allActorProfiles=242×1 struct array with fields:
    ActorID
    ClassID
    Length
    Width
    Height
    OriginOffset
    MeshVertices
    MeshFaces
    RCSPattern
    RCSAzimuthAngles
    RCSElevationAngles
Because there are barriers in this scenario, and each barrier segment is considered an actor, actorPoses and actorProfiles functions return the poses of all stationary and non-stationary actors. To only obtain the poses and profiles of non-stationary actors such as vehicles and bicycles, first obtain their corresponding actor IDs using the scenario.Actors.ActorID property.
movableActorIDs = [scenario.Actors.ActorID];
Then, use those IDs to filter only non-stationary actor poses and profiles.
movableActorPoseIndices = ismember([allActorPoses.ActorID],movableActorIDs);

movableActorPoses = allActorPoses(movableActorPoseIndices)
movableActorPoses=2×1 struct array with fields:
    ActorID
    Position
    Velocity
    Roll
    Pitch
    Yaw
    AngularVelocity
movableActorProfiles = allActorProfiles(movableActorPoseIndices)
movableActorProfiles=2×1 struct array with fields:
    ActorID
    ClassID
    Length
    Width
    Height
    OriginOffset
    MeshVertices
    MeshFaces
    RCSPattern
    RCSAzimuthAngles
    RCSElevationAngles
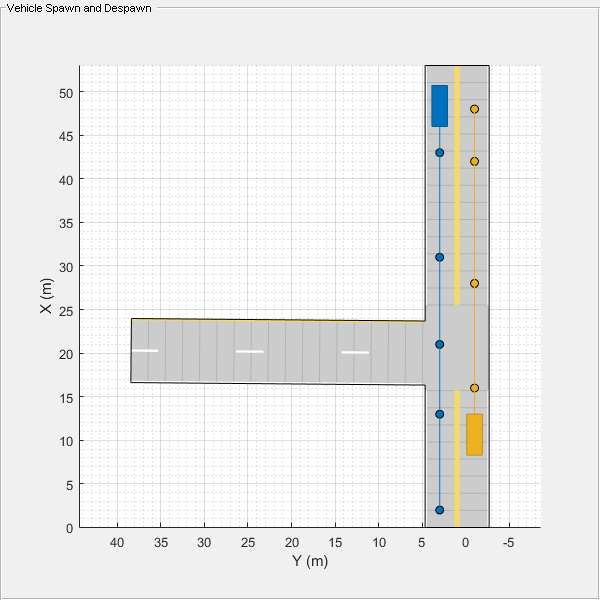
Create a driving scenario. Set the stop time for the scenario to 3 seconds.
scenario = drivingScenario('StopTime',3);Add a two-lane road to the scenario.
roadCenters = [0 1 0; 53 1 0];
laneSpecification = lanespec([1 1]);
road(scenario,roadCenters,'Lanes',laneSpecification);
Add another road that intersects the first road at a right angle to form a T-shape.
roadCenters = [20.3 38.4 0; 20 3 0];
laneSpecification = lanespec(2);
road(scenario,roadCenters,'Lanes',laneSpecification)
ans =
Road with properties:
Name: ""
RoadID: 2
RoadCenters: [2×3 double]
RoadWidth: 7.3500
BankAngle: [2×1 double]
Heading: [2×1 double]
Add the ego vehicle to the scenario and define its waypoints. Set the ego vehicle speed to 20 m/s and generate the trajectories for the ego vehicle.
egoVehicle = vehicle(scenario,'ClassID',1, ...
                    'Position',[1.5 2.5 0]);
waypoints = [2 3 0; 13 3 0;
            21 3 0; 31 3 0;
            43 3 0; 47 3 0];
speed = 20;
smoothTrajectory(egoVehicle,waypoints,speed)
Add a non-ego vehicle to the scenario. Set the non-ego vehicle to spawn and despawn two times during the simulation by specifying vectors for entry time and exit time. Notice that each entry time value is less than the corresponding exit time value.
nonEgovehicle1 = vehicle(scenario,'ClassID',1, ...
                'Position',[22 30 0],'EntryTime',[0.2 1.4],'ExitTime',[1.0 2.0]);
Define the waypoints for the non-ego vehicle. Set the non-ego vehicle speed to 30 m/s and generate its trajectories.
waypoints = [22 35 0; 22 23 0;
            22 13 0; 22 7 0;
            18 -0.3 0; 12 -0.8 0; 5 -0.8 0];
speed = 30;
smoothTrajectory(nonEgovehicle1,waypoints,speed)
Add another non-ego vehicle to the scenario. Set the second non-ego vehicle to spawn once during the simulation by specifying an entry time as a positive scalar. Since you do not specify an exit time, this vehicle will remain in the scenario until the scenario ends.
nonEgovehicle2 = vehicle(scenario,'ClassID',1, ...
                'Position',[48 -1 0],'EntryTime',2);
Define the waypoints for the second non-ego vehicle. Set the vehicle speed to 50 m/s and generate its trajectories.
waypoints = [48 -1 0; 42 -1 0; 28 -1 0;
            16 -1 0; 12 -1 0];
speed = 50;
smoothTrajectory(nonEgovehicle2,waypoints,speed)
Create a custom figure window to plot the scenario.
fig = figure;
set(fig,'Position',[0 0 600 600])
movegui(fig,'center')
hViewPnl = uipanel(fig,'Position',[0 0 1 1],'Title','Vehicle Spawn and Despawn');
hPlt = axes(hViewPnl);
Plot the scenario and run the simulation. Observe how the non-ego vehicles spawn and despawn in the scenario while simulation is running.
plot(scenario,'Waypoints','on','Parent',hPlt)
while advance(scenario)
    pause(0.1)
end
Input Arguments
Name-Value Arguments
Specify optional pairs of arguments as
Name1=Value1,...,NameN=ValueN, where Name is
the argument name and Value is the corresponding value.
Name-value arguments must appear after other arguments, but the order of the
pairs does not matter.
Before R2021a, use commas to separate each name and value, and enclose
Name in quotes.
Example: vehicle('Length',2.2,'Width',0.6,'Height',1.5) creates a
vehicle that has the dimensions of a motorcycle. Units are in meters.
Name of the vehicle, specified as the comma-separated pair consisting of
'Name' and a character vector or string scalar.
Example: 'Name','Vehicle1'
Example: "Name","Vehicle1"
Data Types: char | string
Entry time for a vehicle to spawn in the driving scenario, specified as the
comma-separated pair consisting of 'EntryTime' and a positive
scalar or a vector of positive values. Units are in seconds, measured from the start
time of the scenario.
Specify this name-value pair argument to add or make a vehicle appear in the driving scenario at the specified time while the simulation is running.
To spawn a vehicle only once, specify entry time as a scalar.
To spawn a vehicle multiple times, specify entry time as a vector.
Arrange the elements of the vector in ascending order.
The length of the vector must match the length of the exit time vector.
If the vehicle has an associated exit time, then each entry time value must be less than the corresponding exit time value.
Each entry time value must be less than the stop time of the scenario. You can set the stop time for the scenario by specifying a value for the
'StopTime'property of thedrivingScenarioobject.
Example: 'EntryTime',2
Example: 'EntryTime',[2 4]
Data Types: single | double | int8 | int16 | int32 | int64 | uint8 | uint16 | uint32 | uint64
Exit time for a vehicle to despawn from the driving scenario, specified as the
comma-separated pair consisting of 'ExitTime' and a positive scalar
or a vector of positive values. Units are in seconds, measured from the start time of
the scenario.
Specify this name-value pair argument to remove or make a vehicle disappear from the scenario at a specified time while the simulation is running.
To despawn a vehicle only once, specify exit time as a scalar.
To despawn a vehicle multiple times, specify exit time as a vector.
Arrange the elements of the vector in ascending order.
The length of the vector must match the length of the entry time vector.
If the vehicle has an associated entry time, then each exit time value must be greater than the corresponding entry time value.
Each exit time value must be less than the stop time of the scenario. You can set the stop time for the scenario by specifying a value for the
'StopTime'property of thedrivingScenarioobject.
Example: 'ExitTime',3
Example: 'ExitTime',[3 6]
Data Types: single | double | int8 | int16 | int32 | int64 | uint8 | uint16 | uint32 | uint64
Display color of vehicle, specified as the comma-separated pair consisting of
'PlotColor' and an RGB triplet, hexadecimal color code, color
name, or short color name.
The vehicle appears in the specified color in all programmatic scenario
visualizations, including the plot function, chasePlot function, and plotting functions of birdsEyePlot objects. If you import the scenario into the Driving Scenario
Designer app, then the vehicle appears in this color in all app
visualizations. If you import the scenario into Simulink®, then the vehicle appears in this color in the Bird's-Eye
Scope.
If you do not specify a color for the vehicle, the function assigns one based on
the default color order of Axes objects. For more details, see the
ColorOrder property for Axes objects.
For a custom color, specify an RGB triplet or a hexadecimal color code.
An RGB triplet is a three-element row vector whose elements specify the intensities of the red, green, and blue components of the color. The intensities must be in the range
[0,1], for example,[0.4 0.6 0.7].A hexadecimal color code is a string scalar or character vector that starts with a hash symbol (
#) followed by three or six hexadecimal digits, which can range from0toF. The values are not case sensitive. Therefore, the color codes"#FF8800","#ff8800","#F80", and"#f80"are equivalent.
Alternatively, you can specify some common colors by name. This table lists the named color options, the equivalent RGB triplets, and the hexadecimal color codes.
| Color Name | Short Name | RGB Triplet | Hexadecimal Color Code | Appearance |
|---|---|---|---|---|
"red" | "r" | [1 0 0] | "#FF0000" |
|
"green" | "g" | [0 1 0] | "#00FF00" |
|
"blue" | "b" | [0 0 1] | "#0000FF" |
|
"cyan"
| "c" | [0 1 1] | "#00FFFF" |
|
"magenta" | "m" | [1 0 1] | "#FF00FF" |
|
"yellow" | "y" | [1 1 0] | "#FFFF00" |
|
"black" | "k" | [0 0 0] | "#000000" |
|
"white" | "w" | [1 1 1] | "#FFFFFF" |
|
This table lists the default color palettes for plots in the light and dark themes.
| Palette | Palette Colors |
|---|---|
Before R2025a: Most plots use these colors by default. |
|
|
|
You can get the RGB triplets and hexadecimal color codes for these palettes using the orderedcolors and rgb2hex functions. For example, get the RGB triplets for the "gem" palette and convert them to hexadecimal color codes.
RGB = orderedcolors("gem");
H = rgb2hex(RGB);
Before R2023b: Get the RGB triplets using RGB =
get(groot,"FactoryAxesColorOrder").
Before R2024a: Get the hexadecimal color codes using H =
compose("#%02X%02X%02X",round(RGB*255)).
Position of the rotational center of the vehicle, specified as the comma-separated
pair consisting of 'Position' and an [x
y
z] real-valued vector.
The rotational center of a vehicle is the midpoint of its rear axle. The vehicle extends rearward by a distance equal to the rear overhang. The vehicle extends forward by a distance equal to the sum of the wheelbase and forward overhang. Units are in meters.
Example: [10;50;0]
Velocity (v) of the vehicle center in the
x-, y- and z-directions,
specified as the comma-separated pair consisting of 'Velocity' and
a [vx
vy
vz] real-valued vector. The
'Position' name-value pair specifies the vehicle center. Units
are in meters per second.
Example: [-4;7;10]
Yaw angle of the vehicle, specified as the comma-separated pair consisting of
'Yaw' and a real scalar. Yaw is the angle
of rotation of the vehicle around the z-axis. Yaw is
clockwise-positive when looking in the forward direction of the axis, which points up
from the ground. Therefore, when viewing vehicles from the top down, such as on a
bird's-eye plot, yaw is counterclockwise-positive. Angle values are wrapped to the
range [–180, 180]. Units are in degrees.
Example: -0.4
Pitch angle of the vehicle, specified as the comma-separated pair consisting of
'Pitch' and a real scalar. Pitch is the
angle of rotation of the vehicle around the y-axis and is
clockwise-positive when looking in the forward direction of the axis. Angle values are
wrapped to the range [–180, 180]. Units are in degrees.
Example: 5.8
Roll angle of the vehicle, specified as the comma-separated pair consisting of
'Roll' and a real scalar. Roll is the
angle of rotation of the vehicle around the x-axis and is
clockwise-positive when looking in the forward direction of the axis. Angle values are
wrapped to the range [–180, 180]. Units are in degrees.
Example: -10
Angular velocity (ω) of the vehicle, in world coordinates,
specified as the comma-separated pair consisting of
'AngularVelocity' and a
[ωx
ωy
ωz] real-valued vector. Units are in degrees
per second.
Example: [20 40 20]
Length of the vehicle, specified as the comma-separated pair consisting of
'Length' and a positive real scalar. Units are in meters.
In Vehicle objects, this equation defines the
values of the Length, FrontOverhang,
Wheelbase, and RearOverhang properties:
Length = FrontOverhang + Wheelbase + RearOverhang
If you update the
Length,RearOverhang, orWheelbaseproperty, to maintain the equation, theVehicleobject increases or decreases theFrontOverhangproperty and keeps the other properties constant.If you update the
FrontOverhangproperty, to maintain this equation, theVehicleobject increases or decreases theWheelbaseproperty and keeps the other properties constant.
When setting both the FrontOverhang and
RearOverhang properties, to prevent the Vehicle object
from overriding the FrontOverhang value, set
RearOverhang first, followed by FrontOverhang. The
object calculates the new Wheelbase property value automatically.
Example: 5.5
Width of the vehicle, specified as the comma-separated pair consisting of
'Width' and a positive real scalar. Units are in meters.
Example: 2.0
Height of the vehicle, specified as the comma-separated pair consisting of
'Height' and a positive real scalar. Units are in meters.
Example: 2.1
Extended object mesh, specified as an extendedObjectMesh object.
Radar cross-section (RCS) pattern of the vehicle, specified as the comma-separated
pair consisting of 'RCSPattern' and a
Q-by-P real-valued matrix. RCS is a function
of the azimuth and elevation angles, where:
Q is the number of elevation angles specified by the
'RCSElevationAngles'name-value pair.P is the number of azimuth angles specified by the
'RCSAzimuthAngles'name-value pair.
Units are in decibels per square meter (dBsm).
Example: 5.8
Azimuth angles of the vehicle's RCS pattern, specified as the comma-separated pair
consisting of 'RCSAzimuthAngles' and a P-element
real-valued vector. P is the number of azimuth angles. Values are
in the range [–180°, 180°].
Each element of RCSAzimuthAngles defines the azimuth angle of
the corresponding column of the 'RCSPattern' name-value pair.
Units are in degrees.
Example: [-90:90]
Elevation angles of the vehicle's RCS pattern, specified as the comma-separated
pair consisting of 'RCSElevationAngles' and a
Q-element real-valued vector. Q is the number of
elevation angles. Values are in the range [–90°, 90°].
Each element of RCSElevationAngles defines the elevation
angle of the corresponding row of the 'RCSPattern' name-value
pair. Units are in degrees.
Example: [0:90]
Front overhang of the vehicle, specified as the comma-separated pair consisting of
'FrontOverhang' and a real scalar. The front overhang is the
distance that the vehicle extends beyond the front axle. If the vehicle does not
extend past the front axle, then the front overhang is negative. Units are in
meters.
In Vehicle objects, this equation defines the
values of the Length, FrontOverhang,
Wheelbase, and RearOverhang properties:
Length = FrontOverhang + Wheelbase + RearOverhang
If you update the
Length,RearOverhang, orWheelbaseproperty, to maintain the equation, theVehicleobject increases or decreases theFrontOverhangproperty and keeps the other properties constant.If you update the
FrontOverhangproperty, to maintain this equation, theVehicleobject increases or decreases theWheelbaseproperty and keeps the other properties constant.
When setting both the FrontOverhang and
RearOverhang properties, to prevent the Vehicle object
from overriding the FrontOverhang value, set
RearOverhang first, followed by FrontOverhang. The
object calculates the new Wheelbase property value automatically.
Example: 0.37
Rear overhang of the vehicle, specified as the comma-separated pair consisting of
'RearOverhang' and a real scalar. The rear overhang is the
distance that the vehicle extends beyond the rear axle. If the vehicle does not extend
past the rear axle, then the rear overhang is negative. Negative rear overhang is
common in semitrailer trucks, where the cab of the truck does not overhang the rear
wheel. Units are in meters.
In Vehicle objects, this equation defines the
values of the Length, FrontOverhang,
Wheelbase, and RearOverhang properties:
Length = FrontOverhang + Wheelbase + RearOverhang
If you update the
Length,RearOverhang, orWheelbaseproperty, to maintain the equation, theVehicleobject increases or decreases theFrontOverhangproperty and keeps the other properties constant.If you update the
FrontOverhangproperty, to maintain this equation, theVehicleobject increases or decreases theWheelbaseproperty and keeps the other properties constant.
When setting both the FrontOverhang and
RearOverhang properties, to prevent the Vehicle object
from overriding the FrontOverhang value, set
RearOverhang first, followed by FrontOverhang. The
object calculates the new Wheelbase property value automatically.
Example: 0.32
Distance between the front and rear axles of a vehicle, specified as the
comma-separated pair consisting of 'Wheelbase' and a positive real
scalar. Units are in meters.
In Vehicle objects, this equation defines the
values of the Length, FrontOverhang,
Wheelbase, and RearOverhang properties:
Length = FrontOverhang + Wheelbase + RearOverhang
If you update the
Length,RearOverhang, orWheelbaseproperty, to maintain the equation, theVehicleobject increases or decreases theFrontOverhangproperty and keeps the other properties constant.If you update the
FrontOverhangproperty, to maintain this equation, theVehicleobject increases or decreases theWheelbaseproperty and keeps the other properties constant.
When setting both the FrontOverhang and
RearOverhang properties, to prevent the Vehicle object
from overriding the FrontOverhang value, set
RearOverhang first, followed by FrontOverhang. The
object calculates the new Wheelbase property value automatically.
Example: 1.51
Path to the RoadRunner asset for export, specified as a string scalar. When you export the
driving scenario containing this vehicle to a RoadRunner scenario using the startRoadRunnerForScenario
function, the function maps the vehicle to the RoadRunner asset located at the path you specify. If you do not specify the
AssetPath argument, the function uses the default asset path
mapping between the driving scenario vehicles and their corresponding RoadRunner scenario assets based on ClassID as illustrated in
this table:
| Driving Scenario Class ID | Driving Scenario Actor Type | RoadRunner Asset |
|---|---|---|
| 1 | Car | Assets/Vehicles/ADT Vehicles/SK_Sedan.fbx |
| 2 | Box Truck | Assets/Vehicles/ADT Vehicles/SK_BoxTruck.fbx |
| 3 | Bicycle | Assets/Vehicles/Cuboid.rrvehicle |
| 4 | Pedestrian | Assets/Characters/Citizen_Male.rrchar |
| All other class IDs | All other custom dynamic actors | Assets/Vehicles/Cuboid.rrvehicle |
Example: "Assets/Vehicles/PickupTruck.fbx"
Type of 3-D display asset, specified as a string scalar. When you create a high-fidelity 3-D plot of the driving scenario using the plotSim3d function, the function maps the vehicle to the 3-D display asset you specify. You can specify any of these 3-D display assets for the AssetType value for your vehicle:
"Cuboid"
"Sedan"
"MuscleCar"
"Hatchback"
"SportUtilityVehicle"
"SmallPickupTruck"
"BoxTruck"
"Bicyclist"
"MalePedestrian"
"FemalePedestrian"
"Barrier"
If you do not specify the AssetType argument, the function uses the
default asset path mapping between the driving scenario vehicles and their
corresponding 3-D display assets based on ClassID as illustrated in
this table:
| Driving Scenario Class ID | Driving Scenario Actor Type | 3-D Display Asset |
|---|---|---|
| 1 | Car | Sedan |
| 2 | Box Truck | BoxTruck |
| 3 | Bicycle | Bicyclist |
| 4 | Pedestrian | MalePedestrian |
| 5 | Barrier | Barrier |
| All other class IDs | All other custom dynamic actors | Cuboid |
Example: "MuscleCar"
Output Arguments
More About
In driving scenarios, an actor is a cuboid (box-shaped) object with a specific length, width, and height. Actors also have a radar cross-section (RCS) pattern, specified in dBsm, which you can refine by setting angular azimuth and elevation coordinates. The position of an actor is defined as the center of its bottom face. This center point is used as the actor's rotational center, its point of contact with the ground, and its origin in its local coordinate system. In this coordinate system:
The X-axis points forward from the actor.
The Y-axis points left from the actor.
The Z-axis points up from the ground.
Roll, pitch, and yaw are clockwise-positive when looking in the forward direction of the X-, Y-, and Z-axes, respectively.

A vehicle is an actor that moves on wheels. Vehicles have three extra properties that govern the placement of their front and rear axle.
Wheelbase — Distance between the front and rear axles
Front overhang — Distance between the front of the vehicle and the front axle
Rear overhang — Distance between the rear axle and the rear of the vehicle
Unlike other types of actors, the position of a vehicle is defined by the point on the ground that is below the center of its rear axle. This point corresponds to the natural center of rotation of the vehicle. As with nonvehicle actors, this point is the origin in the local coordinate system of the vehicle, where:
The X-axis points forward from the vehicle.
The Y-axis points left from the vehicle.
The Z-axis points up from the ground.
Roll, pitch, and yaw are clockwise-positive when looking in the forward direction of the X-, Y-, and Z-axes, respectively.

This table shows a list of common actors and their dimensions. To specify these values in Actor and Vehicle objects, set the corresponding properties shown.
| Actor Classification | Actor Object | Actor Properties | ||||||
|---|---|---|---|---|---|---|---|---|
Length | Width | Height | FrontOverhang | RearOverhang | Wheelbase | RCSPattern | ||
| Pedestrian | Actor | 0.24 m | 0.45 m | 1.7 m | N/A | N/A | N/A | –8 dBsm |
| Car | Vehicle | 4.7 m | 1.8 m | 1.4 m | 0.9 m | 1.0 m | 2.8 m | 10 dBsm |
| Motorcycle | Vehicle | 2.2 m | 0.6 m | 1.5 m | 0.37 m | 0.32 m | 1.51 m | 0 dBsm |