Label Images and Send for Review
The Image Labeler app enables you to label a set of images as a Task Owner. A Project Owner must first assign a label task to you as part of a distributed labeling project with multiple team members. For more information about how to set up a team labeling project as a project owner, see Create Project for a Labeling Team and Publish Tasks.
As a task owner, you are responsible for completing the assigned label task and sharing the labeled images for review. For more information on the tasks for each role, see the Using This Example section of Get Started with the Image Labeler.
This example details the steps a task owner must follow to:
Open a project created and shared by the project owner.
Load an assigned label task.
Label images.
Share the labeled images for review.
Open Labeling Project and Load Assigned Label Task
A task owner with access to a full MATLAB® license can open a labeling project and label images by following these instructions.
Open the Image Labeler app using one of these options:
MATLAB® Toolstrip: On the Apps tab, under Image Processing and Computer Vision, click the app icon.
In the MATLAB command prompt, enter
imageLabeler
Note
To install the Image Labeler app and access the shared labeling project, a task owner without access to a full MATLAB license must use a compiled executable file shared by the project owner. For more information on the executable file created by the project owner, see Create Executable for Label Task Owners Without Full MATLAB License.
Open Labeling Project
The Project Owner has predefined your labeling tasks and labeling instructions are as part of the team project.
Select Open Project.

In the file explorer, navigate to the project folder location shared with you by the project owner. Select the
.prjfile, and click Open.
Load Assigned Label Task
After you select and open the team labeling project, the app provides the option to open the project in project owner or task owner mode.
To proceed as a task owner, follow these steps:
Select Task Owner. The app displays an interface in which you can select a Task Owner Name.
Select
Team Member Afrom the Task Owner Name list. The Task List shows the Task Name and Task Type of any tasks assigned to the selected team member.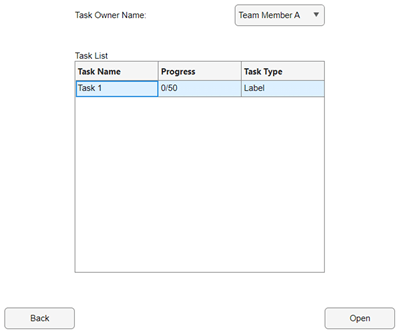
Select the label task you want to perform. Select
Task
                            1
and click Open. The Image Labeler app opens theTask 1label task in task owner mode.
Image Labeler Layout in Task Owner Mode
In task owner mode, the Image Labeler toolstrip has an Image Labeler tab and a Visualization tab. If the project contains pixel label definitions, the toolstrip also has the Label Pixels tab.
In addition to the ROI Label Definitions and Scene Label Definitions panes, a Task instructions pane provides instructions for the task owner from the project owner. Select a label definition to label an ROI or the entire scene in the currently selected image.
ROI Label Definitions — Label one or more objects or regions of interest in the image.
Scene Label Definitions — Assign a qualitative label for the entire image.
Each entry in the ROI Label Definitions pane is a label definition indicating its ROI label type (axis-aligned or rotated rectangle, point, line, polygon, pixel, or projected cuboid) and color. For more information about label definitions, see ROI Labels, Sublabels, and Attributes.
The Image Browser pane shows the 50 images assigned to
Team Member A for Task 1, and the
View Labels, Sublabels, and Attributes pane displays the
ROI labels applied and the status of all scene labels, specific to the selected
image.
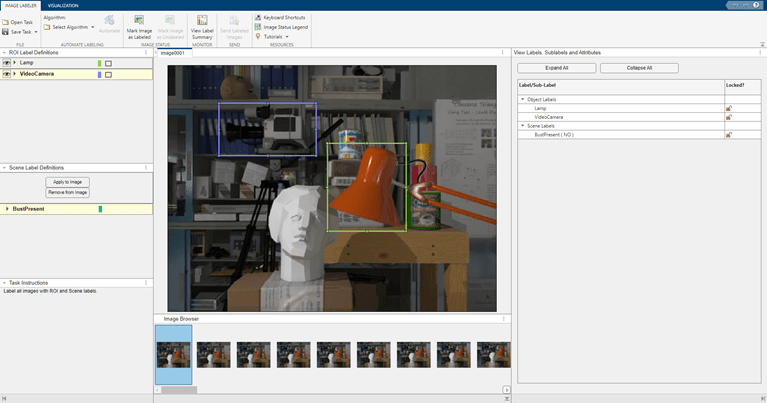
The Visualization tab provides options for visualizing the labels you mark on the images. Using the Visualization tab, you can:
Modify the app layout.
Control display options of the ROI label name (for example, on hover, always displayed, or never).
Display ROI Color based on label or instance.
By Label— Display ROIs for the same label in the same color.By Instance— Display each instance of an ROI label in a different color.
Change label opacity.
For more information on the Image Labeler app layout, panes, and tabs, see Layout of the Image Labeler App.
Label Images
As a label task owner, you can label tasks using any of these options:
Label images manually.
Use a suitable built-in automation algorithm.
Create a new algorithm.
Import an algorithm.
For more information about labeling images using an automation algorithm, see Label Ground Truth Using an Automation Algorithm. For more information about how to import an existing automation algorithm or create a new one, see Create Custom Automation Algorithm for Labeling.
Label Images Using Predefined Label Definitions
This section of the example shows you how to manually label the images in your assigned label task. As a task owner you must label the images using the predefined ROI and scene labels in this table.
| Label Name | Label Type | Label Color |
|---|---|---|
Lamp | Rectangle ROI | Green |
VideoCamera | Rectangle ROI | Blue |
BustPresent | Scene | Cyan |
To label the assigned images, follow these steps:
In the Image Browser pane, select the image you want to label. The Image Labeler app opens with the first image in the label task is selected, by default.
Select a label definition from the ROI Label Definitions pane and draw the ROI. To label the lamp in the image, select
Lampand in the display pane with the name of your selected image, draw a rectangle around the lamp by clicking where you want one corner of the rectangle to be and dragging the cursor to position the diagonally opposite corner.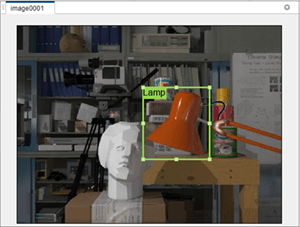
To label the video camera in the image, in the ROI Label Definitions pane, select
VideoCameraand use the same process as in the previous step to draw an ROI containing the video camera.If the image contains a bust, apply the
BustPresentscene label to the image. In the Scene Label Definitions pane, select the check box after theBustPresentscene label. Notice that theBustPresentscene label indicates the number of images that have been labeled with the scene label.The manually marked ROI Label Definitions and the Scene Label Definitions appear on the image. A green rectangle indicates the lamp and a blue rectangle indicates the video camera in the image. The image thumbnail in the Image Browser pane displays an
SLtag, which indicates the presence of the scene label in the image.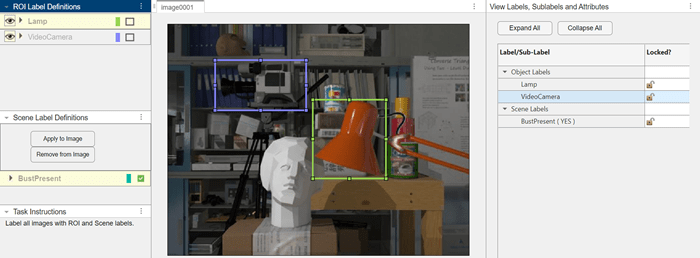
Follow the same procedure to label all 50 images in the assigned task. You can navigate through the images using the image thumbnails in the Image Browser pane. You can also see the change in status of the marked labels for each image in the View Labels, Sublabels, and Attributes pane.
To view or hide individual ROI labels or sublabels in a labeled image use the ![]() icon on the ROI Label
Definitions pane. To hide a label or sublabel, click the
icon on the ROI Label
Definitions pane. To hide a label or sublabel, click the ![]() icon next to the label or sublabel. The app hides
the corresponding label or sublabel, and displays the
icon next to the label or sublabel. The app hides
the corresponding label or sublabel, and displays the ![]() icon instead. Select it to again visualize the
associated label.
icon instead. Select it to again visualize the
associated label.
For images with scene labels, you can view or hide the SL on
the image thumbnails using the ![]() in front of the scene label in the
Scene Label Definitions pane.
in front of the scene label in the
Scene Label Definitions pane.
Evaluate Labels
To evaluate your labels, you can view a visual summary of the labeled images. From the app toolstrip, select View Label Summary. Use this summary to compare the frames, frequency of labels, and scene conditions.
The X-axis of the distribution graph displays the numeric ID of each image assigned to the label task. The Y-axis represents the progress of the label task for the selected label in each image..
For all ROI labels except pixels, the Y-axis displays the number of ROIs at each timestamp or for each image.
For pixel ROI labels, the Y-axis displays the percentage of the frame that has been labeled for each pixel.
For scene labels, the graph displays the presence or absence of a scene label at each timestamp or for each image in a collection.
For more information, see View Summary of Ground Truth Labels.
Save Labeling Session
To save the marked labels, on the app toolstrip, select Save Project. Saving the project also saves your session preferences, such as the layout of the app. To restore layout options to the default layout, select Default Layout in the Visualization tab.
Share Labeled Images for Review
In a distributed labeling project, label task owners can share their labeled images with other team members for review and feedback. Collaborative review of labeled images minimizes inter-observer variability and maximizes labeling accuracy.
You can share the complete set of labeled images or only a part of it, with the project owner. The project owner can then assign the labeled images to one or more other team members for review.
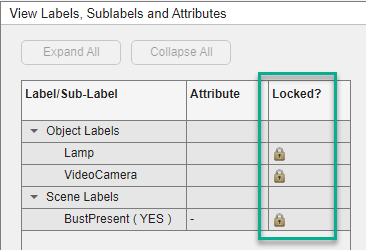
Set Image Status to Mark Image as Labeled
To share the labeled images for review and feedback, you must first lock the labels you marked on the images against further modification. To lock the image labels and prevent further changes, set the status of the labeled image to Mark Image as Labeled.
Select one or more labeled images in the Image Browser.
On the app toolstrip, select Mark Image as Labeled.
After the image status changes to Mark Image as Labeled,
The status indicator at the corner of the image thumbnail in the Image Browser becomes a green check box.
The status of image labels in the Locked? column of the View Labels, Sublabels and Attributes pane, changes to a locked symbol.
Note
The task owner cannot modify ROI and scene labels after locking them. To unlock and modify the marked labels you must:
Select the labeled images you want to modify in the Image Browser. To select more than one labeled image, hold Ctrl and select each desired image.
On the app toolstrip, select Mark Image as Unlabeled.
Share Labeled Images for Review
To share all the labeled images for review, click Send Labeled Images on the app toolstrip. For each image shared for review, the status legend on the image thumbnail in the Image Browser panel changes from a green check box to an yellow lock.
While you are working on the label task, you can save the project at any stage. This enables the Project Owner to access the images that you have completed labeling up to that point.
Note
To enable the Send Labeled Images button, you must mark the status of at least one image to Mark Image as Labeled.