Customize a Microsoft Word Title Page Template
The Report Explorer default Word document conversion template contains document part
templates for the front (recto) and back (verso) side of a report title page. The Report Explorer
file converter for the Word (from template) output type uses the title
page part templates to produce the title pages in the Word output.
This example shows how to create a custom template that changes the color of the title and how to customize the layout of a title page. The example uses a custom template with the Report Generator magic square report example.
Create a Custom Template
Note
To complete the rest of this example, you need a custom Word conversion template. If you have a custom template that you want to use for this example, you can skip to Change the Color of a Report Title.
In the Report Explorer, select Tools > Edit Document Conversion Template.
In the list of templates, select the Default Word Template.
In the Template Browser, click Copy template.
In the file browser, navigate to the folder on the MATLAB® path that you want to use for the custom template. For the file name, enter
magic-squareand click Save.In the list of templates, select Copy of Default Word Template.
At the top of the Template Properties dialog box, use these settings:

Apply the properties by selecting another template in the list of templates.
Change the Color of a Report Title
You can customize the Magic Square Template (see Create a Custom Template) to use blue text for the report title.
In the Report Explorer, select Tools > Edit Document Conversion Template.
In the Report Explorer list of Word templates, select
Magic Square Template.In the Template Browser, click Open style sheet. In Word, the template opens, with the Manage Styles dialog box displayed.
In the Manage Styles dialog box, select the
rgTitlestyle and click Modify.
In the Modify Style dialog box for
rgTitle, click the down arrow forAutomatic. Select the blue color box and click OK.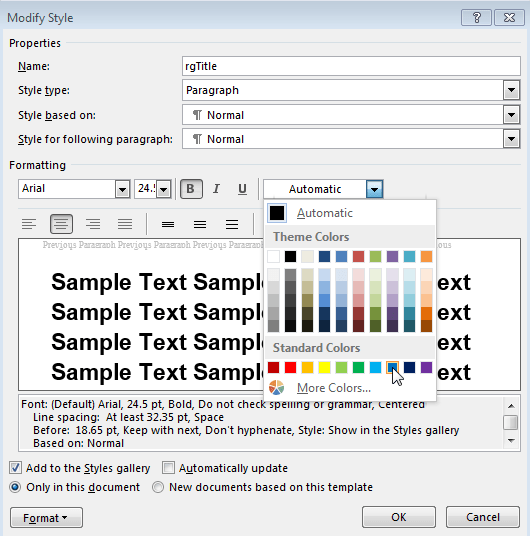
In the Manage Styles dialog box, click OK.
Save and close the template.
Assign the Template to a Report
You can assign the customized template to the magic-square.rpt Report
Explorer report.
In the Report Explorer, select Report Generator node.
In the Report Explorer, in the list of reports, select
magic_square.rpt.
In the Report Options pane, click Open report.
In the
magic_squaresreport, add a Title Page component. In the Title Page dialog box, set the Title field toMagic Squares.Below the Title Page component, add a Chapter component.
In the Report Options dialog box, set File format to
Word (from template)and instead ofDefault Word Template, selectMagic Squares Template.
Generate the report. Select the
magic_squaresreport. In the Report Explorer toolbar, click the Report button.
In the generated report, the title,
Magic Squares, appears in blue.
Customize Title Page Content and Layout
This example assumes you have created a custom Magic Square Template (see Create a Custom Template). You can use a different custom Word template.
In the Report Explorer, select Tools > Edit Document Conversion Template.
In the Report Explorer list of Word templates, select
Magic Square
       Template
. In the Report Options pane, click Open template.With the cursor in the first (and only visible) paragraph in the template, in the Insert tab, select the Quick Parts button.
In the Quick Parts gallery, select
rgRectoTitlePageto insert of the front title page part template in the main document conversion template.Tip
To display Word markup for the part template, on the Word ribbon, in the Developer tab, click Design Mode.
Highlight the
rgImagehole and drag it above thergTitlehole.Delete the
rgAuthorhole.Select the
rgRectoTitlePagepart template and click the Quick Parts button.Click Save Selection to Quick Part Gallery.
In the Create New Building Block dialog box, set Name to
rgRectoTitlePageand the Category tomlreportgen. Click OK.In the template, select the contents of the part template (including the section break) and click the Delete button.
Save and close the template.
Suppose that you use the custom template to generate a report that has a Title Page component that specifies an image and an author. The generated report displays the image at the top of the title page and does not include an author.