Customize Microsoft Word Component Templates
Custom Word Component Templates
You can customize a Word component template (such as a title page template) to:
Tailor report formatting to meet your specific formatting requirements.
Delete content by deleting a hole. For a description of holes, see Component Holes.
Change component layout by changing the order of holes.
Change a title page, table of contents, or chapter page layout, including page size, page orientation, page margins, and header and footer content and format.
If you delete a hole in a component template, the generated report does not include the
component data associated with that hole. For example, the rgRectoTitlePage
part template includes an rgAuthor hole. If you delete the
rgAuthor hole, then reports generated with the template do not include the
author, even if the report has a Title Page component that specifies a
value for the Author property.
The Report Explorer ignores holes in a component template that do not correspond to content properties specified by the component. If you need to generate content not addressed by one of the Report Explorer’s components, use a Form or Subform component to generate the content. For example, you can use a Subform component with a custom template to generate a title page that contains content, such as a sign-off block, not addressed by the Title Page component.
Display the Developer Ribbon in Word
To work with holes in a Word template, use the Word Developer ribbon. If the Developer tab is not showing in your Word ribbon, add it to the ribbon.
In Word, select File > Options.
In the Word Options dialog box, select Customize Ribbon.
In the Customize the Ribbon list, select the Developer check box and click OK.
Tip
If you do not see Developer check box in the list, set Customize the Ribbon to
Main Tabs.
Customize a Word Component Template
To customize a report element such as a title page, replace the appropriate default component template with a customized copy of the template. For an example of creating a custom Word component template, see Customize a Microsoft Word Title Page Template.
Note
You cannot customize a default template’s styles directly. You must create a copy of the default template and customize the copy’s styles, see Copy a Template.
In the Report Explorer, select Tools > Edit Document Conversion Template.
In the list of templates in the middle pane, select a custom template.
Note
If the template does not appear in the template list, refresh the Report Explorer’s template cache, see Template Cache.
In the Properties pane, click Open template.
At the beginning of the template, position the cursor in the first paragraph and click the Quick Parts button.
In the Insert tab, select the Quick Parts
 button.
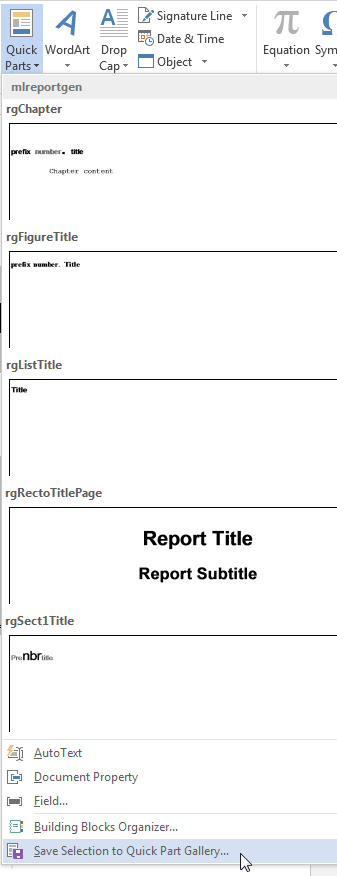
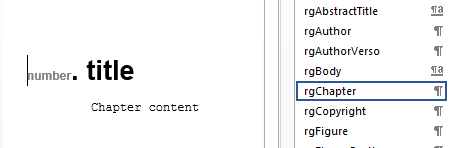
In the Quick Parts Gallery, select the part template (for example,
rgChapter).Edit the copy of the part template. For example, remove a hole by right-clicking and selecting Remove Content Control.
In the template, select the part template, including all of its holes.
In the Quick Parts Gallery, select Save Selection to Quick Part Gallery.
In the Create New Building Block dialog box, set Name to the part template name (for example,
rgChapter) and the Category tomlreportgen. Click OK.In the template, delete the customized part template.
Save the main template.
Set Default Text Style for a Hole
Your template can specify the name of a style to use as a default to format text generated for a hole.
In the Report Explorer, select Tools > Edit Document Conversion Template.
In the list of templates in the middle pane, select the custom template that has the hole you want to set the default text style for.
In the Template Browser, click Open template.
In the Insert tab, select the Quick Parts
button.In the Quick Parts Gallery, select the part template that contains the hole (for example,
rgChapter).Right-click in the text area of the hole whose default text style you want to specify. For example, in
rgChapter, right-click in thergChapterTitlehole.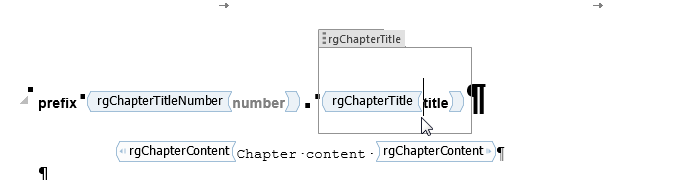
Select Properties.
In the Content Control Properties dialog box, select the Use a style to format text typed into the empty control check box.
From the Style list, select a style to use an existing style or select New Style to create a new style to use as the default style and click OK.
Select the part template and click the Quick Parts button.
Click Save Selection to Quick Part Gallery.
In the Create New Building Block dialog box, set Name to the part template name (for example,
rgChapter) and the Category tomlreportgen. Click OK.Save and close the template.
Distinguish Inline and Block Holes
The Report Explorer supports two types of holes: inline and block.
Use an inline hole is for content that you can include in a Word paragraph.
Use a block hole for content that you cannot embed in a paragraph.
You can configure the Word editor to provide visual cues that indicate whether a hole is an inline or block hole.
Open the custom Word template.
On the Word ribbon, select the Home tab.
Click the Show/Hide
 button to display Word paragraph markers.
On the Word ribbon, select the Developer tab.
Click Design Mode to see the Word markup for holes.
Click a hole to determine whether it is an inline or block hole.
Inline hole — The bounding box does not include the paragraph marker.
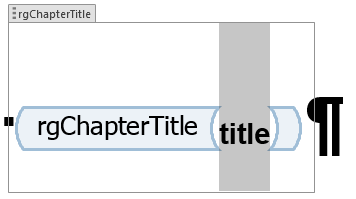
Block hole — The bounding box does include the paragraph marker.

Avoid Changing Block Holes to Inline Holes
Do not change a block hole to an inline hole.
You can accidentally change a block hole to an inline hole by removing the paragraph marker
of an inline hole that is followed by a block hole. For example, if you delete the paragraph
marker for the rgChapterTitle inline hole, the
rgChapterContent block hole changes to an inline hole.

Delete a Hole
In the Report Explorer, select Tools > Edit Document Conversion Template.
In the list of Word templates in the middle pane, select the custom template that you want to edit.
In the Template Browser, click Open template.
To display Word paragraph markers (if they are not already visible), on the Word ribbon in the Home tab, click the Show/Hide
button.In the Word ribbon, in the Insert tab, click the Quick Parts
 button.
Select the part template to customize. For example, select
rgChapterto customize the part template for a chapter.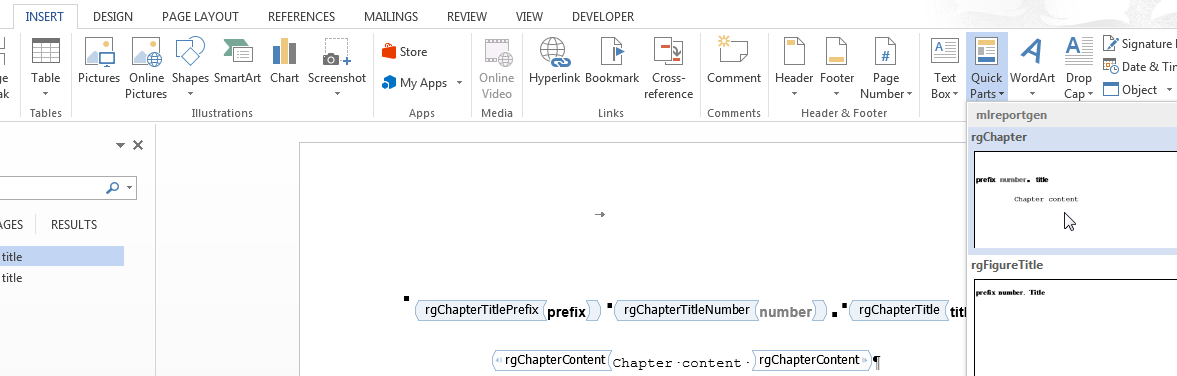
Tip
To display Word markup for the part template, on the Word ribbon, in the Developer tab, click Design Mode.
Write down the name of the part template you are customizing, because you need to enter that name later in this procedure.
In the
rgChapterpart template, delete thergChapterTitlePrefixhole. Select the hole markup and click the Delete key.In the template, select all of the contents of the part template.
Right-click and select Properties.
In the Content Control Properties dialog box, in the Title and Tag fields, enter the name of the template part you are customizing
rgChapter. Click OK.In the template, select all of the contents of the part template. In the Insert tab, click the Quick Parts button.
Click Save Selection to Quick Part Gallery.
In the Create New Building Block dialog box, set Name to the part template name (for example,
rgChapter) and the Category tomlreportgen. Click OK.In the template, select all of the contents of the part template and click the Delete button.
Save and close the template.
Add an Inline Hole
In the Report Explorer, select Tools > Edit Document Conversion Template.
In the list of Word templates in the middle pane, select the custom template that you want to edit.
In the Template Browser, click Open template.
To display Word paragraph markers, click the Show/Hide
button.Position the Word insertion mark at the point in a paragraph where you want to add an inline hole.
Tip
If the hole is the only content in a paragraph or is at the end of a paragraph, add several blank spaces and insert the hole before the spaces.
Click the Rich Text Control button
 . Word inserts a rich text control at the insertion
point.
. Word inserts a rich text control at the insertion
point.To see hole markup, on the Word ribbon, in the Developer tab click Design Mode.
Right-click in the hole and select Properties.
In the dialog box, in the Title and Tag fields, enter the name of the hole. Use a Report Explorer hole name. For example, if you insert an
rgChapterTitlePrefixhole, set the Title and Tag fields torgChapterTitlePrefix.In the template, select all of the contents of the part template. In the Insert tab, click the Quick Parts button.
Click Save Selection to Quick Part Gallery.
In the Create New Building Block dialog box, set Name to the part template name (for example,
rgChapter) and the Category tomlreportgen. Click OK.In the template, select all of the contents of the part template and click the Delete button.
Save and close the template.
Add a Block Hole
Creating a block-level hole in a Word document is essentially the same as creating an inline hole. The main difference is that rich text content control must contain an (empty) paragraph instead of residing in a paragraph. Create an empty paragraph at the point where you want to create a block-level hole. If you are at the end of a document, create a second empty paragraph.
Remove or Modify Chapter Prefix
Reports that use the default templates include the word Chapter as a prefix in the chapter title. If you do not want to use the prefix, you can delete from your template before you create a report. If you want to use a word other than Chapter, for example, for localization, you can replace the prefix.
Open the template.
On the Word Insert ribbon, in the Text area, click the Explore Quick Parts button.
To insert an instance of the part you want to modify in your template, select the rgChapter quick part.
Edit the instance. You can remove the prefix hole, or you can replace it with fixed text.
Make sure that the style applied to this line is still rgChapter.
Select the edited instance. Then, on the Insert ribbon, click the Explore Quick Parts button and select Save Selection to Quick Parts Gallery.
In the dialog box, set Name to
rgChapterand Category tomlreportgen, and then click OK. Confirm that you want to overwrite the previous version.Save and close the template.