Specify Route to Import HERE HD Live Map Data and Build Scenes
This example shows how to specify a route, using CSV file, to import HERE HD Live Map data and build scenes in RoadRunner by using the HERE HD Live Map 1 service. This example requires a RoadRunner Scene Builder license.
Prerequisites
You must have a HERE Marketplace account. For information on creating one, see Get a HERE account.
Your HERE Marketplace account must contain a project that includes the required catalogs for the region in which you want to build your scene. Catalogs store map data for specific geographic regions. Currently the HERE HD Live Map service provides catalogs for regions in North America and Western Europe. For more information on creating a project and linking catalogs, see Manage HERE Projects.
You must register an app to your HERE account, specifying the project that contains your required catalogs as the default project. For more information, see Manage HERE Apps.
Generate Access Key ID and Access Key Secret credentials for the registered app. These credentials enable you to connect RoadRunner to your HERE HD Live Map project. For more information on how to create these credentials, see Get App Credentials.
Specify Route Using CSV or KML File
Specify a route by using a CSV or KML file containing waypoints as latitude and longitude coordinates. You can use a CSV or KML file to import route-specific HERE HD Live Map data.
A CSV file must contain start and end waypoints. The file must specify each waypoint as latitude and longitude coordinates across two columns. This table shows an example of the values in a CSV file.
| Latitude | Longitude |
|---|---|
| 51.4466245 | 7.0164133 |
| 51.4465135 | 7.0166801 |
| 51.4465396 | 7.0168027 |
| 51.4466536 | 7.0171364 |
| 51.4468237 | 7.0175373 |
| 51.4469181 | 7.0177346 |
A KML file must contain start and end waypoints. The file must specify each waypoint as a comma-separated pair of longitude and latitude coordinates. This code snippet shows an example of a KML file. You can specify coordinates for more than one route using a single KML file.
<kml>
<Document>
  <Placement>
    <LineString>
      <coordinates>
        7.0164133,51.4466245
        7.0166801,51.4465135
        7.0168027,51.4465396
        7.0171364,51.4466536
        7.0175373,51.4468237
        7.0177346,51.4469181
      </coordinates>
    </LineString>
  </Placement>
</Document>
</kml>
Import Route-Specific Data
Open the Scene Builder Tool from the toolbar by clicking the Scene Builder Tool button.
![]()
Then, click the Import Data For Area button on the toolbar to the left of the scene-editing canvas. This opens a HERE HD Import Settings dialog box.
![]()
On the HERE HD Live Map Marketplace Credentials tab of the dialog box, enter your HERE HD Live Map access credentials, Access Key ID and Access Key Secret.
On the Settings tab, select Import Route and specify these options.
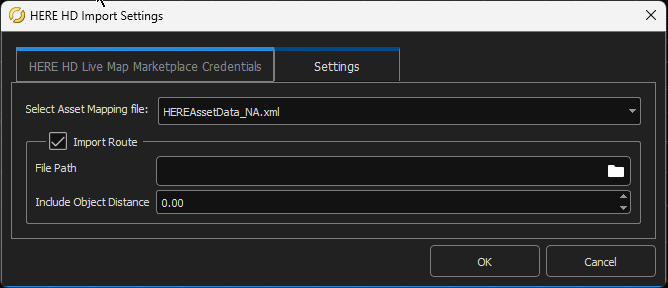
File Path — Specify the full path to the CSV or KML file that contains your latitude and longitude waypoints. Alternatively, select the button with the ellipses next to the File Path box and navigate to your file.
Include Object Distance — Specify the distance from your route up to which to include nearby roads and objects. If you specify this parameter as
0.00meters, then the RoadRunner imports only the roads linked to the route specified in your CSV or KML file.
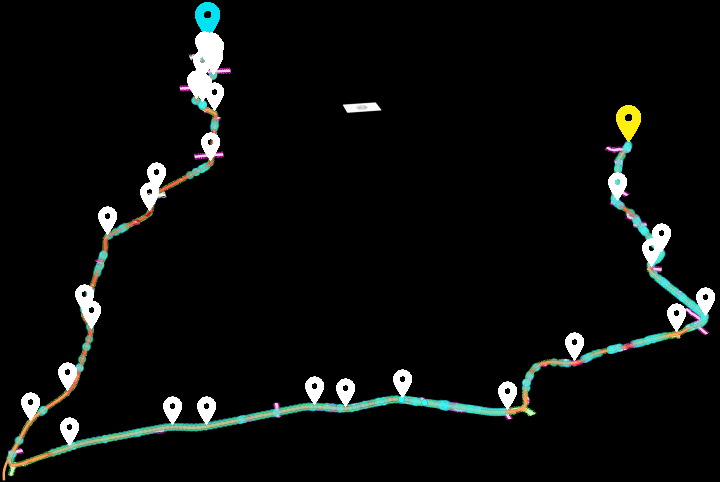
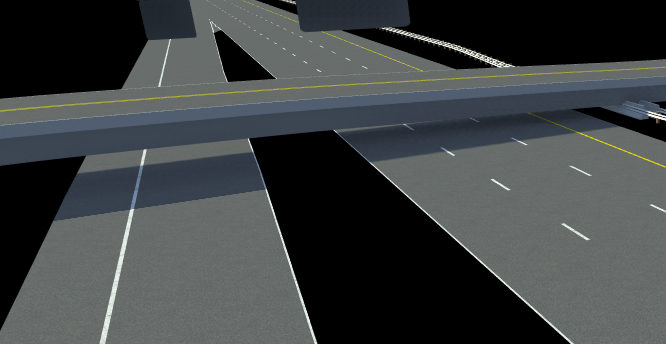
This figure shows an example of imported HERE HD Live Map data by using a route specified
in a CSV file and the Include Object Distance parameter specified as
15.00 meters.
Build Imported Route and Scene
After importing the routes, you can also include nearby roads and objects along the created routes to build them. You can control this inclusion by accessing the properties of the created route. Select the route to view its available properties in the Attributes pane.
Route
Include Object Distance — Specify the distance from your route up to which to include nearby roads and objects by either manually specifying a distance in this parameter or interactively moving the slider. The default value for this parameter is same as the value of Include Object Distance you specified on the Settings tab of HERE HD Import Settings dialog box. If you specify this parameter as
0.00meters, RoadRunner builds only the roads linked to your route.Note
The value for this parameter must be less than or equal to the value of Include Object Distance you specified on the Settings tab of HERE HD Import Settings dialog box.
Highlight Included Objects — Specify whether to highlight the nearby roads and objects along the route in the scene editing canvas. These highlights are based on the distance specified in the Include Object Distance parameter. To disable highlights, clear this option. By default, RoadRunner HD Map highlights nearby roads and objects.
Click the Build Scene button on the toolbar to the left of the scene editing canvas.
![]()
Building scenes using the Scene Builder Tool requires a RoadRunner Scene Builder license.
In the Scene Builder dialog box, you can view and modify these options:
Fit Cross Sections — By default, the Scene Builder Tool imports cross-section information such as superelevation (banking) and crowning. To import flat cross-sections, clear this option. For more information about cross-sections, see the Cross Section Tool.
Auto Detect Asphalt Surfaces — By default, the Scene Builder Tool detects asphalt surfaces and applies an asphalt texture to them. To apply a grass texture to all surfaces, clear this option. For more information about surfaces and textures, see How Surfaces Work in RoadRunner.
Clear Scene of Existing Data — By default, the Scene Builder Tool removes already built roads from your scene when you use it to build a scene. To keep the existing roads in the scene, clear this option.
Auto Correct Unrealistic Road Elevation — By default, the Scene Builder Tool attempts to automatically correct unrealistic elevations of imported roads. The tool bases elevation corrections on the elevation data of neighboring roads that have been imported with high confidence from the HERE HD Live Map data. To manually correct unrealistic road elevation for the imported HERE HD Live Map data, clear this option.
Remove Inconsistent Lane Connections— By default, the Scene Builder Tool retains all lane connections, including those that may be physically unrealistic. When you select this option, the tool programmatically analyzes the lane connectivity within your road network and removes lane connections that cannot exist realistically. This option prevents the creation of unusable and convoluted road layouts, that result from manual scene editing or importing data from sources such as HERE HD Live Map data, OpenStreetMap® (OSM), or Tom Tom HD Map data. To retain all imported or manually created lane connections, clear this option.
Combine Transition Lanes — By default, the Scene Builder Tool combines the transition lanes in the imported HD map to build a single road. Transition lanes are multiple lanes derived from a single road, used to guide vehicle movement from one lane to another in response to changes in road conditions. For example, this figure shows transitions lanes branching from a single road in a RoadRunner HD Map.

Select Combine Transition Lanes to reduce the creation of overlapping roads and the number of junctions in the built scene. Clear this option to retain the connectivity information among adjacent transition lanes in the built scene.
Use Lane Groups — By default, the Scene Builder Tool uses lane groups to build roads. When you use lane groups, the tool builds a distinct road by combining only those lanes that are part of the same lane group. The tool uses the geometry of lane groups to produce road curves. If the geometry of a lane group is not available, then the tool uses the geometry of the lane boundaries of that lane group to produce the corresponding road curve.
Clear this option to ignore the lane group data, which enables the tool to combine more lanes together to build a road. The tool combines all the lanes, between junctions, into a single road. This enables you to build a smaller number of longer roads than you can build by using lane groups. When you ignore lane groups, the tool does not use the geometry of lane groups to produce road curves. Instead, the tool uses the geometry of lane boundaries to produce road curves.
Curvature Blend — The Scene Builder Tool builds roads using straight lines and circular arcs. Curvature Blend determines the portion of the arcs used for transitioning from a line to an arc. You can specify this value within the range [0, 1] to control the smoothness of the roads built along the curvature.
Enable Overlap Groups — By default, the Scene Builder Tool does not create automatic junctions at road overlaps. To create junctions, the tool uses explicit junction information specified in the imported HD map data. To create automatic junctions at geometric overlaps, clear this option. For more information on overlap groups, see Prevent Creation of Automatic Junctions Between Roads.
Overlap Group Name — When you select the Enable Overlap Groups option, the tool sets the Overlap Group Name option to
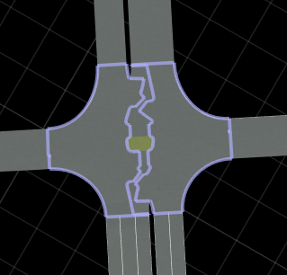
SceneBuild, by default. You can use the Overlap Group Name option to control the behavior of automatic junction creation when you build an HD map data over an existing scene. For example, if roads in the existing scene have an Overlap Group option value ofTransferImport, and you do not want to create automatic junctions at geometric overlaps between them and roads specified by HD map data, you must set the Overlap Group Name option toTransferImport. Otherwise the tool creates automatic junctions at geometric overlaps between the roads of the existing scene and the roads specified by the imported HD map data. To use this option you must select the Enable Overlap Groups option.Preserve Junction Lanes — Use the Preserve Junction Lanes option to preserve all junction lanes present in the imported map. When you select this option, the tool does not consider road overlaps in the map and instead uses the junction definitions from the imported map while building the RoadRunner scene. The tool builds junctions in the RoadRunner scene that retain the original junction lanes from the imported map. Selecting this option can prevent the tool from creating multiple broken junctions in the built scene. To use this option, you must select the Enable Overlap Groups option.
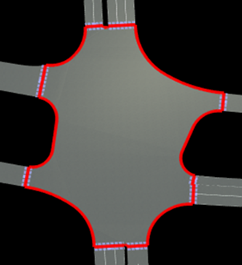
Effect of Preserve Junction Lanes Option on Junction Creation
RRHD Map with Junction Imported in RoadRunner Canvas Using Scene Builder Tool RoadRunner Scene Built Using Scene Builder Tool Without Preserve Junction Lanes RoadRunner Scene Built Using Scene Builder Tool with Preserve Junction Lanes 
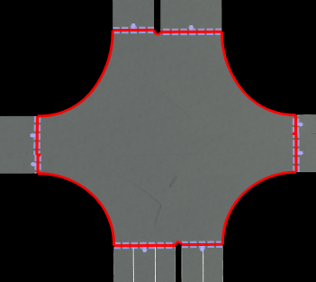
Preserve Junction Shape — Use the Preserve Junction Shape option to preserve the shapes of junctions present in the imported map. When you select this option, the tool builds the RoadRunner scene while using the junction polygon definitions from the imported map to preserve the original junction geometry in the built scene. If a junction definition does not include polygons, the tool does not preserve the junction shape. Additionally, if a junction polygon definition is complex and unrealistic, or if a junction polygon extends beyond junction lanes, the tool might not preserve the exact junction shape. To use this option, you must select the Enable Overlap Groups and Preserve Junction Lanes options.
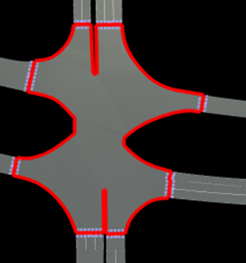
Effect of Preserve Junction Shape Option on Junction Creation
RRHD Map with Junction Imported in RoadRunner Canvas Using Scene Builder Tool RoadRunner Scene Built Using Scene Builder Tool Without Preserve Junction Shape RoadRunner Scene Built Using Scene Builder Tool with Preserve Junction Shape 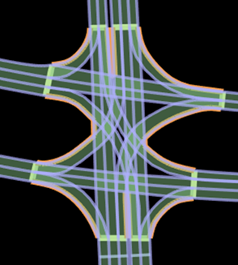
Auto Detect Bridges — By default, the Scene Builder Tool creates bridges at road intersections when the roads have different elevations. The tool extends the bridges by 20 meters on either side of the intersection. You can change the amount of extension by changing the Bridge Span Inflation value. To prevent the tool from creating bridges, clear this option. For more information, see Road Construction Tool.
Build Info — Displays the link length and number of links in all imported data, as well as in the selected subset of roads in the scene.
You can specify what to build from the imported data, in the Scene Builder dialog box, from these options:
All Data— Build all the imported data.Selected Data and Selected Routes— Build selected data and selected routes.To select scene objects, click each desired object. You can also click and drag in the scene editing canvas to draw a box around the objects you want to select.
Drag the box toward the top-left of the canvas to select only objects that are fully contained in the box.
Drag the box in any other direction (toward the bottom-left, top-right, or bottom-right) to select any object that is at least partially within the box.
The Scene Builder Tool retains previous selections, appending newly selected objects to the group of previously selected objects. To remove objects from the selection, hold Ctrl and either click the objects you want to remove or click and drag in the scene editing canvas to draw a box around them. To deselect all the currently selected objects, press Ctrl+D.
To start creating routes, right-click on the lanes in the scene editing canvas along the travel direction of the lane. For more information on creating routes, see Create Route and Build Scene Using HD Map Data.
You can also hold Shift and click additional routes to add them to the selection.
All Routes— Build all the roads and objects associated with the routes that you have created. For more information on creating routes, see Create Route and Build Scene Using HD Map Data.
You can also delete selected data to avoid building it.
For this example, build the entire scene by selecting All Data
and clicking Build.
Verify Results
The Scene Builder Tool builds the scene from the HERE HD Live Map data and displays information about the results in a dialog box. For information about troubleshooting common import issues, see Troubleshoot Import and Build Issues. To close the dialog box, select Close.
Navigate away from the RoadRunner HD Map by selecting a different tool. Then, explore the scene you built. For example, navigate to the intersecting roads and inspect the overpass.
Continue exploring and editing the scene by using other RoadRunner capabilities. Then, export the scene by selecting File, then Export and then selecting a supported file format. For more details, see Export Scenes.
See Also
Topics
1 You need to enter into a separate agreement with HERE in order to gain access to the HDLM services and to get the required credentials (access_key_id and access_key_secret) for using the HERE Service.