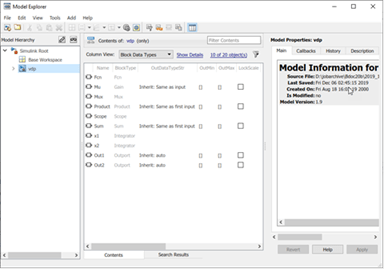
Model Explorer
View, modify, and add elements of Simulink models, Stateflow charts, and workspace variables
Description
Use the Model Explorer to view, modify, and add elements of Simulink® models, Stateflow® charts, and workspace variables.
The Model Explorer lets you focus on specific elements (for example, blocks, signals, and properties) without navigating through the model or chart.
Use the Model Explorer to search for:
Variables in workspaces and data dictionaries
Variable usage in a model
Instances of a type of block
Block parameters and parameter values
You can combine search criteria and iteratively refine the results. Search in the Model Explorer for model elements, starting with the node you select in the model hierarchy. You can search the entire model, in a particular system, or in a system and all the systems below it in the hierarchy. Using your search results, you can batch edit model elements. For information about how to batch edit parameter values using the Model Explorer, see Batch Edit Parameter Values Using Model Explorer.
To manipulate model data (block parameters, signals, and states) in a searchable, sortable table, consider using the Model Data Editor. You can specify data attributes such as parameter values, signal names, and initial values for states.
To create, modify, and view the entries in a data dictionary, use the Model Explorer. See View and Revert Changes to Dictionary Data.
Open the Model Explorer
In the Simulink Toolstrip, on the Modeling tab, click Model Explorer.
In an open model in the Simulink Editor, right-click a block, and then click the Open In Model Explorer button
 .
.In an open Stateflow chart, right-click the drawing area and select Explore.
Examples
You can use the Model Explorer to add many kinds of objects to a model, chart, or workspace. The types of objects that you can add depend on the node that you select in the Model Hierarchy pane.
Use toolbar buttons or the Add menu to add objects. The Add menu lists the types of objects you can add.
You can cut, copy, and paste objects from one workspace into another workspace.
In the Contents pane, perform one of these actions:
Right-click the workspace object you want to cut or copy. Select Cut or Copy.
Click the workspace object you want to cut or copy. In the Edit menu, select Cut or Copy.
Click the workspace object you want to cut or copy. In the toolbar, click the Cut button
 or Copy button
 .
.
To paste the workspace object that you cut or copied, in the Model Hierarchy pane:
Right-click the workspace into which you want to paste the object, and select Paste.
Click the workspace into which you want to paste the object. In the Edit menu, select Paste.
Click the workspace into which you want to paste the object. In the toolbar, click the Paste button
 .
.
When you copy and paste (or drag and drop), you can manage the resolution of name conflicts. In the dialog box, choose an action for each item whose name conflicts with an existing item.
Skip— Default action when the conflicting items have the same value.Replace— Default action when the conflicting items have different values.Keep both— Preserve both copies. The name given to the copied item follows the naming rules that are used in the MATLAB® workspace.
If the source and destination are the same, the software resolves the name conflict by following the naming rules that are used in the MATLAB workspace.
You can also cut, copy, and paste by selecting an object and performing drag and drop operations.
You can edit object properties in the Model Explorer.
In the Contents pane, first select the row that contains the value, and then click the value. Change the value of the selected property by typing or selecting a new value.
To assign the same property value to multiple objects in the Contents pane, select the objects and then change one of the values of the selected objects. The Model Explorer assigns the new property value to all of the selected objects.
Alternatively, you can edit values for model elements in the Dialog pane. To display the Dialog pane, click View > Show Dialog Pane.
To edit workspace variables, such as arrays or structures, you can use the Variable Editor.
To open a properties dialog box for an object, in the Model Hierarchy pane, right-click the object and select Properties. Alternatively, click an object and from the Edit menu, select Properties.
To find objects that might not be currently displayed, search.
In this example, you search for elements that have an Integer rounding mode parameter. You then refine the results to include only n-D Lookup table blocks. You can use the search results to find out more about how these values are set or make batch changes to the elements found by the search.
Open the Model Fault-Tolerant Fuel Control System example model
sldemo_fuelsys.openExample('simulink_automotive/ModelingAFaultTolerantFuelControlSystemExample') sldemo_fuelsysOn the Modeling tab, click Model Explorer.
To specify the scope of the search, use the Model Hierarchy pane in combination with the View > Show Current System and Below setting. For example, to search the current system and loaded systems below it, select the
sldemo_fuelsysnode and enable View > Show Current System and Below.Display the search bar by enabling View > Toolbars > Search Bar.
In the search bar, set:
Search to
by Property
                      Name
Property to
RoundingRoundingis the programmatic name for the Integer rounding mode parameter. Block reference pages list the programmatic name for a parameter in the parameter description.
Click Search. In the Search Results box, results appear. You can go to an item by clicking the link to the path.
Refine the search. In the search bar, click the Search Options button
 and select Refine
Search.
and select Refine
Search.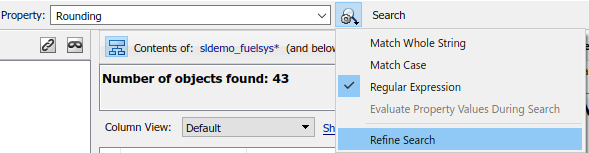
The search button label changes to Refine. Additional search criteria act on the previous set of results.
Set Search to
by Block Typeand set Type toLookup_n-D. Click Refine.To work further with the values, click Show Details.
Suppose the property you are interested in learning more about or acting on is
Rounding. First, add a column for it. SelectRoundingfrom the list (you can enter it in the Find Properties box to locate it quickly), and click the Display property as column in view button .
.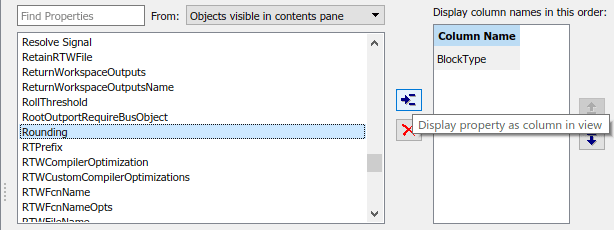
A column for
Roundingappears in the search results. For any column, you can view, sort, and change values for multiple items. For example, to change theRoundingvalues on all of the n-D Lookup Table blocks in this search, select all the items in the list. In the Rounding column, click any cell and select a new value from the list (for example,Floor).
Tip
To view a summary of the search options that you used, expand the Number
of objects found box by clicking the Show Search
Details button ![]() .
.
You can use the Model Explorer to create, modify, and view the entries in a data dictionary. See View and Revert Changes to Dictionary Data.
By default, the Model Explorer displays objects for the system that you select in the Model Hierarchy pane. It does not display data for child systems. You can override that setting, so that the Model Explorer displays objects for the whole hierarchy of the currently selected system.
To toggle between displaying only the current system and displaying the whole system hierarchy of the current system, use one of these techniques:
Select View > Show Current System and Below.
Click the Show contents of current system and below button
 at the top of the Contents
pane.
at the top of the Contents
pane.
When you select the Show Current System and Below option:
The Model Hierarchy pane highlights the current system and its child systems.
After the path in the Contents pane, the text
(and below)appears.
Note
To display the contents of a data dictionary, in the Model
Hierarchy pane, select the individual section nodes under the dictionary
node. For example, to display model design data, select the Design
Data node. Alternatively, to see the contents of the whole dictionary,
select the data dictionary node and click the Show contents of current
system and below button ![]() at the top of the Contents
pane.
at the top of the Contents
pane.
Loading very large models for the current system and below can be slow. To stop the loading process at any time, either click the Show contents of current system only button or click another node in the tree hierarchy.
If you show the current system and below, you might want to change the view to better reflect the displayed system contents.
The setting for the Show Current System and Below option is persistent across Simulink sessions.
Note
To open a graphical object (for example, a model, subsystem, or chart) in a Simulink Editor window from the Model Explorer, right-click the object in the Model Hierarchy pane, then select Open.
By default, the Model Explorer does not display the contents of linked library subsystems or masked subsystems in the Model Hierarchy pane.
To display the contents of linked library subsystems or masked subsystems, use one of these approaches:
At the top of the Model Hierarchy pane, click the Show/Hide Library Links button
 or the Show/Hide Masked
Subsystems button
or the Show/Hide Masked
Subsystems button  .
.From the View menu, select Show Library Links or Show Masked Subsystems.
Linked subsystems and masked subsystems are visible in the Contents pane, regardless of how you configure the Model Hierarchy pane.
Note
Search does not find elements in linked library or masked subsystems that are not displayed in the Model Hierarchy pane.
For subsystems that are both linked and masked, how you set the linked subsystems and masked subsystems options affects which subsystems appear in the Model Hierarchy pane, as described in the following table.
| Settings | Subsystems Displayed in the Model Hierarchy Pane |
|---|---|
Show Library Links Hide Masked Subsystems | Only library-linked, unmasked subsystems |
Hide Library Links Show Masked Subsystems | Only masked subsystems that are not library-linked subsystems |
Show Library Links Show Masked Subsystems | All library-linked or masked subsystems |
To browse a model that includes Model blocks, you can expand the Model Hierarchy pane nodes of the Model blocks.
To browse a model referenced by a Model block:
Right-click the referenced model node in the Model Hierarchy pane.
Select Open Model.
The referenced model opens as a top model and appears as a separate node in the Model Hierarchy pane. While you can expand the Model block node and display the corresponding contents, you must use the node that corresponds to the referenced model to edit them.
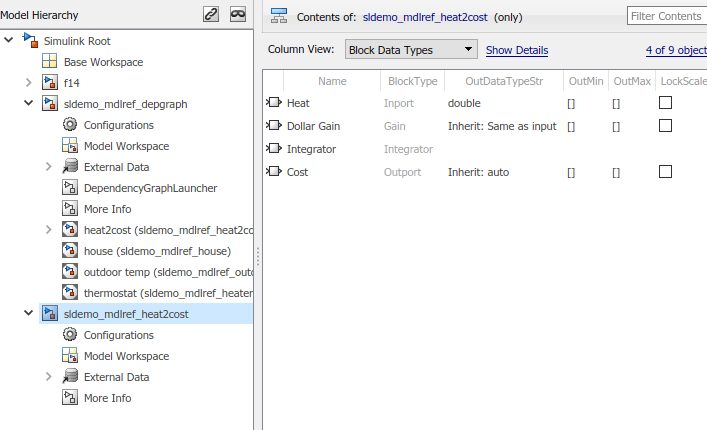
For example, the sldemo_mdlref_depgraph model includes
Model blocks that reference other models. If you open the
sldemo_mdlref_depgraph model and expand that model node in the
Model Hierarchy pane, you see that the model contains several
Model blocks, including heat2cost.
If you right-click the heat2cost
Model block node and select Open Model, the
Contents pane displays the objects in the
heat2cost
Model block. You can expand the heat2cost node.

You can browse the contents of the referenced model, but you cannot edit the objects in the Model block.
To edit the referenced model, expand the referenced model node in the
Model Hierarchy pane, and then access the properties of objects
in the referenced model. For example, expand the
sldemo_mdlref_heat2cost node.
For information about referenced models, see Model Reference Behavior and Capabilities.
You can change the font size in the Model Explorer panes.
To increase the font size, press Ctrl+Plus (+). Alternatively, from the Model Explorer View menu, select Increase Font Size.
To decrease the font size, press Ctrl+Minus (-). Alternatively, from the Model Explorer View menu, select Decrease Font Size.
The changes remain in effect for the Model Explorer and in Simulink dialog boxes across Simulink sessions.
If a default view that ships with the Model Explorer does not meet your needs, you can modify or create a view.
To open the View Manager dialog box, select View > Column View > Manage Views.
To copy and rename an existing view:
In the View Manager dialog box, select the view that you want to use as the starting point for your new view.
Click the Copy button.
A new row appears at the bottom of the View Manager table. The new row contains the name of the view you copied, followed by a number in parentheses. For example, if you copy the
Stateflowview, the initial name of the copied view isStateflow (1).
To create a new view, in the View Manager dialog box, click the New button. A new view row appears at the bottom of the View Manager table.
After you create a view, you can name and describe the view:
Double-click the name of the view in the View column and enter a name for the view.
Double-click the text in the Description column and enter a description for the view.
Click OK.
You can control the information the Contents pane displays and directly manipulate column headings.
To control which property columns to display, use the View > Column View option.
To control which types of objects to display, use the View > Row Filter option.
To focus on specific objects in the Contents pane, based on a search string, filter contents.
As you customize the table represented by the current view, you change the current view definition. The Model Explorer saves the following changes to the table as part of the column view definition:
Grouping by property
Sorting in a column
Changing the order of property columns
Adding a property column
Hiding and removing property columns
When you change from one view to another view, the Model Explorer saves any customizations that you have made to the previous view.
For example, suppose you set Column View to Block Data
Types view and you hide the LockScale property column. If
you then switch to use the Data Objects view, and later use the
Block Data
              Types
view again, the Block Data
Types view no longer includes the LockScale column that
you hid.
At the end of a Simulink session, the Model Explorer saves the view customizations that you made during that session. When you reopen the Model Explorer, Simulink uses the customized view, and maintains any changes that you made to the view in the previous session.
If you modify a default view that ships with the Model Explorer, you can reset it to factory settings. With the default view as the current view, in the Contents pane, click Show Details, then click Options > Reset This View to Factory Settings.
To reset the factory settings for all default views in one step, in the View Manager dialog box, click the Options > Reset All Views to Factory Settings.
Note
When you reset all views, the Model Explorer removes all the custom views you have created. Before you reset views to factory settings, export any views that you will want to use in the future. For more information, see Manage Views.
In the View Manager, you can delete, reposition, export, and import views for use by the Model Explorer.
To open the View Manager, select View > Column View > Manage Views.
To delete a view from the Column View list of views:
In the View Manager dialog box, select one or more views that you want to remove from the list.
Click the Delete button or press the Delete key.
Click OK.
Deleting a view using the View Manager dialog box permanently deletes that view from the Model Explorer interface. If you think you or someone else might want to use a view again, consider exporting the view before you delete it.
To change the position of a view in the Column View list:
In the View Manager dialog box, select one or more views that you want to move up or down in the table of views.
Click the up or down arrow buttons to the right of the table. Repeat this step until the view appears where you want it to be in the table.
Click OK.
To export views that you or others can then import:
In the View Manager dialog box, select one or more views that you want to export.
Click the Export button. The Export Views dialog box opens with check marks next to the views that you selected.
Click OK. An Export to File Name dialog box opens.
Navigate to the folder where you want to export the view. By default, the Model Explorer exports views to the current folder in MATLAB.
Specify the file name for the exported view. The file is saved as a
.matfile.Click OK.
To import view files for use by the Model Explorer:
In the View Manager dialog box, click Import. The Select
.matFile to Import dialog box opens.Navigate to the folder that contains the view you want to import.
Select the MAT file containing the view that you want to import and click Open. A confirmation dialog box opens. Click OK to import the view.
The imported views are added at the bottom of the View Manager table. The Model Explorer automatically renames the view if a name conflict occurs.
Related Examples
Parameters
Search Bar
Open the search bar by selecting View > Toolbars > Search Bar.
Use the Search setting to specify the type of objects or properties to include in the search.
| Search Type Option | Description |
|---|---|
by Name | Searches a model or chart for all objects that have the specified string in the name of the object. |
by Property Name | Searches for objects that have a specified property. Specify the target property name from a list of properties that objects in the search domain can have. |
by Property Value | Searches for objects with a property value that matches the value you specify. Specify the name of the property, the value to be matched, and the type of match (for example, equals, less than, or greater than). |
by Block Type | Searches for blocks of a specified block type. Select the target block type from the list of types contained in the currently selected model. |
by Stateflow Type | Searches for Stateflow objects of a specified type. |
for Variable Usage | Searches for blocks that use variables defined in a workspace. Select the base workspace or a model workspace (model name) and, optionally, the name of a variable. |
for Referenced Variables | Searches for variables that a model or block uses. Specify the name of the model or block in the by System field. The model or block must be in the Model Hierarchy pane. |
for Unused Variables | Searches for variables that are defined in a workspace but not used by any model or block. Select the name of the workspace from the drop-down list for the in Workspace field. |
for Library Links | Searches for library links in the current model. |
by Class | Searches for Simulink objects of a specified class. |
for Fixed Point Capable | Searches a model for all blocks that support fixed-point computations. |
for Model References | Searches a model for references to other models. |
by Dialog Prompt | Searches a model for all objects whose dialog boxes contain the prompt you specify. |
by String | Searches a model for all objects in which the string you specify occurs. |
Use search option settings to specify the scope of the search.
| Search Option | Description |
|---|---|
| Match Whole String | Do not allow partial string matches (for example, do not allow
|
| Match Case | Considers case when matching strings (for example,
|
| Regular Expression | Considers a string to be matched as a regular expression. |
| Evaluate Property Values During Search | This option applies only for searches by property value. If enabled, Model Explorer evaluates the value of each property as a MATLAB expression and compares the result to the search value. If this option is disabled, the Model Explorer compares the unevaluated property value to the search value. |
| Refine Search | Enables you to search the initial search results. The second search operation searches for objects that meet both the original and the new search criteria. |
By default, search strings are case-insensitive and are treated as regular
expressions. The search allows partial string matches. You cannot use wildcard
characters in search strings. For example, if you enter *1 as a name
search string, you get no search results unless there is an item whose name starts with
the characters *1. If there is an out1 item, the
search results do not include that item.
Model Hierarchy Pane
Expand Simulink Root to display nodes representing the MATLAB workspace, Simulink models, and Stateflow charts that are in the current session.
Expanding a model or chart node in the Model Hierarchy pane displays nodes representing the following elements, as applicable, for the models and charts you have open.
| Node | Description |
|---|---|
Configurations | Select the Configurations node to show the model's configuration sets and configuration references in the Contents pane. For information about adding, deleting, saving, and moving configuration sets, see Manage Configuration Sets for a Model. |
Model Workspace | For information about how to use the Model Explorer to work with model workspace variables, see these topics: |
| External data | Expand the External Data node to display external data sources for the model, including the base workspace (if access is enabled), and data dictionaries. |
Top-level subsystems | Expand a node representing a subsystem to display underlying subsystems. |
Model blocks | Expand model blocks to show contents of referenced models. |
Stateflow charts |
|
Base Workspace represents the MATLAB workspace. The MATLAB workspace is the base workspace for Simulink models and Stateflow charts. Variables defined in this workspace are visible to all open models and charts.
Contents Pane
The Contents pane displays one of two tables containing information about models and charts, depending on the tab that you select:
The Contents tab displays an object property table for the node that you select in the Model Hierarchy pane.
The Search Results tab displays the search results table.
You can also click Show Details to add and modify the columns that appear in the tables.
The Contents pane displays a table of model and chart object data.
In the Contents tab and in the Search Results tab:
Table columns correspond to object properties (for example,
NameandBlockType).The table displays the first two columns (the object icon and the
Nameproperty) persistently, so that these columns remain visible regardless of how far you scroll to the right.Table rows correspond to objects (for example, blocks, and states).
The objects and properties displayed in the Contents pane depend on:
The column view that you select in the Column View menu
The node that you select in the Model Hierarchy pane
The kind of object (for example, subsystem or chart) that you select in the Model Hierarchy pane
The View > Row Filter options that you select
The link next to Contents of at the top of the Contents pane links to the currently selected node in the Model Hierarchy pane. The model data displayed in the Contents pane reflects the setting of the Current System and Below option.
The Model Explorer uses views to specify sets of property columns to display in the Contents pane.
Each kind of node in the Model Hierarchy pane displays specific properties in the Contents pane. For example, a Simulink model or subsystem node displays properties such as:
BlockType(block type)OutDataTypeStr(output data type)OutMin(minimum value for the block output)
Generally, a column view does not contain the total set of properties for all the objects in a node. Specifying a subset of properties to display can streamline the task of exploring and editing model and chart object properties and increase the density of the data displayed in the Contents pane.
You can use a view to capture the following characteristics of the model information to show in the Model Explorer:
Properties that you want to display in the Contents pane
The layout of the Contents pane (for example, grouping by property, the order of property columns, and sorting)
You can use views in the following ways:
Use the standard views that ship with the Model Explorer
Customize the standard views
Create your own views
The first time you open the Model Explorer, Simulink automatically applies one of the standard views to the node you select in the Model Hierarchy pane. The Model Explorer applies a view based on the kind of node you select.
The Model Explorer assigns one of four categories of nodes in the Model Hierarchy pane. The Model Explorer initially associates a default view with each node category. The node categories are:
| Node Category | Kinds of Hierarchy Nodes Included | Initial Associated View |
|---|---|---|
| Simulink | Models, subsystems, and root level models | Block Data Types |
| Workspace | Base and model workspace objects | Data Objects |
| Stateflow | Stateflow charts and states | Stateflow |
| Configurations | Configurations section node | Configurations |
| Other | Objects that do not fit into one of the first three categories; for example, configuration sets | Default |
The Column View field at the top of the Contents pane displays the view that the Model Explorer is currently using.
In the Contents pane, from the Column View
list, you can select a different view. If you select a different view, then the Model
Explorer associates that view with the category of the current node. For example,
suppose the selected node in the Model Hierarchy pane is a
Simulink model, and the current view is Data Objects. If you
change the view to Signals, then when you select another Simulink model node, the Model Explorer uses the Signals view.
By default, the Model Explorer automatically applies a view based on the category of node that you select and the last view used for that node. You can manually select a view from the Column View list that better meets your current task.
You can shift from the default mode of having the Model Explorer automatically apply views to a mode in which you must manually select a view to change views.
To enable the manual view selection mode:
Select View > Column View > Manage Views.
The View Manager dialog box opens.
In the View Manager dialog box, click the Options button and clear Change View Automatically.
In the manual view selection mode, if you switch to a different kind of node in the Model Hierarchy pane that has a different view associated with it, the Contents pane displays a yellow informational bar suggesting a view to use.
You can manage views (for example, create a new view or export a view) using the View Manager dialog box. To open the View Manager dialog box, select the Manage Views option from either:
The View > Column View menu
The options listed when you click the Options button in the column view details section
The View Manager dialog box displays a list of defined views and provides tools for you to manage views.
You can manage views in several ways, including creating, deleting, reordering, exporting, importing, and resetting views.
The tip interface appears immediately above the table in the Contents pane. It does not appear if, in the View Manager dialog box, you clear Options > Change View Automatically. The tip interface displays a link for changing the current view to a suggested view. To choose the suggested view displayed in the tip bar, click the link. To hide the currently displayed tip, from the menu button on the right side of the tip bar, select Hide This Tip.
Initially, the suggested view is the default view associated with a node. If you associate a different view with a node category, then the tip suggests the most recently selected view when you select similar nodes.
To change from manual specification of views to automatic specification, from the tip interface, select the down arrow and Change View Automatically.
To enable the tip interface, in the View menu, select Column View > Manage Views. In the View Manager, enable Options > Change View Automatically.
Dialog Pane
Use the Dialog pane to view and change properties of objects that you select in the Model Hierarchy pane or in the Contents pane.
By default, the Dialog pane appears to the right of the Contents pane. To show or hide the Dialog pane, use one of these approaches:
From the View menu, select Show Dialog Pane.
From the main toolbar, click the Dialog View button
 .
.
To edit property values using the Dialog pane:
In the Contents pane, select an object (such as a block or signal). The Dialog pane displays the properties of the object you selected.
Change a property (for example, the port number of an Outport block).
Click Apply to accept the change, or click Revert to return to the original value.
By default, clicking outside the Dialog pane when a field has unapplied changes causes the Apply Changes dialog box to appear. Click Apply to accept the changes or Ignore to revert to the original settings.
To prevent the Apply Changes dialog box from displaying:
In the dialog box, click the In the future Apply or Ignore (whichever I select) without asking check box.
If you want Simulink to apply changes without warning you, press Apply. If you want Simulink to ignore changes without warning you, press Ignore.
To restore the Apply Changes dialog box, from the Tools menu, select Prompt if dialog has unapplied changes.
When you select a numeric MATLAB variable or a Simulink.Parameter object in a model
workspace, the Argument check box appears in the
Dialog pane. This check box configures the variable or object as
a model argument. See Configure Instance-Specific Values for Block Parameters in a Referenced Model.