Autonomous Emergency Braking with RoadRunner Scenario
This example shows how to simulate an autonomous emergency braking (AEB) system, designed in Simulink®, with RoadRunner Scenario.
Introduction
RoadRunner Scenario is an interactive editor that enables you to design scenarios for simulating and testing automated driving systems. You can place vehicles, define their paths and interactions in the scenario, and then replay the scenario in the editor. RoadRunner Scenario supports in-editor playback for scenario visualization and connecting to other simulators, such as MATLAB® and Simulink, for cosimulation.
AEB is an advanced active safety system that helps drivers avoid or mitigate collisions with other vehicles. This example shows how to use RoadRunner Scenario to simulate the AEB test bench model used in the Autonomous Emergency Braking with Sensor Fusion example.
This figure shows an overview of the information exchanged between RoadRunner Scenario, and autonomous emergency braking test bench model in Simulink. The autonomous emergency braking model reads all actor runtimes from RoadRunner Scenario and utilizes the actors pose and ego pose information for Simulation. The model gets the vision and radar detections from the sensors and uses this information to control the ego vehicle and writes back the updated ego pose to RoadRunner Scenario.

In this example, you:
Set up the environment — Configure MATLAB settings to interact with RoadRunner Scenario.
Author Euro NCAP scenario using RoadRunner Scenario — Author the RoadRunner scene and scenario for testing the AEB system using the European New Car Assessment Programme (Euro NCAP) test protocol.
Explore the AEB test bench — The test bench model has interfaces for RoadRunner Scenario, sensors, sensor fusion and tracking, decision logic, an AEB controller, vehicle dynamics, and metrics assessment.
Simulate with Car-to-Car Front Turn-Across-Path scenario — Cosimulate the AEB test bench model with RoadRunner Scenario for the Car-to-Car Front turn-across-path (CCFtap) test scenario, and plot the simulation results.
Perform iterative testing with scenario variants — Configure Simulink Test Manager to create and run variants of the CCFtap scenario, with speed variations of both the vehicles under test (VUT) and the global vehicle target (GVT), to assess the AEB test bench per the Euro NCAP specifications.
Explore other scenarios — Test the system under additional conditions.
Set Up Environment
This section shows how to set up the environment to cosimulate the AEB application with RoadRunner Scenario.
Note: If you are working on the Windows® platform, ensure that the file path of the example is less than 135 characters to maintain compatibility and prevent errors.
Tip: To avoid file path length issues, use the userpath function to check or set the file path.
Check file path length limitation on Windows
if ispc
    currentPath = pwd;
    if length(currentPath) >= 135
        error(['The file path is too long. Use a path with fewer ' ...
            'than 135 characters to comply with Microsoft' char(174) ...
            ' Windows' char(174) ' file system limits. ' ...
            'Shorten the folder names, move your project to a higher-level directory, ' ...
            'or use the userpath function to avoid this issue.']);
    end
end
Specify the path to your local RoadRunner installation folder. This code shows the path for the default installation location on Windows®.
rrAppPath = "C:\Program Files\RoadRunner " + matlabRelease.Release + "\bin\win64";
Specify the path to your RoadRunner project. This code shows a sample project folder on Windows.
rrProjectPath = "C:\RR\MyProjects";
To update the path for the RoadRunner installation folder, get the root object within the settings hierarchical tree. For more information, see SettingsGroup.
s = settings;
s.roadrunner.application.InstallationFolder.TemporaryValue = rrAppPath;
Open RoadRunner using the specified path to your project.
rrApp = roadrunner(rrProjectPath);
The rrApp RoadRunner object enables you to interact with RoadRunner from the MATLAB workspace. You can open the scenario and update the scenario variables using this object. For more information on this object, see roadrunner.
To explore the test bench model, load the Autonomous Emergency Braking with RoadRunner Scenario project.
openProject("AEBWithRRScenario");
To reduce Command Window output, turn off model predictive controller (MPC) update messages.
mpcverbosity("off");
Copy the RoadRunner scene, scenario, and behavior files to the RoadRunner project.
AEBWithRRScenarioProject = currentProject;
projectPath = convertStringsToChars(AEBWithRRScenarioProject.RootFolder);
projectRootFolder = projectPath(1:find(projectPath=='\',1,'last')-1);

copyfile(fullfile(projectRootFolder,"AEBTestScenarios/RoadRunner/Scenes"),fullfile(rrProjectPath,"Scenes"),'f')
copyfile(fullfile(projectRootFolder,"AEBTestScenarios/RoadRunner/Scenarios"),fullfile(rrProjectPath,"Scenarios"),'f')
copyfile(fullfile(projectRootFolder,"AEBWithRRScenario/TestBench/AEB.rrbehavior.rrmeta"),fullfile(rrProjectPath,"Assets","Behaviors"),'f')
Author Euro NCAP Scenario Using RoadRunner Scenario
This example reuses the AEB components from the Autonomous Emergency Braking with Sensor Fusion example, but shows you how you can simulate an AEB application with a Euro NCAP scenario authored using RoadRunner Scenario. This example uses a CCFtap Euro NCAP scenario authored using a junction scene, JunctionWithConnectingLanes. Open the scene.
openScene(rrApp,"JunctionWithConnectingLanes.rrscene")

The Euro NCAP specification refers to the ego vehicle as the vehicle under test (VUT) and the target vehicle as a global vehicle target (GVT).
The scenario_01_CarToCar_FrontTAP.rrscenario file is a RoadRunner scenario compatible with the AEBWithRRTestBench model. In this scenario, a VUT turns across the path of an oncoming GVT that is traveling at a constant speed, causing a collision in which the frontal structure of the GVT strikes the frontal structure of the VUT. The VUT and GVT follow predefined paths specified in the scenario. Open the scenario in the JunctionWithConnectingLanes scene.
openScenario(rrApp,"scenario_01_CarToCar_FrontTAP.rrscenario")

The GVT travels on a straight-line path. The VUT travels straight, makes a left turn, and then travels straight again. The initial and final straight-line trajectories of the VUT are clothoid, and during the turn, the trajectory has a fixed radius per the Euro NCAP Test Protocol - AEB Car-to-Car systems version 3.0.1. The scenario_01_CarToCar_FrontTAP scenario has a VUT test speed of 10 km/h, or 2.778 m/s. The VUT trajectory parameters, Computed Arc Radius and Circular Arc Angle are 9 m and 48.76 degrees, respectively. You can also configure this scenario for other VUT speeds. For more details, see the Simulate with Scenario Variants section of this example.
To simulate the AEB behavior, use the AEB.rrbehavior.rrmeta file to assign custom behavior to the ego vehicle.

Connect to the RoadRunner Scenario server for cosimulation using the createSimulation function, and enable data logging.
rrSim = rrApp.createSimulation;
set(rrSim,Logging="on")
Connection status: 1
Connected to RoadRunner Scenario server on localhost:60730, with client id {f5a2c884-f5bf-4cde-a1cc-46cf7959dd74}
rrSim is a ScenarioSimulation object. Use this object to set variables and read scenarios and map-related information.
The AEB application is designed to run at a step size of 0.05 seconds. Set the simulation step size of RoadRunner Scenario to 0.05 seconds.
Ts = 0.05;
set(rrSim,StepSize=Ts)
Explore Test Bench
In this example, you use a system-level simulation test bench model to simulate and test the behavior of the AEB model with the RoadRunner Scenario. Open the test bench model.
modelName = 'AEBWithRRTestBench';
open_system(modelName)
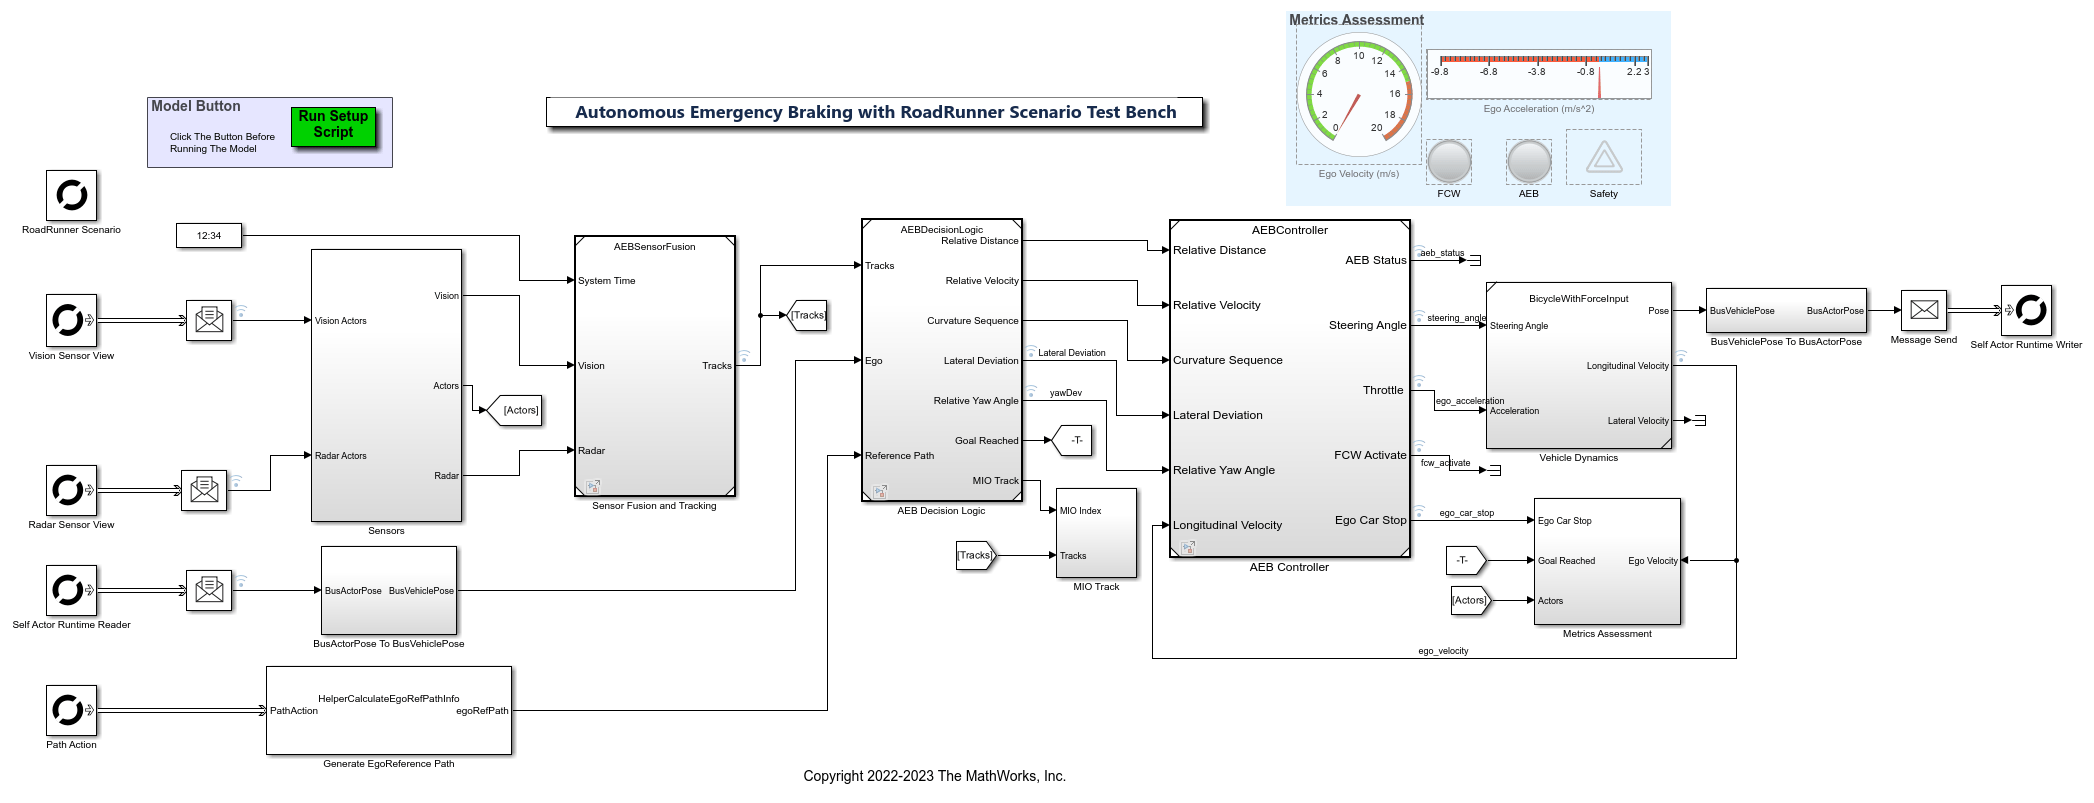
The test bench model contains RoadRunner Scenario blocks, which configure, read from, and write to RoadRunner Scenario, as well as these modules:
Sensors— Subsystem that specifies the actors, camera, and radar sensor used for simulation from the RoadRunner scenario.Sensor Fusion and Tracking— Algorithm model that fuses vehicle detections from the camera to those from the radar sensor.AEB Decision Logic— Algorithm model that specifies the lateral and longitudinal decision logic that provides the most important object (MIO) related information and ego vehicle reference path information to the controller.AEB Controller— Algorithm model that specifies the steering angle and acceleration controls.Vehicle Dynamics— Subsystem that specifies the dynamic model of the ego vehicle.Generate EgoReference Path— Subsystem that calculates the reference path attributes using the path information from RoadRunner Scenario.Metrics Assessment— Subsystem that assesses system-level behavior.
The Sensor Fusion and Tracking, AEB Decision Logic, AEB Controller, Vehicle Dynamics, and Metrics Assessment are reused from the Autonomous Emergency Braking with Sensor Fusion example.
This example focuses on the RoadRunner Scenario blocks and the Sensors subsystem.
RoadRunner Scenario Blocks
The RoadRunner Scenario blocks consist of:
RoadRunner Scenario— Defines the interface for an actor model.Vision Sensor View— RoadRunner Scenario Reader block that retrieves target poses in the vision sensor coverage using the Sensor View parameter set toTarget Poses.Radar Sensor View— RoadRunner Scenario Reader block that retrieves target poses in the radar sensor coverage using the Sensor View parameter set toTarget Poses.Self Actor Runtime Reader— RoadRunner Scenario Reader block that reads ego actor runtime information.Path Action— RoadRunner Scenario Reader block that reads the reference path of the ego vehicle.Self Actor Runtime Writer— RoadRunner Scenario Writer block that writes the ego vehicle runtime to RoadRunner Scenario.
Sensors
The Sensors subsystem synthesizes the vision and radar sensors, which are attached to the ego vehicle.
Open the Sensors subsystem.
open_system("AEBWithRRTestBench/Sensors")

The Sensors subsystem contains these blocks:
The Driving Radar Data Generator block generates clustered detections from radar sensor mounted on ego vehicle.
The Vision Detection Generator block generates detections and measurements from a camera mounted on the ego vehicle.
To control sensor configuration from the RoadRunner Scenario simulation object, retrieve a SensorSimulation object. Then, specify the block paths for vision and radar sensors in the model.
sensorSim = get(rrSim,"SensorSimulation");
visionSensorBlkPath = [modelName,'/Sensors/Vision Detection Generator'];
radarSensorBlkPath = [modelName,'/Sensors/Driving Radar Data Generator'];
sensorSim is a SensorSimulation object. Use the addSensors function of this object to attach vision and radar sensors to the ego vehicle.
addSensors(sensorSim,{visionSensorBlkPath, radarSensorBlkPath}, evalin("base", "egoActorID")); % attach sensor to ego actor.
Simulate with CCFtap Scenario
This example uses the helperSLAEBWithRRSetup helper function to set up the ego profile, and target actor profiles, along with the sensor parameters based on the ego vehicle speed. These values are scenario dependent, and can change based on the selected scenario. Configure the model with the scenario_01_CarToCar_FrontTAP scenario.
helperSLAEBWithRRSetup(rrApp,rrSim,scenarioFileName="scenario_01_CarToCar_FrontTAP")
This model may take few seconds to update the diagram when compiling for the first time. Update the model before running the simulation.
set_param(modelName,SimulationCommand="update")
Simulate the scenario and observe how the AEB system avoids collision.
set(rrSim,SimulationCommand="Start")
while strcmp(rrSim.get("SimulationStatus"),"Running")
  pause(1)
end

Notice that the sensor fusion and tracking algorithm tracks the target vehicle and the decision logic algorithm finds that target as the MIO, and that the AEB system applies the brake to mitigate the collision.
Plot the simulation results by using the helperPlotAEBResults helper function.
helperPlotAEBResults(logsout,"scenario_01_CarToCar_FrontTAP")

TTC vs. Stopping Time — Compares the time-to-collision and the stopping times for the forward collision warning (FCW), first stage partial brake, second stage partial brake, and full brake, respectively. For more information about multi-stage partial braking, see Autonomous Emergency Braking with Sensor Fusion.
FCW and AEB Status — Displays the FCW and AEB activation status based on the comparison results from the first plot.
Ego Car Acceleration — Shows the acceleration of the ego vehicle.
Ego Car Yaw and Yaw Rate — Shows the yaw and yaw rate of the ego vehicle.
Ego Car Velocity — Shows the velocity of the ego vehicle.
Headway — Shows the headway between the ego vehicle and the MIO.
In the first few seconds, the ego vehicle travels with its specified velocity of 2.778 m/s. The sensors detect the target vehicle at the intersection. Immediately after the detection, the FCW system activates.
The AEB system then applies the first stage of the partial brake, and the ego vehicle starts to slow down.
The ego vehicle reduces its velocity to mitigate the collision in this scenario.
Perform Iterative Testing with Scenario Variants
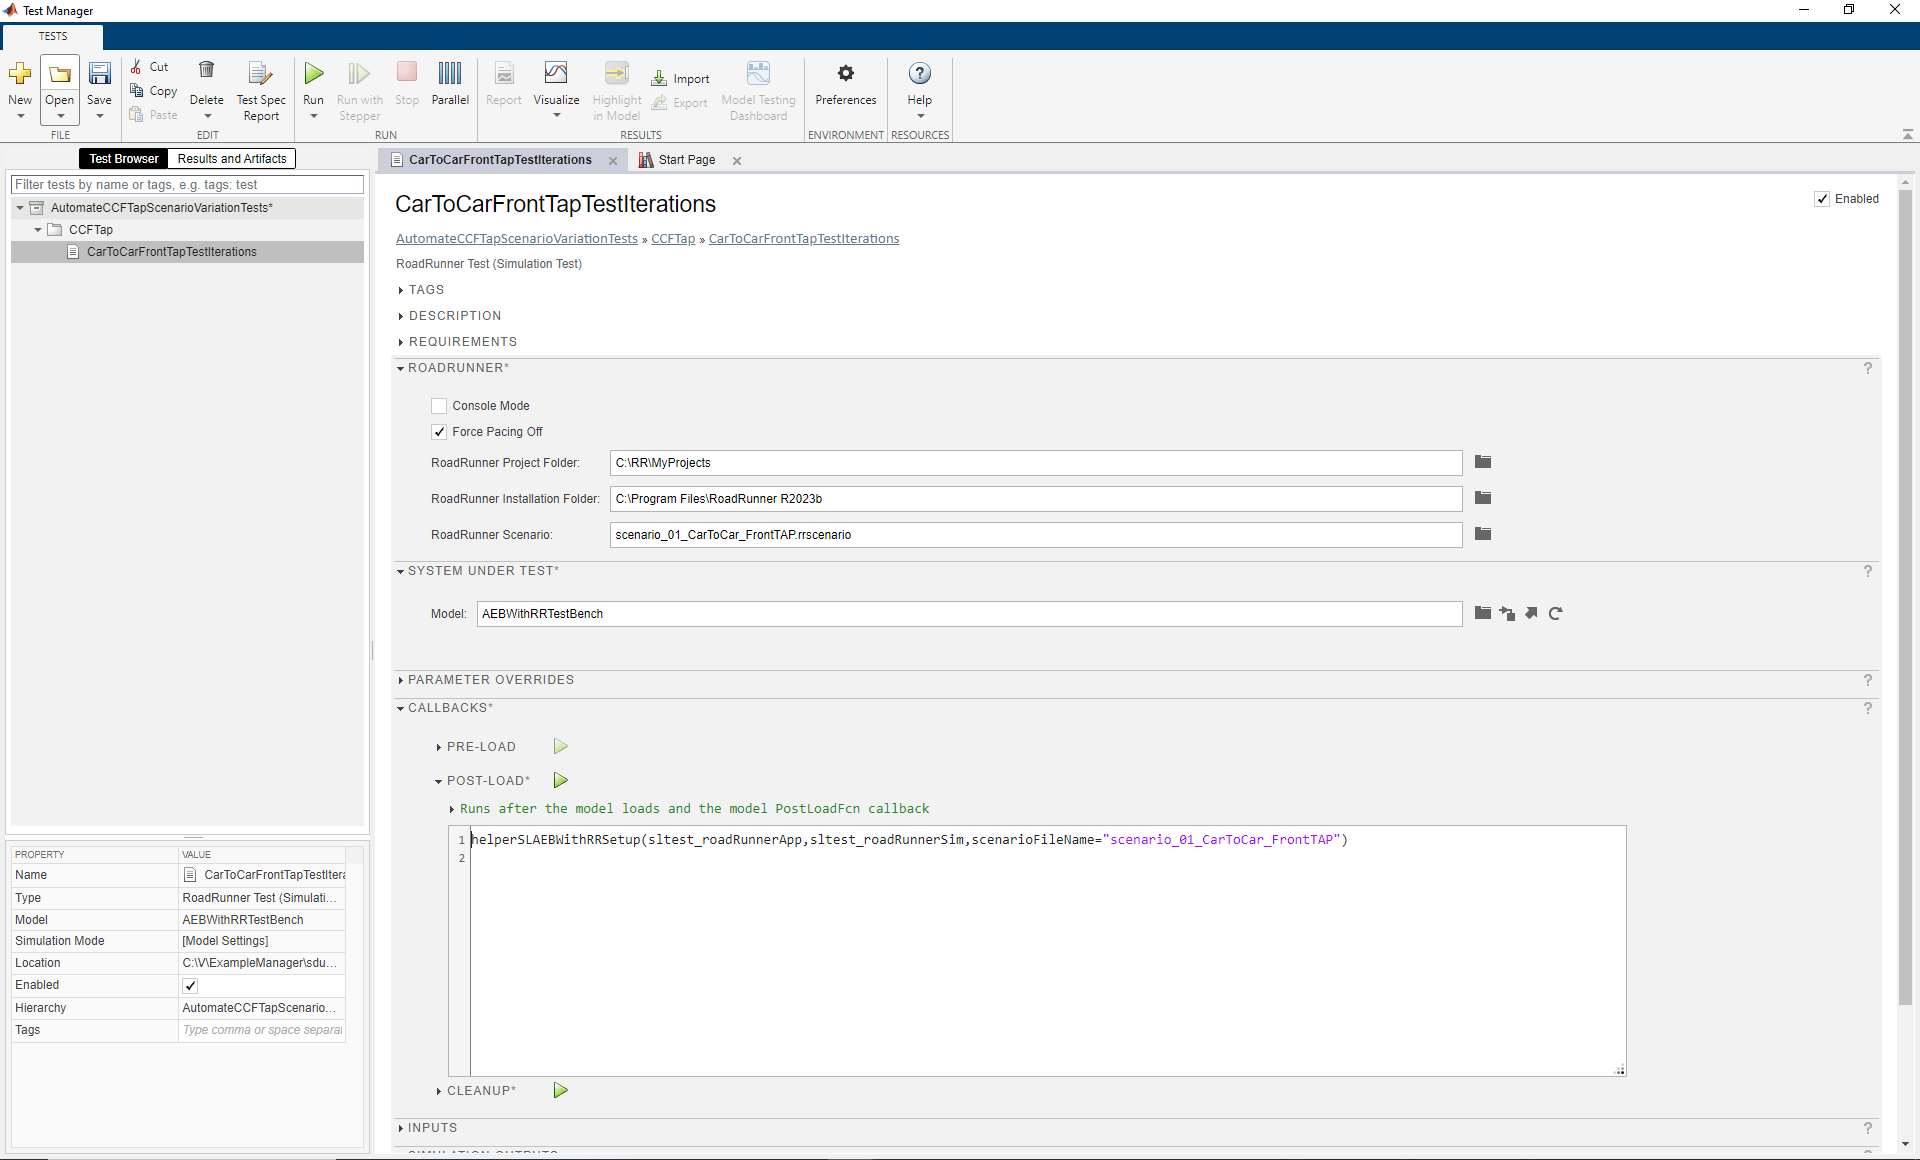
This example includes a Test Manager to test CCFtap scenarios that enables you to vary speeds of the VUT and GVT as per the Euro NCAP Test Protocol - AEB Car-to-Car systems version 3.0.1. Open the AutomateCCFTapScenarioVariationTests.mldatx test file in the Test Manager and configure the RoadRunner Project Folder and RoadRunner Installation Folder properties for the CarToCarFrontTapTestIterations test case.
sltestmgr
testFile = sltest.testmanager.load("AutomateCCFTapScenarioVariationTests");
testSuite = testFile.getTestSuites;
testCase = testSuite.getTestCaseByName("CarToCarFrontTapTestIterations");
testCase.setProperty("RoadRunnerProjectFolder",rrProjectPath);
testCase.setProperty("RoadRunnerInstallationFolder",extractBefore(rrAppPath,"\bin\win64"));
You can generate 9 different scenario variations by using these speed values for the VUT and GVT:
VUT — 10, 15, or 20 km/h
GVT — 30, 45, or 55 km/h
To keep the same collision point for all these variations, the example modifies the wait time of the GVT. The example also updates the trajectory of the VUT with the change in its test speed, as shown in this table.

This example uses a CCFTapVariationData.mat file that contains the VUT trajectory parameters and precalculated GVT wait times for all 9 scenario variations.
Load the mat file.
load("CCFtapVariationData.mat")
disp(CCFTapVariationData)
    vutSpeed    gvtSpeed    vutAlpha    vutBeta    vutRadius    gvtWaitTime
    ________    ________    ________    _______    _________    ___________

       10          30        20.62       48.76           9        6.1779
       10          45        20.62       48.76           9        7.4019
       10          55        20.62       48.76           9         7.847
       15          30        20.93       48.14       11.75           2.2
       15          45        20.93       48.14       11.75           3.5
       15          55        20.93       48.14       11.75        3.9728
       20          30        21.79       46.42       14.75             0
       20          45        21.79       46.42       14.75        1.3668
       20          55        21.79       46.42       14.75        1.8728
scenario_01_CarToCar_FrontTAP contains variables that enable you to vary the VUT trajectory parameters and GVT wait times, as shown in this image.

The Simulink scripted iteration framework enables you to modify these variables to automate the testing of these CCFTap scenario variants in closed-loop using the test bench model.

The setRoadRunnerVariable function sets these parameters for each iteration:
VUT_Speed— Speed of the ego vehicle.GVT_Speed— Speed of the target vehicle.GVT_WaitTime— Wait time of the target vehicle.CCFtap_Alpha— Alpha angle of the turn in the ego path.CCFtap_Beta— Beta angle of the turn in the ego path.CCFtap_Radius— Radius of the turn in the ego path.
The addIteration function adds test iterations to the CarToCarFrontTapTestIterations test case. For more information on creating scripted iterations, see the Test Iterations (Simulink Test).
Delete ScenarioSimulation object and close the active RoadRunner Scenario instance before testing the scenario variants.
delete(rrSim);
close(rrApp);
Run and Explore Results for CCFtap Scenario Variants
To test the system-level model with the CCFtap variants from Simulink Test, use this code:
resultSet = run(testFile);
testFileResults = getTestFileResults(resultSet);
testSuiteResults = getTestSuiteResults(testFileResults);
testCaseResults = getTestCaseResults(testSuiteResults);
testIterationResults = getIterationResults(testCaseResults);
After simulating the test case, the Test Manager uses the helperPlotAEBResults function from the CLEANUP callback to generate the post-simulation plots. For more information on these plots, see Autonomous Emergency Braking with Sensor Fusion example.
The testIterationResults output contains the results for all the iterations.
Explore Other Scenarios
In this example, you have explored the behavior for the scenario_01_CarToCar_FrontTAP.rrscenario scenario, which uses the JunctionWithConnectingLanes.rrscene scene. You can use the same test bench model to explore other scenarios. This example provides these additional scenarios that are compatible with the AEBWithRRTestBench model.
scenario_02_CarToCar_RearStationary.rrscenario— In this scenario, the VUT collides with the GVT that is stationary in the VUT lane.
scenario_03_CarToPedestrian_NearSide_Adult.rrscenario— In this scenario, the ego vehicle collides with a pedestrian who is traveling from the right side of the road, which Euro NCAP test protocols refer to as the near side.
Using these test scenarios, you can verify whether the AEB system successfully applies the brake and avoids or mitigates a collision with the target.
These scenarios use the HighwayStraightRoad.rrscene scene, which contains a two-way, four-lane, straight highway road. You can explore these scenarios in RoadRunner Scenario. For example, to open the scenario_02_CarToCar_RearStationary.rrscenario scenario, enter this command.
openScenario(rrApp,"scenario_02_CarToCar_RearStationary.rrscenario")
You can configure the AEBWithRRTestBench model to simulate this scenario by using the helperSLAEBWithRRSetup function. To configure the model to run the scenario_02_CarToCar_RearStationary.rrscenario scenario, enter this command.
helperSLAEBWithRRSetup(rrApp,rrSim,scenarioFileName="scenario_02_CarToCar_RearStationary")
When you are finished with this example, enable MPC update messages.
mpcverbosity("on");
See Also
Blocks
- World To Vehicle | Driving Radar Data Generator | Vision Detection Generator | RoadRunner Scenario | RoadRunner Scenario Reader | RoadRunner Scenario Writer
Topics
- Autonomous Emergency Braking with High-Fidelity Vehicle Dynamics
- Autonomous Emergency Braking with Sensor Fusion
- Automate Testing for Autonomous Emergency Braking
- Autonomous Emergency Braking with Vehicle Variants
- Automate Testing for Scenario Variants of AEB System
- Forward Collision Warning Using Sensor Fusion
- Highway Lane Change Planner with RoadRunner Scenario
- Add Sensors to RoadRunner Scenario Using Simulink