Deploy Smart Speaker Model on Raspberry Pi
The previous example showed how to apply the Simulink® speech command recognition model as a component of a smart speaker system.
Software developed to control a smart speaker must be deployed onto the final hardware. Simulink provides built-in functionality for developing and deploying generated code. This example shows how to adapt and deploy the smart speaker model to Raspberry Pi® hardware from Simulink.
Deploy Smart Speaker System on Raspberry Pi Using Simulink
This example demonstrates how to deploy a smart speaker system on Raspberry Pi® using Simulink®. A smart speaker is a speaker that can be controlled by your voice. You run the smart speaker Simulink model on Raspberry Pi in External Mode. The voice commands are captured through the USB microphone connected to your Raspberry Pi board. You can optionally input voice commands through the pre-recorded files. The smart speaker model plays the audio on the speaker connected to the Raspberry Pi. You make the smart speaker play music with the command "Go". You make it stop playing music by saying "Stop". You increase or decrease the music volume with the commands "Up" and "Down", respectively. For details about modeling the various modules used in the smart speaker model, see Apply Speech Command Recognition Network in Smart Speaker Simulink Model.
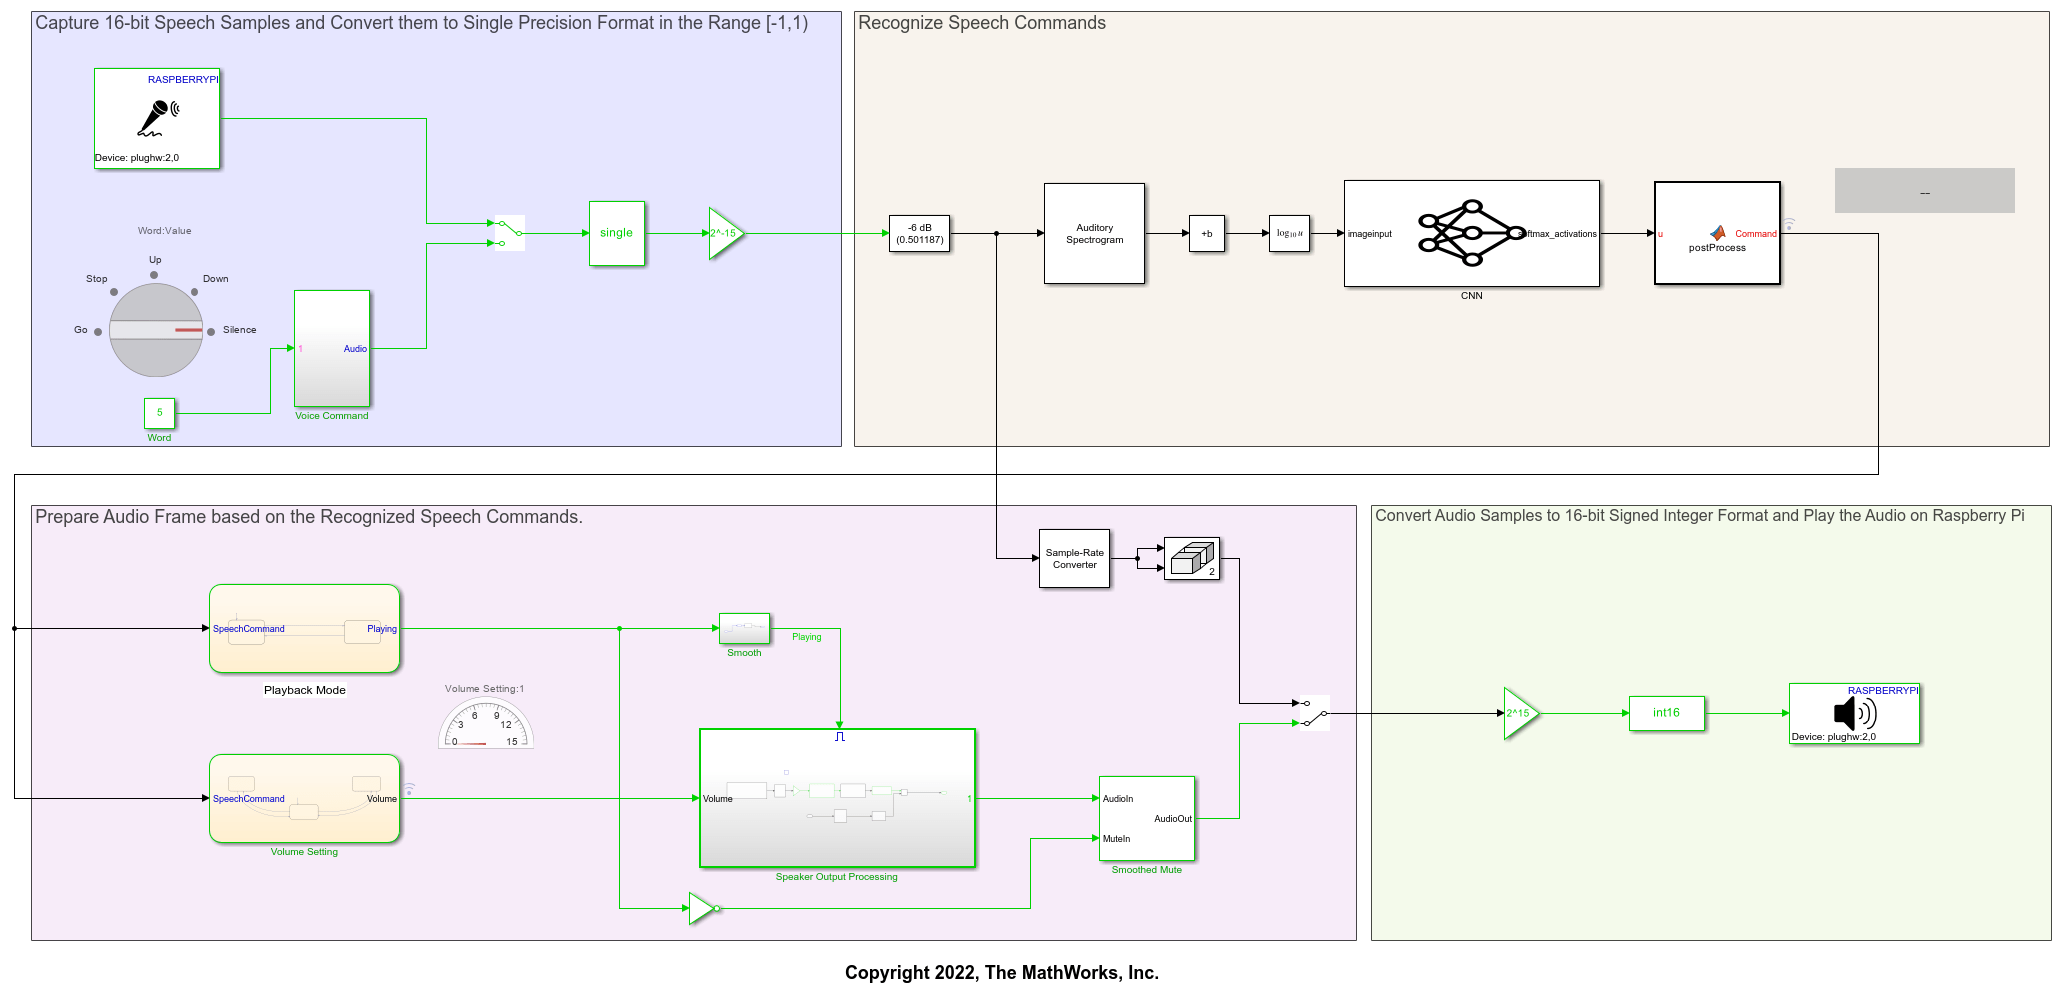
Smart Speaker Model
The model comprises three main parts.
Audio input path captures 16-bit speech samples, converts them to single precision format in the range [-1,1), and classifies them as speech commands
Audio output path prepares speaker audio frame based on the recognized speech commands
Play audio on Raspberry Pi converts audio samples to 16-bit signed integer format and plays the speaker audio on Raspberry Pi
modelName = "AudioSmartSpeakerOnRaspberryPi";
open_system(modelName)
Configure Audio I/O Blocks
The smart speaker model uses the ALSA Audio Capture (Simulink) block to capture the voice commands from a microphone connected to your Raspberry Pi board. The model uses the ALSA Audio Playback (Simulink) block to play the audio on a speaker connected to your Raspberry Pi board. The ALSA Audio IO blocks are included in Simulink Support Package for Raspberry Pi Hardware. After connecting the microphone and speaker to your Raspberry Pi board, you list the audio capture and audio playback devices using listAudioDevices (Simulink)
r = raspberrypi("raspiname","pi","password");
audioCaptureDevicesList = listAudioDevices(r,"capture");
audioPlaybackDevicesList = listAudioDevices(r,"playback");
You set the Device name in the block parameters dialog box of the ALSA Audio Capture block to the device of your choice from audioCaptureDevicesList. Similarly, you configure the Device name in the block parameters dialog box of the ALSA Audio Playback block to the playback device of your choice from audioPlaybackDevicesList.
Display the details of an audio capture and audio playback device from audioCaptureDevicesList and audioPlaybackDevicesList.
audioCaptureDevicesList(1)
ans =
struct with fields:
             Name: 'USB-Audio-LogitechUSBHeadsetH340-LogitechInc.LogitechUSBHeadsetH340atusb-0000:01:00.0-1.2,fullspeed'
           Device: '2,0'
         Channels: {'2'}
         BitDepth: {'16-bit integer'}
     SamplingRate: {'44100'}
audioPlaybackDevicesList(3)
ans =
struct with fields:
             Name: 'USB-Audio-LogitechUSBHeadsetH340-LogitechInc.LogitechUSBHeadsetH340atusb-0000:01:00.0-1.2,fullspeed'
           Device: '2,0'
         Channels: {'2'}
         BitDepth: {'16-bit integer'}
     SamplingRate: {'44100'}
To use the above devices, you set the Device name in the ALSA Audio Capture block and ALSA Audio Playback block dialog box to plughw:2,0. You set the Audio sampling frequency (Hz) to 16000 as the subsequent convolutional neural network (CNN) used to recognize voice commands was trained on a 16000 Hz sampling frequency.
The model provides a manual switch to switch audio from microphone to the pre-recorded audio files. You select the voice commands using the Rotary switch. The model uses four Audio File Read (Simulink) blocks to read the audio files go.wav, stop.wav, up.wav, and down.wav. Note that Audio File Read (Simulink) block is included in Simulink Support Package for Raspberry Pi Hardware.
Modify the Data Type of the Audio Samples
ALSA Audio Capture (Simulink) and Audio File Read (Simulink) blocks outputs 16-bit signed integers audio samples with values in the interval of ![$[ -2^{15} , 2^{15} -1 ]$](../../examples/deeplearning_shared/win64/AudioSmartSpeakerOnRaspberryPiSimulinkExample_eq13904826047286630422.png) . You cast the output of these blocks output to single-precision data and multiply it by
. You cast the output of these blocks output to single-precision data and multiply it by  to change the numerical range to
  . Note that you are changing the numerical range because the subsequent blocks expect the audio in the range .
The ALSA Audio Playback (Simulink) block expects 16-bit signed integers as input, hence the output of the preceding block that prepares audio frame must be converted to 16-bit signed integers. The range of the floating-point audio frame samples is . You multiply the floating-point audio frame samples by  to bring the range to . After multiplying, you typecast the product to
 int16 data type. These int16 audio frame samples can be fed to ALSA Audio Playback (Simulink) block. The AudioSmartSpeakerOnRaspberryPi model uses Gain (Simulink) block to multiply the audio samples by the constants or . It uses Data Type Conversion (Simulink) block to typecast the audio samples to single or int16.
Configure Smart Speaker Model Settings and Run the Model in External Mode
Open the AudioSmartSpeakerOnRaspberryPi model, go to MODELING Tab and Click on Model Settings or press Ctrl+E to open the configuration parameters dialog box.
Select a solver that supports code generation. Set Solver to auto (Automatic solver selection) and Solver type to Fixed-step.
set_param(modelName,SolverName="FixedStepAuto")
set_param(modelName,SolverType="Fixed-step")
Select Code Generation and set the System Target File to ert.tlc whose Description is Embedded Coder.
set_param(modelName,SystemTargetFile="ert.tlc")
Set the Language to C, which will automatically set the Language Standard to C99.
set_param(modelName,TargetLang="C")
Set the code replacement library to 'GCC ARM Cortex-A'.
set_param(modelName,CodeReplacementLibrary="GCC ARM Cortex-A")
Set the Maximum stack size to 20000 bytes
set_param(modelName,MaxStackSize="20000")
In Configuration > Hardware Implementation, set the Hardware board to Raspberry Pi and enter your Raspberry Pi credentials in the Board Parameters.
In the same window, set External mode > Communication interface to XCP on TCP/IP.
Check Signal logging in Configuration > Data Import/Export to enable signal monitoring in External Mode.
Go to the Hardware tab and click on Monitor & Tune to run the model in external mode.
Previous Step
Apply Speech Command Recognition Network in Smart Speaker Simulink Model
See Also
Topics
Select a Web Site
Choose a web site to get translated content where available and see local events and offers. Based on your location, we recommend that you select: United States.
You can also select a web site from the following list
Americas
- América Latina (Español)
- Canada (English)
- United States (English)
Europe
- Belgium (English)
- Denmark (English)
- Deutschland (Deutsch)
- España (Español)
- Finland (English)
- France (Français)
- Ireland (English)
- Italia (Italiano)
- Luxembourg (English)
- Netherlands (English)
- Norway (English)
- Österreich (Deutsch)
- Portugal (English)
- Sweden (English)
- Switzerland
- United Kingdom (English)