Visualize Aircraft Takeoff using Unreal Engine 3D Environment
This example shows how to visualize an aircraft and a chase helicopter with Unreal Engine® using two different methods. Initially, the 3D environment is set up using a WRL file that contains VRML objects. Then the scene is recreated using builtin sim3d resources. This example simulates an aircraft takeoff, a chase vehicle and a second camera.
Note: This example is not supported in MATLAB Online.
Create the 3D Environment
Create a world object and populate it with a set of actors. Establish a connection to an update method, updateImpl().
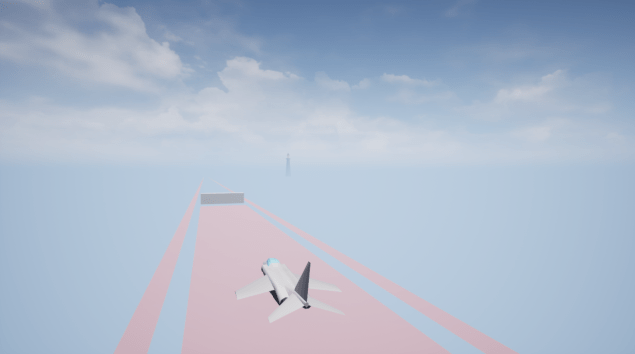
world = sim3d.World('Update',@updateImpl);Use a WRL file to import actors into the world.
world.load('asttkoff.wrl');View World Actors
The virtual reality file just loaded into the world contains various actors. Reference these actors by name when animating them. Display the list of actors in the scene by typing this command.
world.Actors
ans = struct with fields:
    MainCamera1: [1×1 sim3d.sensors.MainCamera]
         Actor4: [1×1 sim3d.Light]
         Actor5: [1×1 sim3d.Light]
         Actor6: [1×1 sim3d.Actor]
         Actor7: [1×1 sim3d.Actor]
        Camera1: [1×1 sim3d.Actor]
          Plane: [1×1 sim3d.Actor]
        Actor10: [1×1 sim3d.Actor]
        Actor11: [1×1 sim3d.Actor]
        Actor12: [1×1 sim3d.Actor]
        Actor13: [1×1 sim3d.Actor]
        Actor14: [1×1 sim3d.Actor]
        Actor15: [1×1 sim3d.Actor]
        Actor16: [1×1 sim3d.Actor]
        Actor17: [1×1 sim3d.Actor]
        Actor18: [1×1 sim3d.Actor]
        Actor19: [1×1 sim3d.Actor]
        Actor20: [1×1 sim3d.Actor]
        Actor21: [1×1 sim3d.Actor]
        Actor22: [1×1 sim3d.Actor]
        Actor23: [1×1 sim3d.Actor]
        Actor24: [1×1 sim3d.Actor]
          Block: [1×1 sim3d.Actor]
        Actor26: [1×1 sim3d.Actor]
        Actor27: [1×1 sim3d.Actor]
        Actor28: [1×1 sim3d.Actor]
       Terminal: [1×1 sim3d.Actor]
        Actor30: [1×1 sim3d.Actor]
        Actor31: [1×1 sim3d.Actor]
        Actor32: [1×1 sim3d.Actor]
        Actor33: [1×1 sim3d.Actor]
     Lighthouse: [1×1 sim3d.Actor]
        Actor35: [1×1 sim3d.Actor]
        Actor36: [1×1 sim3d.Actor]
        Actor37: [1×1 sim3d.Actor]
        Actor38: [1×1 sim3d.Actor]
        Actor39: [1×1 sim3d.Actor]
        Actor40: [1×1 sim3d.Actor]
        Actor41: [1×1 sim3d.Actor]
        Actor42: [1×1 sim3d.Actor]
        Actor43: [1×1 sim3d.Actor]
        Actor44: [1×1 sim3d.Actor]
        Actor45: [1×1 sim3d.Actor]
Create a Viewport
Create a viewport to view the scene. The viewport is a window showing the view of the main camera in the world. You can position the camera during creation or later.
createViewport(world);
world.Viewports.Main.Translation = [0,-20,3];
world.Viewports.Main.Rotation = [0,0,pi/2];
The viewport rotation orients the camera in the +Y direction, aligning with the scene's orientation.
Set Simulation Data for the Plane
This code sets simulation time series data. The file takeoffData.mat contains logged simulated data formatted as a 'StructureWithTime'. Load this data for the plane and reformat it for sim3d use. In the current scene, the runway is parallel to the Y-axis, whereas in takeoffData, the runway is assumed to be parallel to the X-axis. Therefore, swap the X and Y coordinates.
Additionally, takeoffData is a structure with time and signals fields. Reformat this data to a time series for sim3d.
load takeoffData
planeData = [takeoffData.time';takeoffData.signals(1).values(:,2)';takeoffData.signals(1).values(:,1)';takeoffData.signals(1).values(:,3)';...
    takeoffData.signals(2).values(:,1)';-takeoffData.signals(2).values(:,2)';takeoffData.signals(2).values(:,3)'];
planeData = [planeData;repmat(world.Actors.Plane.Scale',1,size(planeData,2))];  % Add scale(3)
world.Actors.Plane.ActorAnimation.AnimationType = sim3d.utils.AnimationTypes.TimeSeriesSource;
world.Actors.Plane.ActorAnimation.TimeSeriesSource = planeData;
world.Actors.Plane.ActorAnimation.AnimationRepeatType = sim3d.utils.AnimationRepeatTypes.Cyclic;
Set the mobility of the actor to movable to enable movement during simulation.
world.Actors.Plane.Mobility = sim3d.utils.MobilityTypes.Movable;
Run Simulation
The run method runs the simulation for the specified timeseries data. The time step and stop time can be specified. Specify the time step and stop time using the final time in the takeoffData file.
SampleTime = 1/50;
StopTime = takeoffData.time(end);
world.run(SampleTime,StopTime);
Add a Chase Helicopter
Add a chase helicopter to the animation. Load the helicopter WRL file to display it.
world.load('chaseHelicopter.wrl');  % Includes an actor named "Lynx"
if ~isfield(world.Actors,'Lynx')
    error("Lynx actor not present in chaseHelicopter.wrl");
end
heli = world.Actors.Lynx;
heli.Mobility = sim3d.utils.MobilityTypes.Movable;
Position the helicopter 15 meters behind the airplane (whose CG is at the origin of the scene actor file). The helicopter is oriented facing +Y in the WRL file, like the plane.
heli.Translation = [0,-15,1.3];
Reposition the main camera so that both the plane and the helicopter are visible.
world.Viewports.Main.Translation = [40,15,2];
world.Viewports.Main.Rotation = [0,0,pi];
Set data properties for the chase helicopter. In this case, the data is in the 'Array6DoF' format. In this example, the data uses the 'Array6DoF' format. Rearrange and place it in the ActorAnimation.TimeSeriesSource property of the actor.
load chaseData.mat chaseData;
heliData = chaseData(:,1:7)';
heliData = [heliData(1,:);heliData(3,:);heliData(2,:);heliData(4,:);heliData(5,:);heliData(6,:);heliData(7,:)];
heliData = [heliData;repmat(world.Actors.Plane.Scale',1,size(heliData,2))];
heli.ActorAnimation.AnimationType = sim3d.utils.AnimationTypes.TimeSeriesSource;
heli.ActorAnimation.TimeSeriesSource = heliData;
heli.ActorAnimation.AnimationRepeatType = sim3d.utils.AnimationRepeatTypes.Cyclic;
Set Up Recording
Enable recording of the main window.
world.AnimationRecording = true;
world.AnimationRecordingInterval = [0,StopTime];
world.AnimationRecordingFileName = 'recordRun1';
Run Simulation
Run and record the animation with the added helicopter.
world.run(SampleTime,StopTime);
Play the Recording
Play the recording of the run. A new window will launch, allowing you to step through the run.
world.load('recordRun1.mat');
world.play();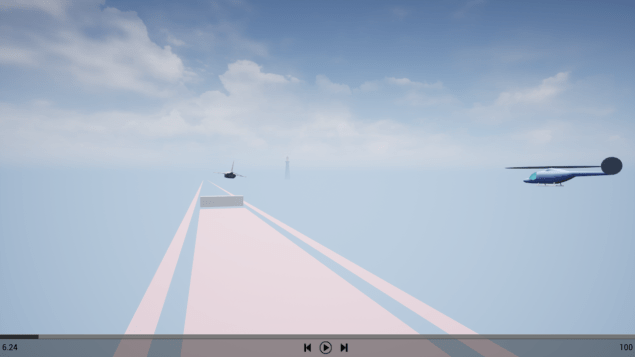
Add Another Camera
To view the simulation from multiple viewpoints, create additional cameras and position them as needed. Use the createViewport function to create the main Simulation 3D window. For additional cameras, select a camera sensor and process its images in the world update method. Place this camera at the end of the runway.
camera2 = sim3d.sensors.IdealCamera("ActorName","Camera2","ImageSize",[768,1024],...
    "HorizontalFieldOfView",60);
camera2.Translation = [0,0,1];
camera2.Rotation = [0,0,pi/2];
world.add(camera2);
Create the updateImpl function at the bottom of this file to operate the camera. Then turn off recording and run the simulation again.
world.AnimationRecording = false;
world.run(SampleTime,StopTime);
Remove Actor
Actors can be removed from a world using the remove function. Remove the "Plane" actor and confirm its removal from the world's list of actors.
world.remove('Plane');Check world's list of actors to confirm.
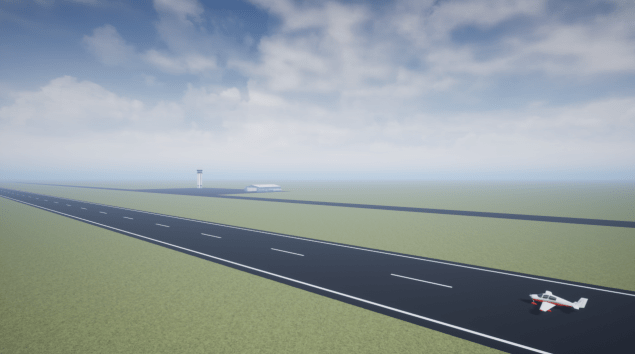
isfield(world.Actors,'Plane')Recreate World with sim3d Features
WRL resource files are not needed to create animations. The aerospace products include various aircraft, rotorcraft, spacecraft, and scenes built for Unreal Engine.
In the second half of this example, rebuild the world using only these resources. Choose the scene at the time of world creation. Clean up the previous world, then recreate it using the Airport scene, and include both output and update methods. Define the outputImpl() and updateImpl() functions in the Helper Functions section.
delete(world);
delete(heli);
delete(camera2);
clear planeData heli heliData world camera2
world = sim3d.World('Map',"/MathWorksAerospaceContent/Maps/Airport",'Output',@outputImpl,'Update',@updateImpl);
Position the main viewport near the middle of the scene and at an angle to the left of the runway for a good view.
createViewport(world);
world.Viewports.Main.Translation = [4500,-75,25];
world.Viewports.Main.Rotation = [0,0,deg2rad(50)];
Add a General Aviation Plane
Add a small, four seat, general aviation aircraft to the world, and place it near the center of the runway.
aircraft = sim3d.vehicle.air.GeneralAviationAircraft('ActorName','GA1','Color',"Red",...
    'Translation',[4500,0,-1.647;zeros(14,3)]);
world.add(aircraft);
This vehicle has 15 movable bones and its origin is 1.646 meters above the ground. When you set translation or rotation, you need values for all bones in three dimensions. Note that in this scene, the Z-axis points downward, and the center of the runway is approximately at [5000,0,-0.01] meters.
You can use the same position and rotation data previously used for the Plane for this aircraft, after making adjustments for the scene and vehicle differences. Instead of storing this data in the ActorAnimation field, use world.UserData.aero. The world.UserData field is not utilized by sim3d, so you can use it as you wish.
This example demonstrates how to use world.UserData struct fields to describe the data set required for each actor.
world.UserData.Nactors = 1;  % total number of actors in UserData
% For each UserData actor, create the following entry
world.UserData.Actor.Name = 'GA1';
world.UserData.Actor.Nbones = 15;  % total number of bones
world.UserData.Actor.Type = 'StructWithTime';
Next, load the takeoff data into the Time and Signals fields of world.UserData.Actor. Translate the position coordinate values to start at the specified aircraft.Translation point, inverting the Z value since the Airport scene assumes Z is positive in the downward direction. The StructWithTime format used here has a separate Signals array element for each bone, and Signals.values has one row per time step and six columns for [X, Y, Z, Roll, Pitch, Yaw].
world.UserData.Actor.Time = takeoffData.time;
world.UserData.Actor.Signals.values = takeoffData.signals(1).values;  % x,y,z
world.UserData.Actor.Signals.values(:,4:6) = takeoffData.signals(2).values;  % roll,pitch,yaw
world.UserData.Actor.Signals.values(:,5) = -world.UserData.Actor.Signals.values(:,5);  % pitch airplane up
nvalues = length(world.UserData.Actor.Time);
for i = 1:nvalues
    xyz = world.UserData.Actor.Signals.values(i,1:3);
    xyz(1) = xyz(1) + aircraft.Translation(1,1);
    xyz(2) = xyz(2) + aircraft.Translation(1,2);
    xyz(3) = -xyz(3) + aircraft.Translation(1,3);
    world.UserData.Actor.Signals.values(i,1:3) = xyz;
end
The propeller bone on the General Aviation aircraft is bone number 2, and it rotates around its Y-axis. Define only the first two signals instead of all 15, since only the propeller is animated in this example. The helper functions below will pad the remaining bones with zeros.
angle = 0.0;
for i = 1:nvalues
    angle = angle + 1;
    world.UserData.Actor.Signals(2).values(i,1:6) = [0,0,0,0,angle,0];
end
clear angle xyz i
Now write the outputImpl function to use this data for moving the aircraft and its propeller.
Run Simulation
Run the simulation to see the GA aircraft takeoff from the Airport runway.
world.run(SampleTime,StopTime);
Add A Light Helicopter
Add a light helicopter to the scene and place it 25 meters behind the fixed wing aircraft. The light helicopter has 6 bones and its origin is at ground level.
ltheli = sim3d.vehicle.air.LightHelicopterRotorcraft('ActorName','Heli1','Color',"Blue",...
    'Translation',[4475,0,-3.01;zeros(5,3)]);
world.add(ltheli);
Create a data set for this helicopter, starting from the aircraft data, so that it chases the aircraft. The rotors are connected to bone numbers 3 and 4. Data for bones beyond 4 is not needed. Use the world.UserData struct as before.
world.UserData.Nactors = world.UserData.Nactors + 1;
j = world.UserData.Nactors;
world.UserData.Actor(j).Name = 'Heli1';  % match world.Actors name
world.UserData.Actor(j).Nbones = 6;
world.UserData.Actor(j).Type = 'StructWithTime';
world.UserData.Actor(j).Time = world.UserData.Actor(1).Time;
world.UserData.Actor(j).Signals = world.UserData.Actor(1).Signals;
for i = 1:nvalues
    world.UserData.Actor(j).Signals(1).values(i,1) = ...
        world.UserData.Actor(1).Signals(1).values(i,1) - 25;  % place behind aircraft
    world.UserData.Actor(j).Signals(1).values(i,3) = ...
        world.UserData.Actor(1).Signals(1).values(i,3) + 1.646 - 3;  % start 3 meters above ground
    world.UserData.Actor(j).Signals(1).values(i,5) = ...
        -world.UserData.Actor(1).Signals(1).values(i,5);  % pitch helicopter down
end
world.UserData.Actor(j).Signals(2).values = zeros(nvalues,6);
world.UserData.Actor(j).Signals(3).values = zeros(nvalues,6);
world.UserData.Actor(j).Signals(4).values = zeros(nvalues,6);
% Spin the main rotor at 394 RPM and the tail rotor at twice that
dr = 41.26*SampleTime;
for i = 2:nvalues
    world.UserData.Actor(j).Signals(3).values(i,6) = ...
        world.UserData.Actor(j).Signals(3).values(i-1,6) - dr;  % main rotor
    world.UserData.Actor(j).Signals(4).values(i,6) = ...
        world.UserData.Actor(j).Signals(4).values(i-1,6) - 2*dr;  % tail rotor
end
clear i dr
To view both vehicles in the scene, adjust the main camera position.
world.Viewports.Main.Translation = [4467,-12,3];
world.Viewports.Main.Rotation = [0,0,deg2rad(35)];
Run with Simulation Pacing
Run the simulation with a one-to-one pacing rate for improved realism:
world.EnablePacing = true;
world.PacingRate = 1.0;
world.run(SampleTime,StopTime);
world.wait();

To run the simulation slower than real time, use a pacing rate less than one. The world.wait() command is necessary whenever you run the simulation with pacing or when you pause and resume.
Run with Pause and Resume
You can pause the simulation at a specific time and then resume it. The total run time is 15 seconds. To pause the simulation after 5 seconds, type these two commands.
world.run(SampleTime,StopTime,5);
world.wait();
Now, resume and run it for an additional 5 seconds to reach the 10-second mark.
world.resume(10);
world.wait();
Finally, allow it to run to completion.
world.resume(StopTime);
world.wait();
Close and Delete World
When using pause and resume, the simulation does not end until you issue the world.close() command. To clean up, delete all the created objects before clearing their variables.
world.close();
delete(aircraft);
delete(ltheli);
delete(world);
clear world aircraft ltheli StopTime SampleTime j nvalues
clear takeoffData chaseData
Helper Functions
You can use an update function to read data at each simulation step. The updateImpl function reads image data from Camera1 in the Unreal Engine using the read function of the sim3d.sensors.IdealCamera object.
function updateImpl(world)
% Use this function to direct sensor data or show additional camera images.

% Show Camera2 feed
if isfield(world.Actors,'Camera2')
    % Only update every 2 seconds to save compute
    if mod(world.SimulationTime,2) < 1e-5
        sceneImage = world.Actors.Camera2.read();
        image(sceneImage);
        drawnow;
    end
end
end
This function returns the state of the aircraft (its position and rotation) at any time and provides an array of data and uses an interpolation function to get the values.
function [trans,rotat] = getUserDataStructState(time,actor)
%GETUSERDATASTRUCTSTATE returns the interpolated translation and rotation
%from the world.UserData.Actor struct for the given time.
% The 'StructWithTime' UserData format is required.
%
% Input Parameters:
%   time   = interpolation time (seconds)
%   actor  = world.actor with trajectory data in its UserData
%
% Output Parameters:
%   trans = mbones-by-3 double of [X,Y,Z] (meters)
%   rotat = mbones-by-3 double of [phi,theta,psi] (radians)

if ~strcmp(actor.Type,'StructWithTime')
    trans = 0.0;
    rotat = 0.0;
    return;
end

% Interpolate data with one or more bones
allsignals = cat(3,actor.Signals(:).values);  % N-by-6-by-M: N times, M bones
if isscalar(actor.Signals)
    xyz = interp1(actor.Time,allsignals(:,1:3,:),time,'linear','extrap');  % 1-by-3
    ptp = interp1(actor.Time,allsignals(:,4:6,:),time,'linear','extrap');  % 1-by-3
else
    xyz = squeeze(interp1(actor.Time,allsignals(:,1:3,:),time,'linear','extrap'))';  % M-by-3
    ptp = squeeze(interp1(actor.Time,allsignals(:,4:6,:),time,'linear','extrap'))';  % M-by-3
end
[nrows,ncols] = size(xyz);

% Validation checks
[nr,nc] = size(ptp);
if (ncols ~= 3  || nc ~= 3)
    error('Error: Data in getUserDataStructState does not have 3 columns!');
end
if nr ~= nrows
    error('Error: Data in getUserDataStructState is inconsistent!');
end

% Return M-by-3 data
mbones = actor.Nbones;  % Total number of skeletal bones
if nrows >= mbones
    trans = xyz(1:mbones,:);
    rotat = ptp(1:mbones,:);
else  % Pad missing rows with zeros
    trans = [xyz(1:nrows,:);zeros(mbones-nrows,3)];
    rotat = [ptp(1:nrows,:);zeros(mbones-nrows,3)];
end
end
The world output function, outputImpl, sends data about the actor(s) to Unreal Engine at every time step. This function controls the actor by varying the actor properties.
function outputImpl(world)
% Sets the actor outputs

% Loop over all actors in UserData
for i = 1:world.UserData.Nactors
    name = world.UserData.Actor(i).Name;
    if strcmp(world.UserData.Actor(i).Type,'StructWithTime')
        [trans,rotat] = getUserDataStructState(world.SimulationTime, ...
            world.UserData.Actor(i));
        world.Actors.(name).Translation = trans;
        world.Actors.(name).Rotation = rotat;
    end
end
end