Tune PID Controller Parameters Using Android Application for LEGO EV3 Object Tracking System
This example shows how to create an Android® application to tune the PID controller parameters of an object tracking system using an Android device. This object tracking system has been built using the LEGO® MINDSTORMS® EV3 hardware and the Pixy2 vision sensor.
Introduction
Android devices, such as phones and tablets, are used extensively in robotic applications for controlling and provisioning parameters of robotic devices.
Follow the workflow laid down in this example after completing tasks 1 to 4 in the LEGO EV3 Object Tracking System Using Pixy2 Vision Sensor and PID Controller example.
In this example, you deploy an application on the Android device with a graphical user interface (GUI) to fine-tune the PID controller parameters used for object tracking. The GUI dashboard has interactive knobs and sliders that you can use to fine tune these parameters. Use the network connection set up between the Android device and the EV3 robot to channel this change in the parameters. You can change the position of the knobs and sliders to smoothly track the trained object.
In this example, you will perform the following tasks:
Set up a network connection between the Android device and the EV3 robot.
Configure and run the Simulink® model for the Android device to send and receive the TCP/IP packets from the EV3 robot to tune the PID controller parameters.
Dependency
Implementing the LEGO EV3 object tracking system using the PID controller requires successful deployment of these Simulink models on their respective hardware.
        Simulink Model Name                |    Deployed Hardware    |                           Purpose
----------------------------------------------------------------------------------------------------------------------------------------------------
1. ev3_android_pixy2_tracking_pidcontrol   |   LEGO MINDSTORMS EV3   |   Implement and deploy the object tracking system on EV3 robot
2. androidEv3PIDTuner                      |        Android          |   Tune PID controller parameters through the Android application dashboard
Prerequisites
We recommended that you complete the Connect Android Device to LEGO MINDSTORMS EV3 example.
Required Hardware
Android device such as phone or tablet
Micro USB cable
Task 1: Set Up EV3 Robot
Complete Tasks 1 to 4 from the LEGO EV3 Object Tracking System Using Pixy2 Vision Sensor and PID Controller example.
Task 2: Configure Model and Calibrate Parameters
This support package provides a preconfigured model that you can use to tune the PID controller parameters for the object tracking robot.
1. Open the androidEv3PIDTuner Simulink model.
2. Connect the Android device to the host computer using the micro USB cable.
3. On the Modeling tab of the toolstrip, select Model Settings.
4. In the Configuration Parameters dialog box, select Hardware Implementation. Verify that the Hardware board parameter is set to Android device.
5. From the Groups list under Target hardware resources, select Device options.
6. From the Device list, select your Android device. If your device is not listed, click Refresh.
Note: If your device is not listed even after clicking Refresh, ensure that you have enabled the USB debugging option on your device. To enable USB debugging, enter androidhwsetup in the MATLAB® Command prompt and follow instructions on the screen.
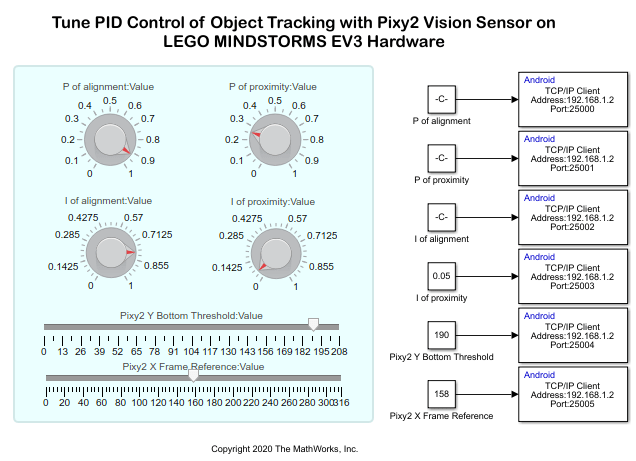
The Android device and the EV3 robot communicate with each other over the TCP/IP network, where the Android device acts as a client (the one that sends data) and the EV3 robot acts as a server (the one that receives data). Any changes you make in the PID controller parameters through the knobs and sliders in the application dashboard are reflected as a subsequent change in the motor power of the EV3 robot.
7. Configure all the TCP/IP Send blocks consistently for the PID controller parameters.
Set the Connection mode parameter to its default value
Client.Set the Remote IP address to match the IP address configured in the LEGO EV3 robot.
Set the Remote IP port to match the port value of the LEGO EV3 robot. The default starting port number is
25000.
Task 3: Run Simulink Model on Android Device
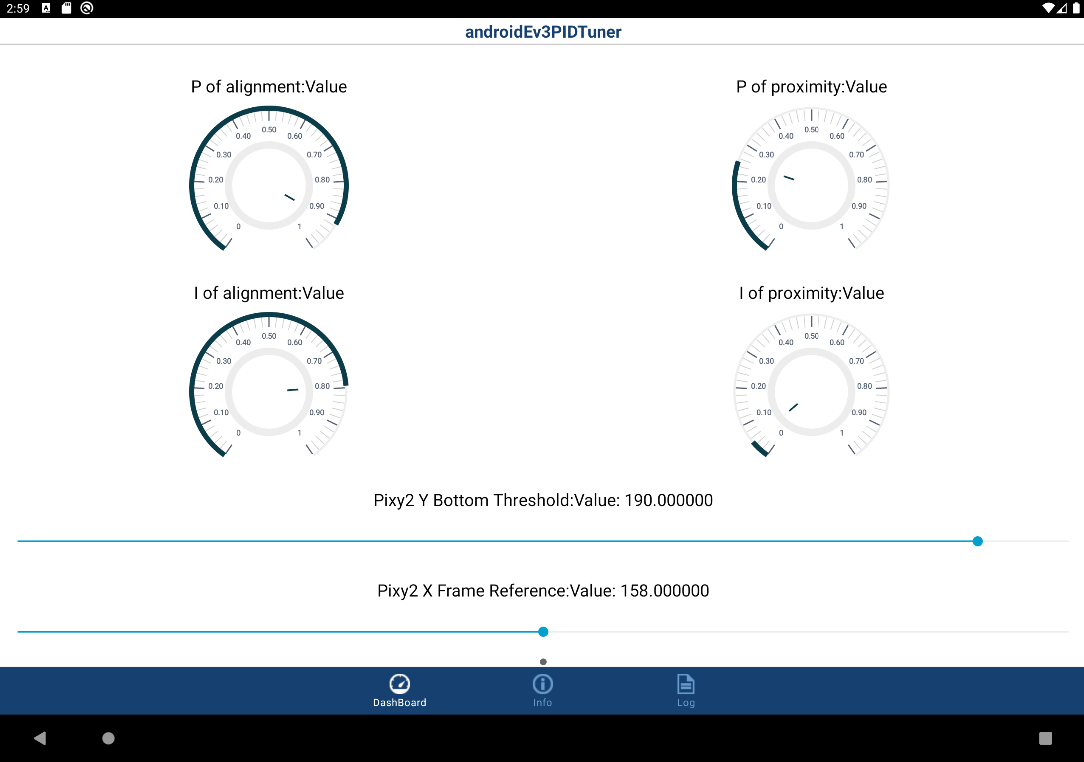
1. On the Hardware tab of the Simulink model, in the Mode section, select Run on board and then click Build, Deploy & Start to build and deploy the model on the Android device. The androidEv3PIDTuner application launches automatically.
This interface uses knobs and sliders to fine-tune the PID controller parameters.
For more information on the PID controller parameters, see Task 3 of the LEGO EV3 Object Tracking System Using Pixy2 Vision Sensor and PID Controller.
2. Change the position of the knobs and sliders and observe the corresponding changes in the EV3 motor to improve the efficiency of the object tracking system.
androidEv3PIDTuner Application
The androidEv3PIDTuner application has these three sections.
Dashboard: The position of the knobs and sliders corresponding to the various PID controller parameters are preconfigured to a default value.
Info: This section provides details such as IP address of the connected LEGO EV3 robot, the device serial number, and the name of the model deployed on the Android device.
Log: This section provides the detailed TCP log description of the application.
Related Links
LEGO EV3 Object Tracking System Using Pixy2 Vision Sensor and PID Controller
Select a Web Site
Choose a web site to get translated content where available and see local events and offers. Based on your location, we recommend that you select: United States.
You can also select a web site from the following list
Americas
- América Latina (Español)
- Canada (English)
- United States (English)
Europe
- Belgium (English)
- Denmark (English)
- Deutschland (Deutsch)
- España (Español)
- Finland (English)
- France (Français)
- Ireland (English)
- Italia (Italiano)
- Luxembourg (English)
- Netherlands (English)
- Norway (English)
- Österreich (Deutsch)
- Portugal (English)
- Sweden (English)
- Switzerland
- United Kingdom (English)