Test Models in Real Time
You can test your system in environments, such as Simulink® Real-Time™, that resemble your application. You begin with model simulation on a development computer, then use software-in-the-loop (SIL) and processor-in-the-loop (PIL) simulations. Real-time testing executes an application on a standalone target computer that can connect to a physical system. Real-time testing can include effects of timing, signal interfaces, system response, and production hardware.
Note
The information in this topic does not apply to testing on third-party test benches using the ASAM XIL standard. For information and examples about performing tests using ASAM XIL, see Install and Set Up the Simulink Test Support Package for ASAM XIL Standard and Create and Run Tests Using the ASAM XIL Standard.
Real-time testing includes:
Rapid prototyping, which tests a system on a standalone target connected to plant hardware. You verify the real-time tests against requirements and model results. Using rapid prototyping results, you can change your model and update your requirements, after which you retest on the standalone target.
Hardware-in-the-loop (HIL) using Simulink Real-Time, which tests a system that has passed several stages of verification, typically SIL and PIL simulations. You can use Simulink Test™ on a Windows® or Linux® computer to run real-time test cases using Simulink Real-Time.
Overall Workflow
This example workflow describes the major steps of creating and executing a real-time test:
Create test cases that verify the model against requirements. Run the model simulation tests and save the baseline data.
Set up the real-time target computer.
Create test harnesses for real-time testing, or reuse model simulation test harnesses. In Test Sequence or Test Assessment blocks,
verifystatements assess the real-time execution.In the Test Manager, create real-time test cases.
For the real-time test cases, configure target settings, inputs, callbacks, and iterations. Add baseline or equivalence criteria.
Execute the real-time tests.
Analyze the results in the Test Manager. Report the results.
Real-Time Testing Considerations
assertstatements in a Test Sequence block or Stateflow® chart are not supported for code generation and are ignored, so no error occurs if the assert condition fails during a Simulink Real-Time simulation. However,verifystatements are supported for Simulink Real-Time code generation and automatically log results for a test case in the Test Manager. The same logging behavior is available when using a Simulink Assert block.Baseline or equivalence comparisons can fail because of missing data or time-shifted data from the real-time target computer. When investigating real-time test failures, look for time shifts or missing data points.
You cannot override the real-time execution sample time for applications built from models containing a Test Sequence block. The code generated for the Test Sequence block contains a hard-coded sample time. Overriding the target computer sample time can produce unexpected results.
You cannot log states or, on some platforms, output ports.
Your target computer must have a file system to use
verifystatements and test case logging.Your target computer must be running Simulink Real-Time.
You cannot use variant configurations.
Complete Basic Model Testing
Real-time testing often takes longer than comparative model testing, especially if you execute a suite of real-time tests that cover several scenarios. Before executing real-time tests, complete requirements-based testing using desktop simulation. Using the desktop simulation results:
Debug your model or make design changes that meet requirements.
Debug your test sequence. Use the debugging features in the Test Sequence Editor. See Debug a Test Sequence.
Update your requirements and add corresponding test cases.
Set up the Target Computer
Real-time testing requires a target computer or external hardware test bench. Simulink Test supports target computers running Simulink Real-Time. For more information, see:
Target Computer Settings (Simulink Real-Time)
Troubleshooting in Simulink Real-Time (Simulink Real-Time)
Configure the Model or Test Harness
Real-time applications require specific configuration parameters and signal properties.
Code Generation
A real-time test case requires a real-time system target file. In the model or harness configuration parameters, on the Apps tab, under Code Generation, click Simulink Coder. In the C Code tab, verify that the system target file (STF) is for a Simulink Real-Time model.
If the button in the Output section is Custom Target, click that button and verify that the Custom target is an STF for a Simulink Real-Time model. If it isn't, select Select system target file and select the STF to generate system target code.
If your model requires a different STF, you can set the parameter using a test
case or test suite callback. After the real-time test executes, set the parameter to
its original setting with a cleanup callback. For example, this callback opens the
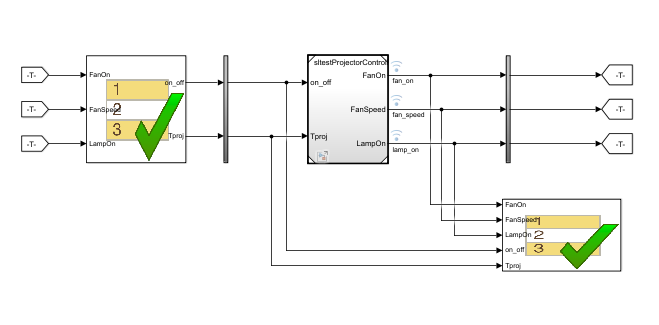
sltestProjectorController model and sets the STF parameter to
speedgoat.tlc.
openExample('sltestProjectorController');
set_param('sltestProjectorController',...
   'SystemTargetFile','speedgoat.tlc');
Data Import/Export Format
Models must use a data format other than dataset. To
set the data format:
Open the configuration parameters.
Select the Data Import/Export pane.
Select the Format.
Log Signals from Real-Time Execution
To configure your signals of interest for real-time testing:
Enable signal logging in the Configuration Parameters, in the Data Import/Export pane.
Name each signal of interest using the signal properties. Unnamed signals can be assigned a default name which does not match the name of the baseline or equivalence signal. In this example test harness, the logged signals have explicit names.
Add Test Cases for Real-Time Testing
Use the Test Manager to create real-time test cases.
In the Simulink toolstrip, on the Apps tab under Model Verification, Validation, and Test, select Simulink Test.
Click Simulink Test Manager.
In the Test Manager, select New > Test Case > Real-Time Test.
Test Type
You can select a baseline, equivalence, or simulation real-time test. For
simulation test types, verify statements serve as pass/fail
criteria in the test results. For equivalence and baseline test types, the
equivalence or baseline criteria also serve as pass/fail criteria.
Baseline — Compares the signal data returned from the target computer to the baseline in the test case. To compare a real-time execution result to a model simulation result, add the model baseline result to the real-time test case and apply optional tolerances to the signals.
Equivalence — Compares signal data from a simulation and a real-time test, or two real-time tests. To run a real-time test on the target computer, then compare results to a model simulation:
Select Simulation 1 on target.
Clear Simulation 2 on target.
The test case displays two simulation sections, Simulation 1 and Simulation 2.
Comparing two real-time tests is similar, except that you select both simulations on target. In the Equivalence Criteria section, you can capture logged signals from the simulation and apply tolerances for pass/fail analysis.
Simulation: Assesses the test result using only
verifystatements and real-time execution. If noverifystatements fail, and the real-time test executes, the test case passes.
Load Application From
Using this option, specify how you want to load the real-time application. The real-time application is built from your model or test harness. You can load the application from:
Model — Choose
Modelif you are running the real-time test for the first time, or your model changed since the last real-time execution.Modeltypically takes the longest because it includes model build and download.Modelloads the application from the model, builds the real-time application, downloads it to the target computer, and executes it on the target computer.Target Application — Choose
Target Applicationto send the target application from the host to a target computer, and execute the application.Target Applicationcan be useful if you want to load an already-built application on multiple targets.Target Computer — This option executes an application that is already loaded on the real-time target computer. You can update the parameters in the test case and execute using
Target
                            Computer
.
This table summarizes which steps and callbacks execute for each option.
| Test Case Execution Step (first to last) | Load Application From | ||
|---|---|---|---|
| Model | Target Application | Target Computer | |
| Executes pre-load callback | Yes | Yes | Yes |
| Loads Simulink model | Yes | No | No |
| Executes post-load callback | Yes | No | No |
| Sets Signal Editor scenario | Yes | No | No |
| Builds real-time application from model | Yes | No | No |
| Downloads real-time application to target computer | Yes | Yes | No |
| Sets runtime parameters | Yes | Yes | Yes |
| Runs Test Sequence scenarios | Yes | No | No |
| Executes pre-start real-time callback | Yes | Yes | Yes |
| Executes real-time application | Yes | Yes | Yes |
| Executes cleanup callback | Yes | Yes | Yes |
Model
Select the model from which to generate the real-time application.
Test Harness
If you use a test harness to generate the real-time application, select the test harness.
Simulation Settings Overrides
For real-time tests, you can override the simulation stop time, which can be
useful in debugging a real-time test failure. Consider a 60-second test that returns
a verify statement failure at 15 seconds due to a bug in the
model. After debugging your model, you execute the real-time test to verify the fix.
You can override the stop time to terminate the execution at 20 seconds, which
reduces the time it takes to verify the fix.
Callbacks
Real-time tests offer a Pre-start real-time application callback which executes commands just before the application executes on the target computer. Real-time test callbacks execute in a sequence along with the model load, build, download, and execute steps. Callbacks and step execution depends on how the test case loads the application.
| Sequence | Load application from: Model | Load application from: Target application | Load application from: Target computer |
|---|---|---|---|
| Executes first | Preload callback | Preload callback | Preload callback |
Post-load callback | — | — | |
Pre-start real-time callback | Pre-start real-time callback | Pre-start real-time callback | |
| Executes last | Cleanup callback | Cleanup callback | Cleanup callback |
Iterations
You can execute iterations in real-time tests. Iterations are convenient for executing real-time tests that sweep through parameter values or Signal Editor scenarios. Results appear grouped by iteration. For more information on setting up iterations, see Test Iterations. You can create:
Tabled iterations from a parameter set — Define several parameter sets in the Parameter Overrides section of the test case. Under Iterations > Table Iterations, click Auto Generate and select Parameter Set.
Tabled iterations from Signal Editor scenarios — If your model or test harness uses a Signal Editor input, below the IterationsTable Iterations table, click Auto Generate and select Signal Editor Scenario. If you use a Signal Editor scenario, load the application from the model.
Tabled iterations from Test Sequence scenarios — If your test harness uses Test Sequence block scenarios, you can create an iteration for each scenario in the Test Manager. Below the Iterations table, click Auto Generate and select Test Sequence Scenario. If you use Test Sequence scenarios, load the application from the model.
Scripted iterations — Use scripts to iterate using model variables or parameters. For example, assume you are testing an oscillator system and use a Test Sequence block to create a square wave test signal using the parameter
frequency.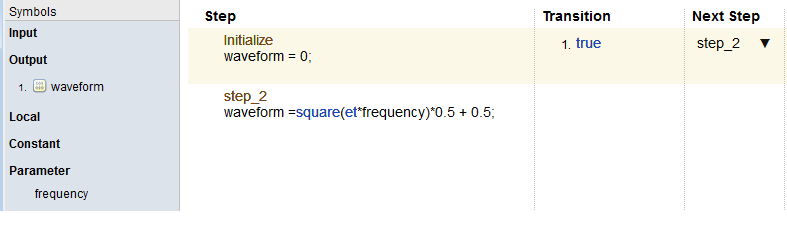
In the test file, you can use real-time test scripted iterations to cover a frequency sweep from 5 Hz to 35 Hz. The script iterates the value of
frequencyin the Test Sequence block.%% Iterate over frequencies to determine best oscillator settings % Create parameter sets freq = 5.0:1.0:35.0; for i_iter = 1:length(freq) % Create iteration object testItr = sltestiteration(); % Set parameters setVariable(testItr,'Name','frequency','Source',... 'Test Sequence','Value',freq(i_iter)); % Register iteration addIteration(sltest_testCase, testItr); end
Assess Real-Time Execution Using verify Statements
In addition to baseline and equivalence signal comparisons, you can assess real-time
test execution using verify statements. A verify
statement assesses a logical expression and returns results to the Test Manager. Use
verify inside a Test Sequence or Test
Assessment block or, if you have a Stateflow license, in a Stateflow chart. See Verify Model Simulation by Using When Decomposition.

See Also
Related Topics
- Use Simulink Real-Time UI to Create and Execute a Real-Time Application (Simulink Real-Time)
You can also select a web site from the following list
Americas
- América Latina (Español)
- Canada (English)
- United States (English)
Europe
- Belgium (English)
- Denmark (English)
- Deutschland (Deutsch)
- España (Español)
- Finland (English)
- France (Français)
- Ireland (English)
- Italia (Italiano)
- Luxembourg (English)
- Netherlands (English)
- Norway (English)
- Österreich (Deutsch)
- Portugal (English)
- Sweden (English)
- Switzerland
- United Kingdom (English)
Asia Pacific
- Australia (English)
- India (English)
- New Zealand (English)
- 中国
- 日本Japanese (日本語)
- 한국Korean (한국어)