Resolve Conflicts in Requirements Using Three-Way Merge
This example explains how you can resolve the conflicts that occur when you try to make the changes on your local Git™ branch.
Download Supporting Files
Open the example to download the supporting files. The repository has a requirement set file crs_req_func_specification.slreqx. To create conflicts in the requirements set file using the local Git environment, run the script create_conflict.m. To manually make the changes that cause conflicts, see Make Changes and Merge Branches in Git.
Once you have run the script, the requirements file crs_req_func_specification.slreqx looks as in this image.

Open Three-Way Merge Tool
To investigate and resolve conflicts using the Three-Way Merge tool, in the Current Folder browser, right-click the requirement set file with conflicts and select Source Control > View Conflicts.

Resolve Conflicts in the Requirements
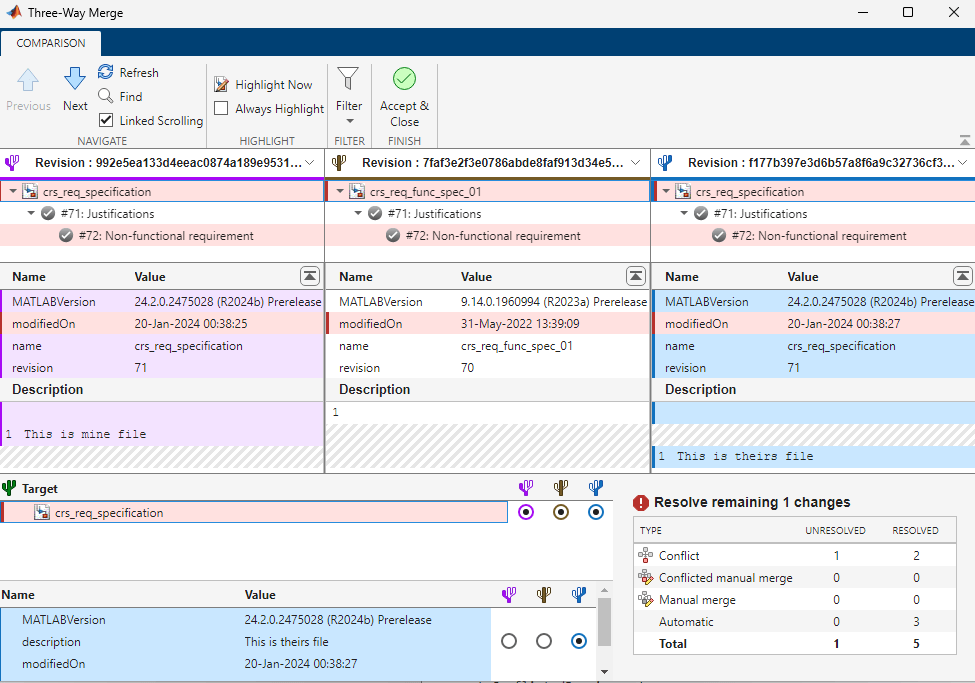
The Three-Way Merge tool opens three panes at the top namely, Mine pane ![]() , Theirs pane
, Theirs pane ![]() that displays the changes against the common base version
that displays the changes against the common base version ![]() (Base pane). The tool automatically resolves differences when possible and opens a Target pane
(Base pane). The tool automatically resolves differences when possible and opens a Target pane ![]() . The Target pane contains a copy of the changes you made and automatic merges.
. The Target pane contains a copy of the changes you made and automatic merges.
The summary table in the bottom right corner shows that the merge tool automatically resolved non-conflicting differences. The table also shows that you must resolve the two remaining changes. For more information, see Resolve Conflicts in Project Using Simulink Three-Way Merge (Simulink).
Review the automerge choices, edit the requirements if desired by using Highlight Now button in the toolstrip and decide how to resolve any remaining conflicts. The conflicts in the Description field resolve automatically.
Suppose you want to restore the value in the Base file. In the Target pane, select the option button in the Base column. It will resolve the conflicts automatically for the description field.

Discard the changes by closing the Three-Way Merge window. Examine the summary table at bottom right. The table now shows that you resolved all the items that require attention. Click Accept & Close to accept the automatic resolve conflicts.
