Managing Requirements for Fault-Tolerant Fuel Control System (Microsoft Office)
Requirements Management Interface (RMI) provides tools for creating and reviewing links between Simulink® objects and requirements documents. This example illustrates linking model objects to Microsoft® Office Documents, navigation of these links, generating requirements report and maintaining consistency of links. See also Working with IBM DOORS Requirements example for features specific to linking with requirements stored in IBM® DOORS®.
The included example model is linked to documents in Microsoft Office format. If only an earlier version of Microsoft Office is available to you, jump to Updating all links when documents are moved or renamed for an example of how to adjust the example model to work with included earlier versions of documents. Direct links to Microsoft Office documents are only supported on Windows® platforms.
Open Example Model
Requirements management features are demonstrated using an example model of a fault-tolerant fuel control system. You can open this model by evaluating the following code.
open_system('slvnvdemo_fuelsys_officereq');Set Up Requirements Manager to Work with Links
In the Apps tab, open Requirements Manager.
In the Requirements tab, ensure Layout > Requirements Browser is selected.
In the Requirements Browser, in the View drop-down menu, select
Links.
In this example, you will work exclusively in the Requirements tab and any references to toolstrip buttons are in this tab.

Viewing Existing Requirements
This example starts with the model that only has a few requirements links. In the Requirements tab, click Highlight Links to highlight blocks with requirements links or evaluate the following code.
rmi('highlightModel', 'slvnvdemo_fuelsys_officereq');
Orange highlighting corresponds to objects with linked requirements. Empty-fill highlighting is for subsystems whose children have links to requirements. Double-click the fuel rate controller block to open the subsystem and review child objects with requirements, or evaluate the following.
open_system('slvnvdemo_fuelsys_officereq/fuel rate controller');Navigate to Document
Right-click the Airflow calculation block in fuel rate controller subsystem and select Requirements > Mass airflow estimation in the context menu.
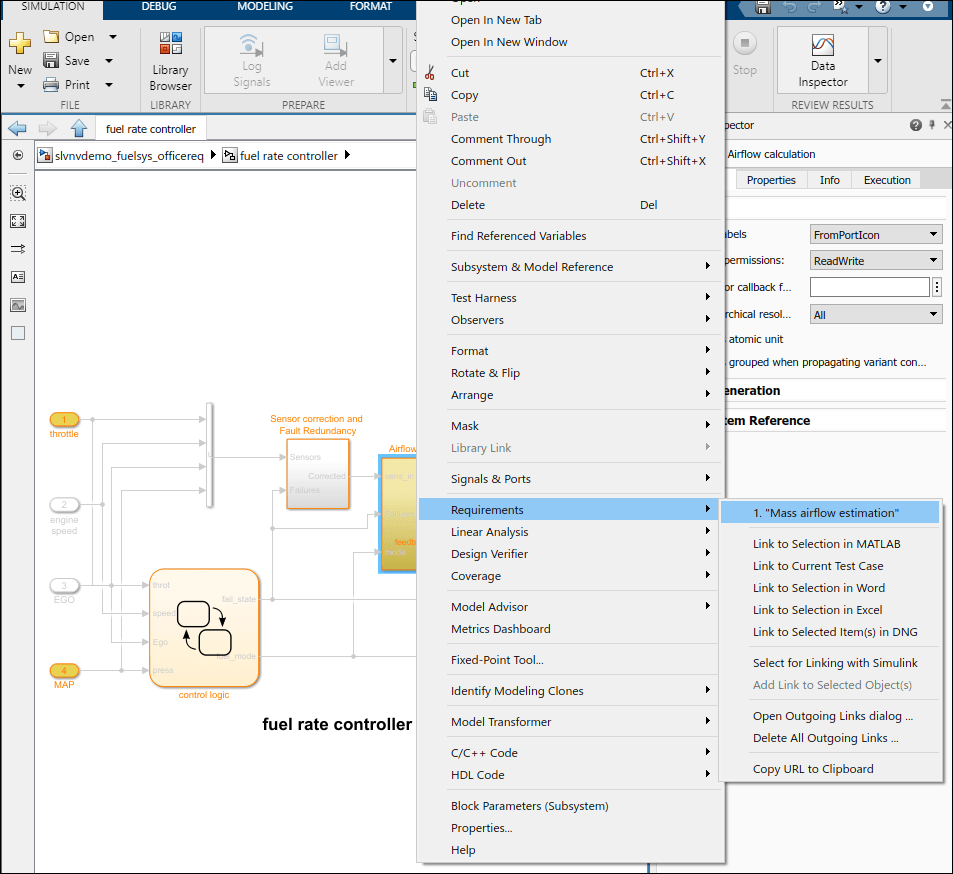
This opens the linked document and selects the target content. You can also evaluate the following code:
rmidemo_callback('view', ...
'slvnvdemo_fuelsys_officereq/fuel rate controller/Airflow calculation',1)
Requirements Links in Stateflow Charts
Double-click the control logic chart block in the fuel rate controller subsystem to open the chart. If you can't find it, evaluate the following code.
rmidemo_callback('locate','slvnvdemo_fuelsys_officereq/fuel rate controller/control logic');
States and transitions linked to requirements are highlighted. Right-click the Rich Mixture state, select Requirements and follow the link at the top to view related documentation. Alternatively, evaluate the following code:
rmidemo_callback('view', ...
'slvnvdemo_fuelsys_officereq/fuel rate controller/control logic:26',1)
Navigate from Requirements Document to Model Objects
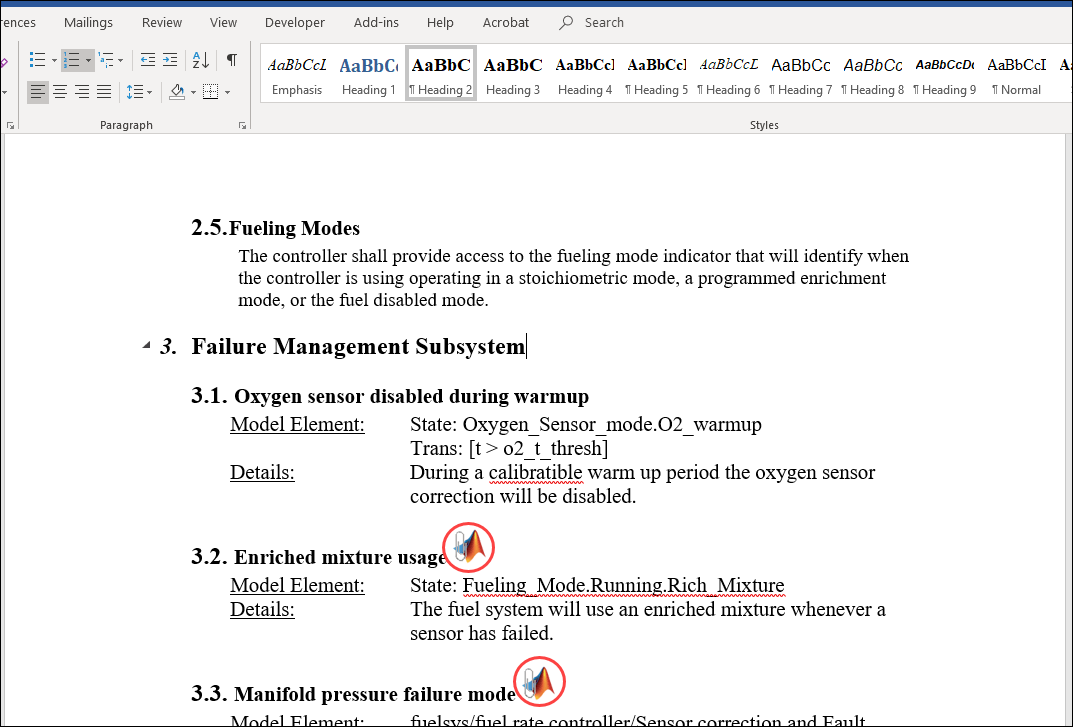
In the slvnvdemo_FuelSys_DesignDescription.docx from the previous step, find section 3.3 Manifold pressure failure mode in the document and double-click the Simulink icon at the end of subheader. This displays a relevant Simulink subsystem diagram with the target object highlighted. Close all model windows and repeat navigation from the document.
Diagrams or charts are opened as necessary as long as model file can be located.
Creating New Links
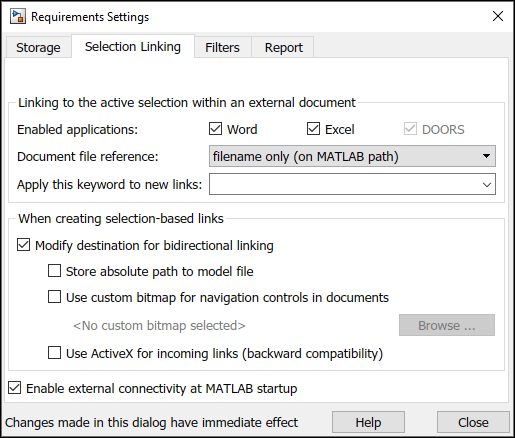
To configure your settings for creating bidirectional links, do the following:
In the Simulink model, in the Requirements tab, select Link Settings > Linking Options.
In the dialog box that appears, make sure that Modify destination for bidirectional linking is checked.
Now create new links similar to the ones you've just navigated. Note: Microsoft Word will not allow you to create the link when the document is ReadOnly. For the next step of this example, consider saving your own local copy of the document and using it instead of the installed document.
In the
slvnvdemo_FuelSys_DesignDescription.docxfind section 2.2 Determination of pumping efficiency.Select the entire header with a mouse.
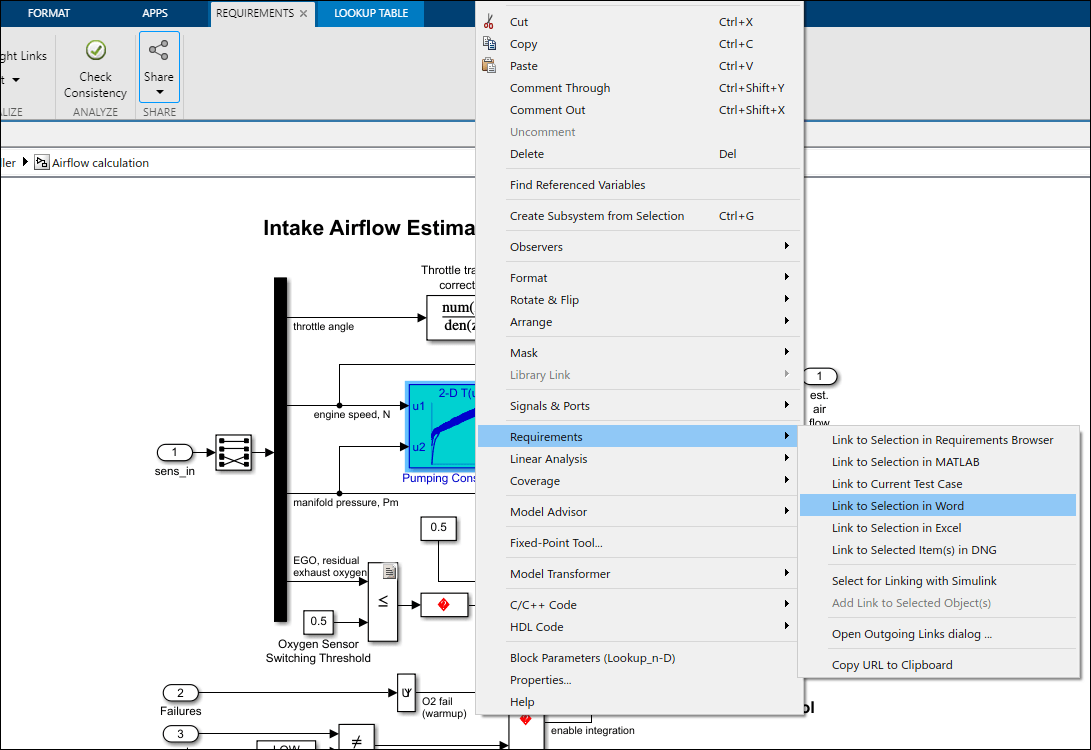
Right-click the
Pumping Constantblock in theAirflow calculationsubsystem. If you can't find it, evaluate the following:
rmidemo_callback('locate',['slvnvdemo_fuelsys_officereq/fuel rate controller/' ...
    'Airflow calculation/Pumping Constant']);
Select Requirements > Link to Selection in Word to create a link.
Right-click Pumping Constant block again. You should now see the newly created link at the top of the context menu. Click it to navigate to the target in section 2.2 of slvnvdemo_FuelSys_DesignDescription.docx.
Generating Requirements Report
In the Requirements tab, click Share > Generate Model Traceability Report to automatically generate a report on all requirements links in the model, or evaluate the following code.
rmidemo_callback('report','slvnvdemo_fuelsys_officereq')
The default report is generated according to the template that is included with the product.
The Report Generator interface provides total control over the content of generated reports, including the creation of entirely new templates. It can be accessed by evaluating the following: setedit('requirements')
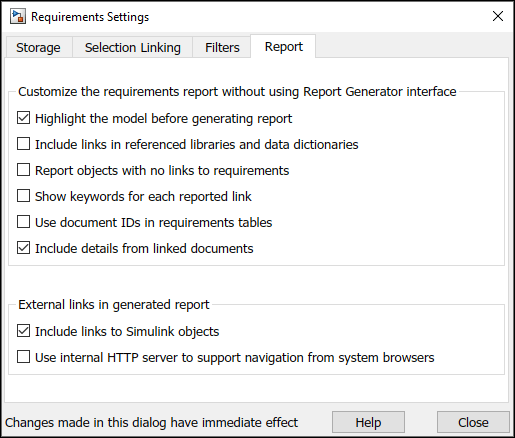
A subset of options is also accessed in the Requirements tab, under Share > Report Options. For example, you may want to disable Highlight the model before generating report checkbox if the resulting report will be printed in black-and-white or viewed via projector, or you may want to include lists of objects that have no links to requirements.
Requirements Consistency Checking
Use Model Advisor to automatically detect and fix inconsistencies in requirements links data. Click Check Consistency in the Requirements tab to open Model Advisor with only the RMI check points activated. The links are checked for missing documents, unmatched locations in documents, unmatched labels for selection-based links, and inconsistent path information. You can also evaluate the following to open Model Advisor:
rmidemo_callback('check','slvnvdemo_fuelsys_officereq')
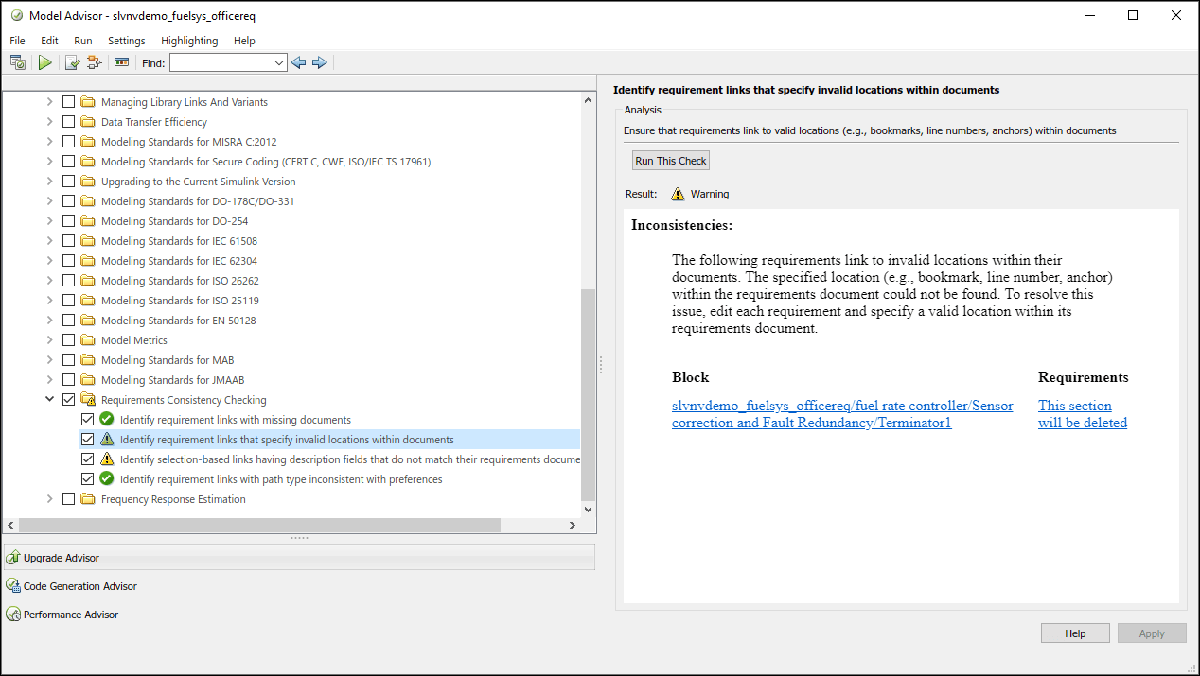
Click the Run Selected Checks button to verify the consistency of links in your model. RMI will automatically open linked documents and check for consistency of stored data. When done, click individual check items to view the results in the right-side panel. In this example, one of the links points to invalid location in a document:

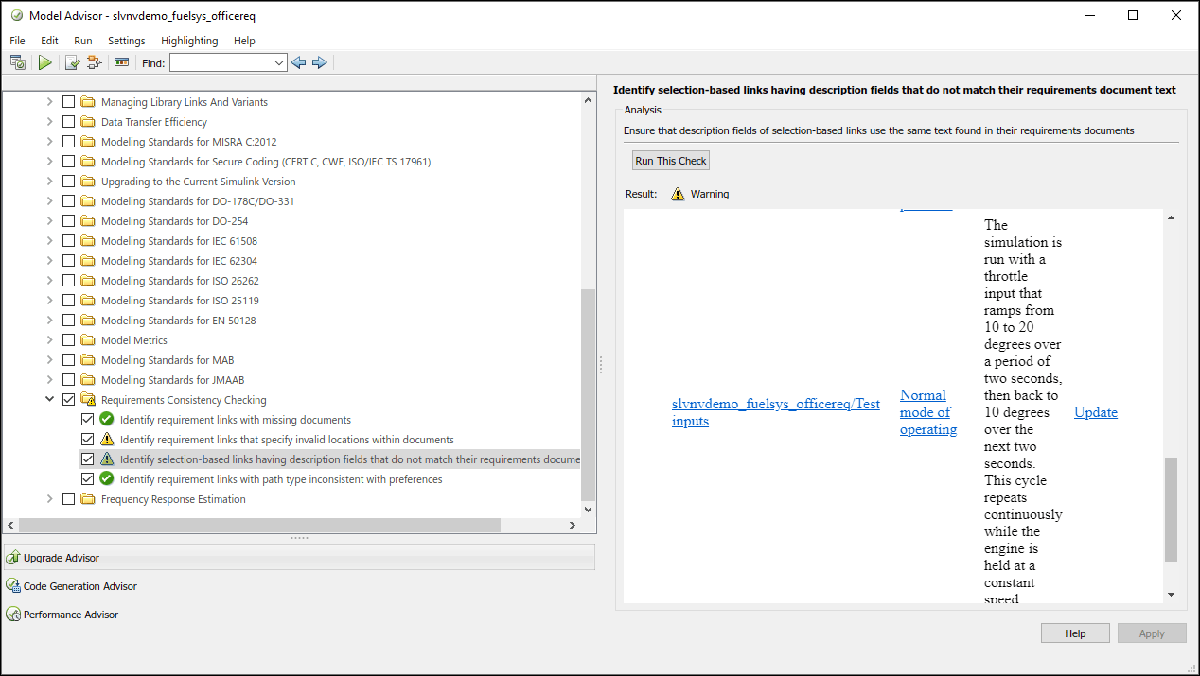
Another link has a label that does not match the original selection when the link was created:

Click Fix or Update in Model Advisor report to automatically resolve reported inconsistencies. Rerun the checks to ensure reported problem is resolved.
Filtering Requirements on User Tag Property
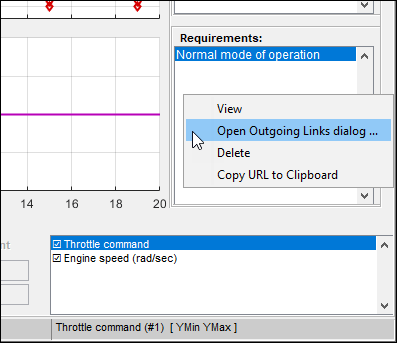
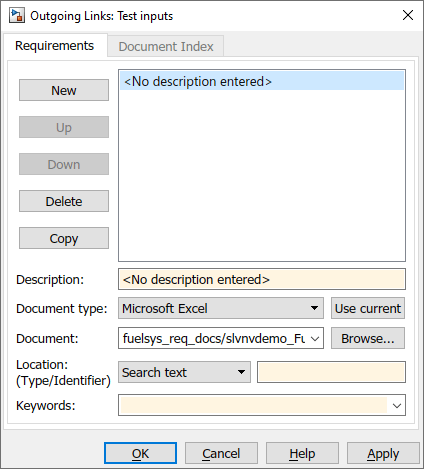
Requirements links in Simulink support an optional User Tag property that can store any comma-separated string values. Use these tags to distinguish between different types of links, for example, functional requirements links, design description links or testing details links. You can specify the tags when creating new links, or later via Open Outgoing Links dialog... dialog box.
You can later use these tags to focus your work on a subset of links, or to automatically strip a subset of links from the model. This is controlled via Filters tab of the Requirements Settings menu, opened by clicking Link Settings > Linking Options in the Requirements tab.
When model requirements are highlighted, modifying the filter setting updates the view to only show the matching requirements links. Requirements links in this example model are tagged with one of the following: "design", "requirement", "test". The view adjusts accordingly when you modify filter settings. For example, you can highlight only links that are tagged "requirement".
If you generate a report with User Tag filters enabled, your report content is filtered accordingly. This may be useful to focus your report on a particular subset of links.
If you run consistency checking with User Tag filters enabled, only links that match the given filter settings are checked. Use this to target your consistency checking to a required subset of links.
Updating All Links When Requirements Documents Are Moved or Renamed
It happens sometimes that the documents need to be renamed or moved after links were created. Use rmidocrename command-line utility to simultaneously adjust all links in the model.
help rmidocrename rmidocrename - (Not recommended) Update model requirements document paths and file names.
rmidocrename(MODEL_HANDLE, OLD_PATH, NEW_PATH)
rmidocrename(MODEL_NAME, OLD_PATH, NEW_PATH)
Using rmidocrename is not recommended. Use slreq.LinkSet.updateDocUri
instead.
rmidocrename(MODEL_HANDLE, OLD_PATH, NEW_PATH) collectively
updates the links from a Simulink(R) model to requirements files whose
names or locations have changed. MODEL_HANDLE is a handle to the
model that contains links to the files that you have moved or renamed.
OLD_PATH is a string that contains the existing file name or path or
a fragment of file name or path.
NEW_PATH is a string that contains the new file name, path or fragment.
rmidocrename(MODEL_NAME, OLD_PATH, NEW_PATH) updates the
links to requirements files associated with MODEL_NAME. You can pass
rmidocrename a model handle or a model name string.
When using the rmidocrename function, make sure to enter specific
strings for the old document name fragments so that you do not
inadvertently modify other links.
rmidocrename displays the number of links modified.
Examples:
For the current Simulink(R) model, update all links to requirements
files whose names contain the string 'project_0220', replacing
with 'project_0221':
rmidocrename(gcs, 'project_0220', 'project_0221');
For the model whose handle is 3.0012, update links after all
documents were moved from C:\My Documents to D:\Documents
rmidocrename(3.0012, 'C:\My Documents', 'D:\Documents');
See also slreq.LinkSet/updateDocUri, rmi, rmitag
Documentation for rmidocrename
Create a writable copy of the example model. For example, open the original system and save as
slvnvdemo_fuelsys_officereq_copy.
open_system('slvnvdemo_fuelsys_officereq')
save_system('slvnvdemo_fuelsys_officereq','slvnvdemo_fuelsys_officereq_copy.slx')

Highlight requirements that are tagged "requirement". These links point to
slvnvdemo_FuelSys_RequirementsSpecification.docxand you need them to point to corresponding locations in Microsoft Word 2003 version of the same document.
rmidemo_callback('filter','slvnvdemo_fuelsys_officereq_copy','requirement')
Evaluate the following code to redirect the links to the
.docdocument:rmidocrename(gcs,'Specification.docx','Specification.doc')Partial matching in document name is performed; you do not need to specify the full name for the document, as long as the given pattern is specific enough to avoid unwanted changes. For example, replacing .doc with .docx would go wrong because .docx becomes .docx. RMI responds with the following message: "Processed 16 objects with requirements, 7 out of 18 links were modified". Only objects with matching requirements were processed due to the current User Tag filter setting.
Try navigating the highlighted links. For example, navigate from
Relational OperatorunderAirflow calculation. Microsoft Word 2003 version of the document opens to a correct location.
rmidemo_callback('locate',['slvnvdemo_fuelsys_officereq_copy/fuel rate controller/' ...
    'Airflow calculation/Relational Operator3'],1);
Insert Navigation Controls into Documents to Match One-way Links
If you previously created one-way links from Simulink objects to documents, and later need to enable navigation from locations in documents back to the corresponding objects in Simulink, use the rmiref.insertRefs utility to insert matching "return" links into the requirements document.
One of the documents included with this example, slvnvdemo_FuelSys_DesignDescription.doc does not have Simulink navigation controls. It does have the bookmarks in locations that correspond to links tagged design in the example model.
Reuse the writable copy of the model from the previous section.
open_system('slvnvdemo_fuelsys_officereq_copy')Evaluate the following code to redirect matching links from slvnvdemo_FuelSys_DesignDescription.docx to slvnvdemo_FuelSys_DesignDescription.doc. The following message appears in the command window: Processed 16 objects with requirements, 8 out of 16 links were modified.
rmidocrename('slvnvdemo_fuelsys_officereq_copy','Description.docx','Description.doc');Navigate one of the links. For example, right-click the
Airflow calculationsubsystem block, right-click and select Requirements and then click the linked requirement. This brings up slvnvdemo_FuelSys_DesignDescription.doc, which does not have Simulink navigation controls. If you can't find the block, evaluate the following code.
rmidemo_callback('locate',['slvnvdemo_fuelsys_officereq_copy/fuel rate controller/' ...
    'Airflow calculation']);
Run
rmiref.insertRefs('slvnvdemo_fuelsys_officereq_copy','word')to insert document-to-model navigation controls into slvnvdemo_FuelSys_DesignDescription.doc. You see the Simulink navigation icons inserted into the document. You can now use these icons to navigate to Simulink objects in the slvnvdemo_fuelsys_officereq_copy model.
It is not possible to insert navigation controls if the specified location bookmark is missing in the document. In this example the document was not saved after the last link was created. The following warning appears in the command window: The named item "Simulink_requirement_item_7" could not be located in the bookmarks or section headings.
When the link in the model does not specify a location, the navigation control is inserted at the top of the document.
Remove All Simulink Reference Buttons from the Document
When Simulink navigation controls are inserted into an Microsoft Office Document, you do not necessarily have to save the document before navigating to Simulink. This allows you to temporarily insert navigation objects when needed. If you saved the document with navigation buttons inserted and now need to go back to a clean document, use the rmiref.removeRefs utility to remove the buttons. For example, perform the following steps to remove the buttons inserted in the previous step of this example:
Make sure
slvnvdemo_FuelSys_DesignDescription.docis open and is your current Microsoft Word document.Run
rmiref.removeRefs('word')to remove the buttons. RMI prompts for confirmation in command window.
Repair Links from Documents to Simulink
Simulink navigation controls embedded in requirements documents may get outdated when Simulink models are modified or moved. This results in broken links. Use the rmiref.checkDoc utility to detect and repair links from external documents to Simulink. In this example you will fix one broken link in slvnvdemo_FuelSys_DesignDescription.docx document.
Run
which slvnvdemo_fuelsys_officereq_copyand remove slvnvdemo_fuelsys_officereq_copy.slx from MATLAB path if exists.Open
slvnvdemo_FuelSys_DesignDescription.docxand try to navigate a link at the very bottom of the document. The following error dialog appears:
Run
rmiref.checkDoc('slvnvdemo_FuelSys_DesignDescription.docx')to check the document for broken links. RMI highlights detected problems in the document and displays an HTML report.
All functional links are listed at the bottom of the report. You can navigate from this report to linked objects in Simulink (Target in Simulink column) and to the target locations in the document (Document content column).
Red font in the report highlights problems that require attention. In this case there is one broken link that references an unresolved model name. Repair the links before moving on.
Cleanup
Clear the link keyword filter.
rmipref('FilterRequireTags','');