Working with Android Audio File Write Blocks
This example shows how to use the Audio File Write block from the Simulink® Support Package for Android® Devices to save the processed or recorded audio data.
Prerequisite
Before you start with this example, we recommend that you complete the Getting Started with Android Devices example.
Required Products
To run the Simulink model, download and install:
Required Hardware
Android device
Headphones with in-line microphone (recommended)
USB cable
Model
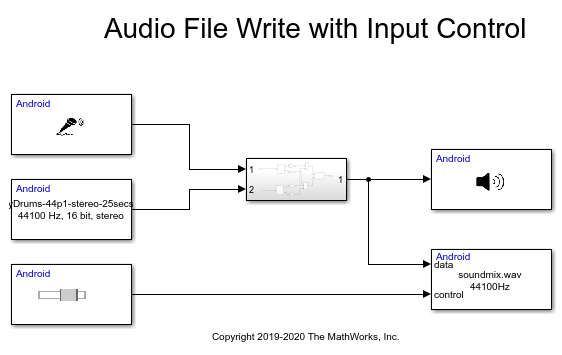
Open the androidAudioFileWriteInputControl Simulink model. This Simulink model demonstrates retrieving and saving of an audio file.

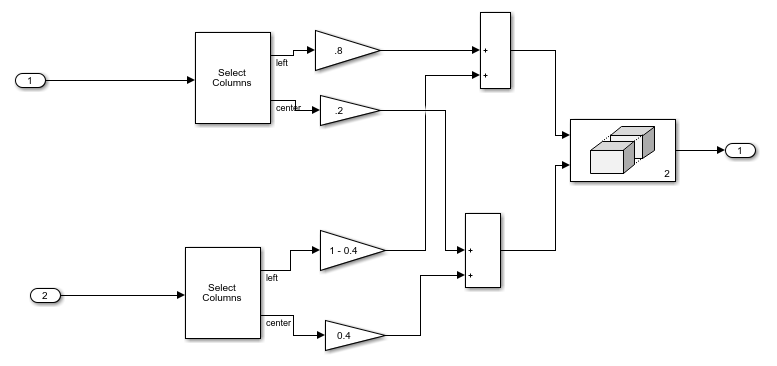
The contents of the subsystem in the model is as shown in this image.

In this model, the voice captured using the Audio Capture block and the audio data read using Audio File Read block are mixed. The Audio Playback block plays the mixed audio data. The Audio File Write block writes this audio data to a file.
Step 1: Configure Simulink Model
1. Open the androidAudioFileWriteInputControl Simulink model.
2. On the Modeling tab, select Model Settings.
3. In the Configuration Parameters dialog box, select Hardware Implementation. Verify that the Hardware board parameter is set to Android Device.
4. On the Hardware tab of the Simulink model, in the Mode section, select Run on board and then click Build, Deploy & Start. The application starts running on the device. After audio processing is complete, press the back button or close the application.
Step 2: Retrieve Audio File from Android Device
The codertarget.android.internal.getFile(Filename,filetype) function is used to get the audio file from the device. Filename and Filetype in the function are the File name and File type parameters specified in the block parameters dialog box. Also, ensure that your Android device is connected to the development computer.
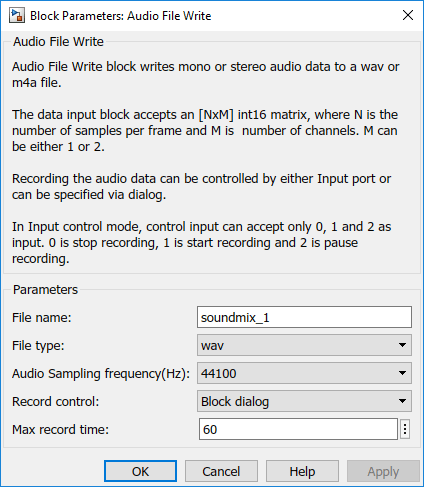
Open the block parameters dialog box. The File name parameter specified will be used as the file name for the file saved on the Android device. The File name of the audio data will be of the format filename_date_time.filetype.
The Audio File Write block supports WAV and M4A types of file formats. The file format of the output file depends on the File type parameter selection.

Step 3: Control Audio Data to Be Saved in File
You can control the audio data to be saved in the file using control input port. This port accepts only 0, 1, and 2 as input. The control input will be available when the Record Control parameter in the block parameters dialog box for Audio File Write block is set to Input port. When the control input is set to 0, saving of audio data stops and audio file closes. When the control input is set to 1, a new file is created, if not created already, else saving of audio data continues. When control input is set to 2, audio data will not be saved and the recording of the audio data to the file pauses.

Deploy the model again or open the deployed app on your Android device. The slider in the app can be used to control the audio data recorded to the file. When the current state of the slider is 1, the data records in the file. If the slider value is changed to 2, audio data recording pauses. To resume recording, change the slider value to 1. Change the slider value to 0 to stop recording and close the file.
Now change the slider value to 1 to create a new file with name soundmix_date_time.wav. Change the slider value to 0 to stop recording or close the app.
Perform Step 2 to retrieve the saved files. There will be two files with different timestamps.
Step 4: Save Audio Data as M4A File
1. In the androidAudioFileWriteInputControl Simulink model, open the block parameters dialog box for Audio File Write block.
2. Select m4a for File type parameter and then select the required Bit rate value. Supported bit rates are 24 kbps, 128 kbps, and 192 kbps.
3. Deploy the model on the phone. Record the audio data and then retrieve the audio file using Step 2.
Step 5: Record Audio Data for Specified Time
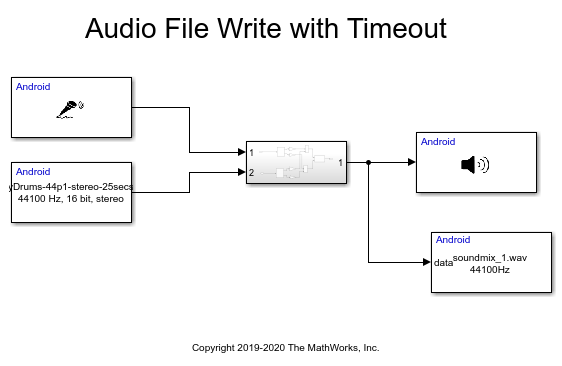
Open the androidAudioFileWriteTimeout Simulink model. In this model, you can specify the record time in the Max record time parameter from the block parameters dialog box of the Audio File Write block.

In this example, audio data will be recorded to the file for 60 seconds as shown in this image.

Deploy the model on the phone. Record the audio data and then retrieve the audio file using Step 2.