Publish Variable-Length Nested ROS Messages and Deploy as ROS Node Using MATLAB
This example shows how to work with complex ROS messages in MATLAB, such as messages with nested submessages and variable-length arrays.
Some ROS message types have nested submessages that are of different message types. Such nested ROS messages can be arrays whose length (number of elements) cannot be predetermined. Examples of such message types include:
geometry_msgs/PoseArray: This message type contains an array of poses of typegeometry_msgs/Pose. It is used to send a bunch of waypoints to the robot in a specific time step.nav_msgs/Path: This message type contains an array of poses of typegeometry_msgs/PoseStamped. It is used for the output of motion planners that send a path for the robot to follow. The path is represented as a sequence of poses, each with its own header and timestamp.
In this example, you send pose arrays of different lengths over a single topic that publishes messages of type geometry_msgs/PoseArray. You then deploy the same as a ROS node.
Load and View Waypoints
Load the source data, which contains waypoints of different lengths that need to be published on a single topic, for the robot to follow. The MAT file wayPointSets.mat loads two sets of waypoints. These can be used to specify the pose array message. The waypoints are in the form of XYZ coordinates.
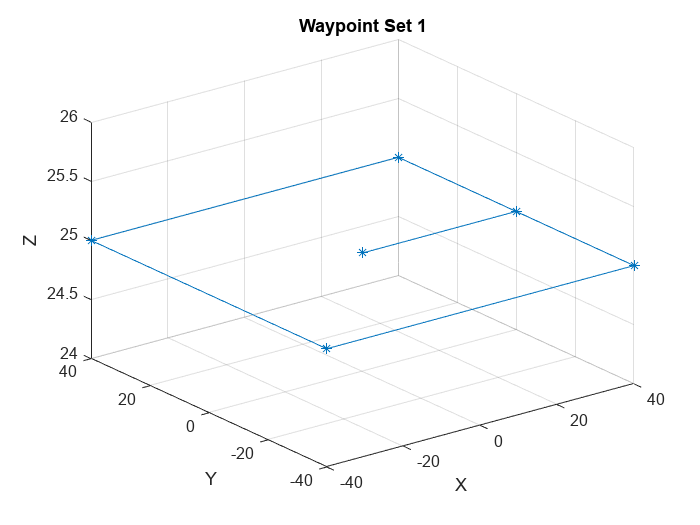
load wayPointSets.mat;Visualize the two sets of waypoints using the plot3 function. Note that the two sets contain different numbers of waypoints.
figure
plot3(wayPointSet1(:,1),wayPointSet1(:,2),wayPointSet1(:,3),"*-")
grid on
xlabel("X")
ylabel("Y")
zlabel("Z")
title("Waypoint Set 1")

figure
plot3(wayPointSet2(:,1),wayPointSet2(:,2),wayPointSet2(:,3),"*-r")
grid on
xlabel("X")
ylabel("Y")
zlabel("Z")
title("Waypoint Set 2")

Initialize and Configure ROS Network
Use rosinit to create a ROS master in MATLAB and start a global node that is connected to the master.
rosinit
Launching ROS Core...
....Done in 4.2642 seconds.
Initializing ROS master on http://172.21.16.85:53613.
Initializing global node /matlab_global_node_21293 with NodeURI http://ah-avijayar:53417/ and MasterURI http://localhost:53613.
Use rospublisher to create a ROS publisher for sending messages of type geometry_msgs/PoseArray. Specify the name of the topic as /waypoints. Add a ROS subscriber that subscribes to the published topic using rossubscriber. Use messages in struct format for better efficiency.
pub = rospublisher("/waypoints","geometry_msgs/PoseArray","DataFormat","struct");
sub = rossubscriber("/waypoints","DataFormat","struct");
Use rosmessage to create an empty message based on the topic published by the publisher, pub.
poseArrayMsg = rosmessage(pub);
Populate Message and Publish
Specify the workspace variable corresponding to the waypoint set that you want to publish. Then, populate the pose array with geometry_msgs/Pose messages. Assign the XYZ position fields of the individual pose message elements from the waypoint set data. Continue adding new individual pose message elements until the pose array message contains all of the waypoint set data. Because struct messages are not handles, the same structure can be reused when populating the array of poses.
% Specify the waypoint set to publish
wayPointsToPublish = wayPointSet1;

% Populate the pose array message
poseMsg = rosmessage("geometry_msgs/Pose","DataFormat","struct");
for k = 1:size(wayPointsToPublish,1)
    poseMsg.Position.X = wayPointsToPublish(k,1);
    poseMsg.Position.Y = wayPointsToPublish(k,2);
    poseMsg.Position.Z = wayPointsToPublish(k,3);
    poseArrayMsg.Poses(k) = poseMsg;
end
Use the send function to publish the pose array message to the topic /waypoints, using the ROS publisher object, pub.
send(pub,poseArrayMsg);
pause(0.5)
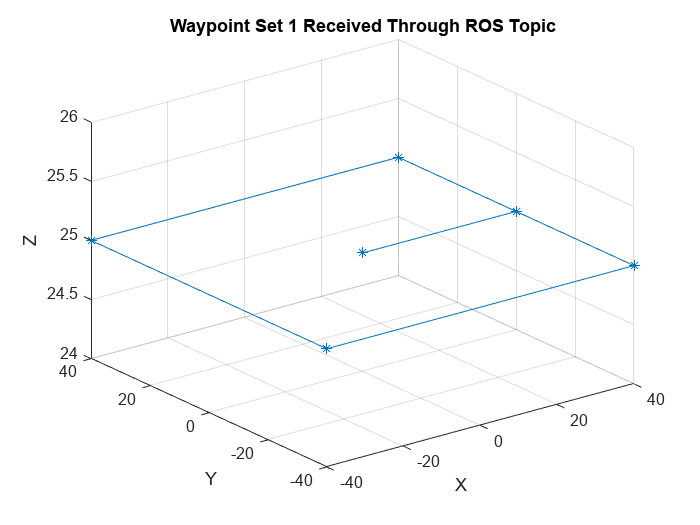
View the pose array message data, as received by the subscriber, using the LatestMessage property of the Subscriber object. Use horzcat to concatenate the position information extracted from the received message into a structure array for the purposes of visualization. Use plot3 to visualize the waypoints as received by the subscriber. Note that the visualization matches that of the corresponding source waypoint data set.
receivedPoseArrayMsg1 = sub.LatestMessage;
waypointPositions1 = horzcat(receivedPoseArrayMsg1.Poses.Position);

figure
plot3([waypointPositions1.X],[waypointPositions1.Y],[waypointPositions1.Z],"*-")
grid on
xlabel("X")
ylabel("Y")
zlabel("Z")
title("Waypoint Set 1 Received Through ROS Topic")

Now publish the second waypoint using the same procedure. Populate the pose array message with the new set of waypoint information.
% Specify the waypoint set to publish
wayPointsToPublish = wayPointSet2;

% Populate the Pose Array Message
poseMsg = rosmessage("geometry_msgs/Pose","DataFormat","struct");
for k = 1:size(wayPointsToPublish,1)
    poseMsg.Position.X = wayPointsToPublish(k,1);
    poseMsg.Position.Y = wayPointsToPublish(k,2);
    poseMsg.Position.Z = wayPointsToPublish(k,3);
    poseArrayMsg.Poses(k) = poseMsg;
end
Use the send function to publish the new pose array message to the same topic via the same ROS publisher object, pub.
send(pub,poseArrayMsg);
pause(0.5)
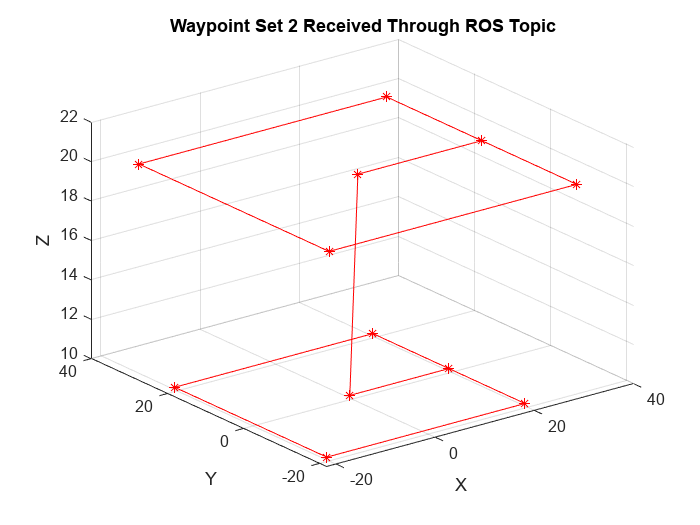
Visualize the pose array message data received by the subscriber by following the same procedure as before.
receivedPoseArrayMsg2 = sub.LatestMessage;
waypointPositions2 = vertcat(receivedPoseArrayMsg2.Poses.Position);

figure
plot3([waypointPositions2.X],[waypointPositions2.Y],[waypointPositions2.Z],"*-r")
grid on
xlabel("X")
ylabel("Y")
zlabel("Z")
title("Waypoint Set 2 Received Through ROS Topic")

The visualization matches that of the corresponding source waypoint data set, indicating the successful broadcast of two sets of pose arrays with different lengths over a single topic.
Generate and Deploy ROS Node
You can now generate a ROS node that uses the same workflow described in the previous section to publish variable-length geometry_msgs/PoseArray messages. Then, you deploy the generated node on the local machine.
Configure MATLAB Coder
Create a MATLAB Coder configuration object that uses "Robot Operating System (ROS)" hardware. Set the build action to "Build and Run" and deploy to "Localhost" options so that the deployed ROS node starts running on the local machine after code generation.
cfg = coder.config("exe");
cfg.Hardware = coder.hardware("Robot Operating System (ROS)");
cfg.Hardware.DeployTo =  "Localhost";
cfg.Hardware.BuildAction = "Build and run";
Use the helperPublishVariableLengthNestedROSMsg function that contains the code verified in the previous section as the entry-point function.
Verify Initialization of Variable-Size Message Field before Deployment
Before ROS node generation, a necessary additional step is to initialize the variable-size data field in the ROS message to an array of a maximum size. This step is necessary to prevent segmentation faults as C++ requires preallocation of arrays. These lines of code perform the necessary steps.
% Create publisher
pub = rospublisher("/waypoints1","geometry_msgs/PoseArray","DataFormat","struct");
poseArrayMsg = rosmessage(pub);

% Specify maximum size of the pose array and initialize with empty pose messages
maxSize = 25;
poseArrayMsg.Poses = repmat(rosmessage('geometry_msgs/Pose',"DataFormat","struct"),maxSize,1);
Note that the variable-size field Poses is initialized to an array of 25 pose message structures. For any other message types, you must initialize its corresponding variable-size data field in a similar fashion.
Generate and deploy ROS Nodes.
codegen helperPublishVariableLengthNestedMsg -config cfg
---
Running ROS node.
Code generation successful.
Retrieve the latest message from the deployed node. Plot and visualize the received pose array message. You notice that an additional waypoint pose at the origin is present in the received pose array message. This is because the code initializes the position of unused pose elements to zero.
nodeSub = rossubscriber("/waypoints1","DataFormat","struct");
receivedPoseArrayMsg3 = receive(nodeSub,5);
waypointPositions3 = vertcat(receivedPoseArrayMsg3.Poses.Position);

figure
plot3([waypointPositions3.X],[waypointPositions3.Y],[waypointPositions3.Z],"*-r")
grid on
xlabel("X")
ylabel("Y")
zlabel("Z")
title("Waypoint Set Received Through Deployed ROS Node")

Use rosshutdown to shut down the ROS network in MATLAB. Doing so, shuts down the ROS master initialized by rosinit and deletes the global node.
rosshutdown
Shutting down global node /matlab_global_node_21293 with NodeURI http://ah-avijayar:53417/ and MasterURI http://localhost:53613.
Shutting down ROS master on http://172.21.16.85:53613.
If the waypoint set data has orientation information, you can populate it in the quaternion orientation fields of the individual pose message elements before publishing. To publish messages of type nav_msgs/Path, use the same procedure, but specify the individual pose message elements as geometry_msgs/PoseStamped type. To publish messages of any other type, specify the appropriate nested message type as individual array elements, and ensure that the source data set contains the required information you want to publish.