Explore ROS 2 Services: Service Client and Service Server Guide
Services provide another means for nodes to communicate with each other. Think of service communication as a phone call request that you make for a specific service or information. The listener on the other end provides the information or performs the task and then ends the call.
A service consists of two components: the service client and the service server. Client nodes can make a remote procedure call to other nodes. Server nodes will do the computation and return a result. You can use services for quick tasks that require an immediate response, like querying a database or requesting a calculation.
Client — A service client, say
Node 1, raises a service request to handle some computation on its behalf. The client waits for the response from the service server. This denotes a synchronous communication mechanism.Server — A service server, say
Node 2receives the service request. It completes the computation and sends a response message back to the client node.
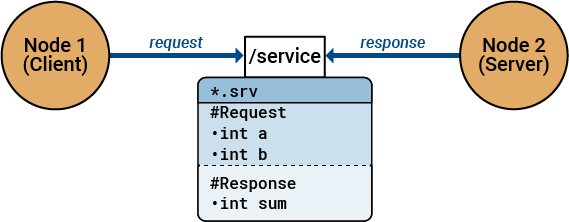
Service Interface
Service messages are described in a .srv file. One node can act as
a client, that raises a request. Another node acting as a server completes the request
and reverts with a response. Hence, a service file is comprised of two messages: one for
the request and another for the response.
You can view the list of available service message types by using ros2 msg
list
ros2 msg
				list
composition_interfaces/ListNodesRequest
composition_interfaces/ListNodesResponse
composition_interfaces/LoadNodeRequest
composition_interfaces/LoadNodeResponse
composition_interfaces/UnloadNodeRequest
composition_interfaces/UnloadNodeResponse
example_interfaces/AddTwoIntsRequest
example_interfaces/AddTwoIntsResponse
control_msgs/QueryCalibrationStateRequest
control_msgs/QueryCalibrationStateResponse
control_msgs/QueryTrajectoryStateRequest
control_msgs/QueryTrajectoryStateResponse...
This list contains service message types of predefined message interface definitions.
You can create a message of any of these predefined types such as
example_interfaces/AddTwoInts.
This example shows how to use ROS 2 services and create a service request.
Use ros2 msg show to view the structure of the request and the
response.
ros2 msg show example_interfaces/AddTwoIntsRequest
int64 a
int64 b
ros2 msg show example_interfaces/AddTwoIntsResponse
int64 sum
The request contains two integers, a and b. The
response contains the sum of a and b in
sum.
Create a service request.
addRequest = ros2message("example_interfaces/AddTwoIntsRequest")addRequest = struct with fields:
MessageType: 'example_interfaces/AddTwoIntsRequest'
a: 0
b: 0
addRequest.a = int64(10)
addRequest = struct with fields:
    MessageType: 'example_interfaces/AddTwoIntsRequest'
              a: 10
              b: 0
addRequest.b = int64(20)
addRequest = struct with fields:
    MessageType: 'example_interfaces/AddTwoIntsRequest'
              a: 10
              b: 20
Send Request to Service and Respond to that Request
This example walks you through the process of using ROS 2 service to compute a path from a start position to a goal position in MATLAB®. The service client node acts as a requester in the ROS 2 network, it sends a request to the service server to compute the path and waits for the response. The service server node acts as a responder to this incoming request, processes it to compute the path, and sends back the response.
To begin with, define a function named pathServiceCallback. This
function will act as the callback for the service server. It handles the service request
from the client, processes it, and prepares the response.
Choose the nav_msgs/GetPlan service message type, which is designed
for path planning tasks.
In this example, the service request asks the server to compute a path between the defined start and goal positions. The function takes two arguments:
Request — This argument contains the data sent by the client, which uses
nav_msgs/GetPlanRequesttype of the defined service message.Response — This argument contains the data to send back to the client, which uses the
nav_msgs/GetPlanResponsetype of the defined service message.
function response = pathServiceCallback(request, response)Extract the start and goal positions from the request object, which
contains the data sent by the client. Extract the x and
y coordinates of the start and goal positions and store them in
startPose and goalPose arrays,
respectively.
startPose = [request.start.pose.position.x, request.start.pose.position.y];
goalPose = [request.goal.pose.position.x, request.goal.pose.position.y];
Compute a simple straight-line path from the start position to the goal position using
the linspace function. This function
generates 100 evenly spaced points between the start and goal positions for both
x and y coordinates.
pathX = linspace(startPose(1), goalPose(1), 100);
pathY = linspace(startPose(2), goalPose(2), 100);
Create a ROS 2 message of type nav_msgs/Path to hold the path
information. Set the header information for the message, including
the frame ID and the timestamp.
pathMsg = ros2message("nav_msgs/Path");
pathMsg.header.frame_id = uint8(1);
pathMsg.header.stamp = ros2time;
Create 100 PoseStamped messages, each representing a point on the
path. For each pose, set the position and orientation. Then, append each pose to the
pathMsg and also to the
response.plan.poses.
for i = 1:100
    poseStamped = ros2message("geometry_msgs/PoseStamped");
    poseStamped.header.frameId = uint8(i);
    poseStamped.header.stamp = ros2time;
    poseStamped.pose.position.x = pathX(i);
    poseStamped.pose.position.y = pathY(i);
    poseStamped.pose.position.z = 0;
    poseStamped.pose.orientation.x = 0;
    poseStamped.pose.orientation.y = 0;
    poseStamped.pose.orientation.z = 0;
    poseStamped.pose.orientation.w = 1;
    pathMsg.poses(i) = poseStamped;
    response.plan.poses(i) = pathMsg.poses(i);
end
Create a ROS 2 node named /path_planning_node. Create a service
server on this node that listens to the /compute_path service of type
nav_msgs/GetPlan. It includes fields for start and goal positions
and a plan (path) that consists of a series of poses. Specify
pathServiceCallback function as the callback function for this
service.
node = ros2node('/path_planning_node');
server = ros2svcserver(node, '/compute_path', 'nav_msgs/GetPlan', @pathServiceCallback)
server =

  ros2svcserver with properties:

      ServiceType: 'nav_msgs/GetPlan'
      ServiceName: '/compute_path'
    NewRequestFcn: @pathServiceCallback
          History: 'keeplast'
            Depth: 10
      Reliability: 'reliable'
       Durability: 'volatile'
         Deadline: Inf
         Lifespan: Inf
       Liveliness: 'automatic'
    LeaseDuration: Inf
Create a service client on the same node to send requests to the
/compute_path service.
client = ros2svcclient(node, '/compute_path', 'nav_msgs/GetPlan')
client =

  ros2svcclient with properties:

      ServiceType: 'nav_msgs/GetPlan'
      ServiceName: '/compute_path'
          History: 'keeplast'
            Depth: 10
      Reliability: 'reliable'
       Durability: 'volatile'
         Deadline: Inf
         Lifespan: Inf
       Liveliness: 'automatic'
    LeaseDuration: Inf
The server and client must have compatible QoS policies, in the absence of which, the code fails to execute the desired outcome.
Create a message object for the request. This object will hold the data that you want to send to the service server.
request = ros2message(client);
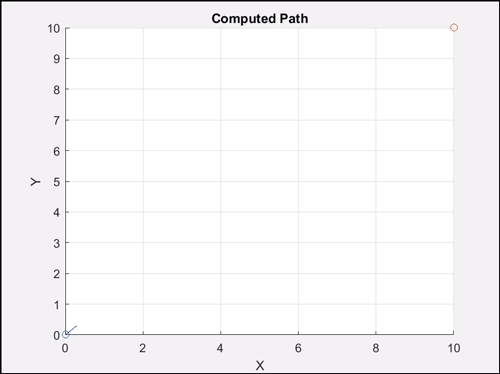
Set the start and goal positions in the request message. The start position is (0, 0) and the goal position is (10, 10).
request.start.pose.position.x = 0;
request.start.pose.position.y = 0;
request.goal.pose.position.x = 10;
request.goal.pose.position.y = 10;
Call the service using the call function. This function sends the
request to the service server and waits for the response. The response, status, and any
message are stored in response, status, and
msg respectively.
[response, status, msg] = call(client, request);
Extract the poses array from the response.plan object, which
contains all the poses (positions and orientations) that make up the computed
path.
poses = response.plan.poses;
Use the arrayfun function to extract the x and y
coordinates from each pose in the poses array stores them in pathX
and pathY arrays, respectively. Initialize two empty arrays,
plotX and plotY, to store the coordinates for
plotting.
pathX = arrayfun(@(pose) pose.pose.position.x, poses);
pathY = arrayfun(@(pose) pose.pose.position.y, poses);
plotX = [];
plotY = [];
Create a new figure for the plot and hold it for multiple plots. Plot the start and goal positions as points on the figure and use a loop to plot the path incrementally.
figure;
hold on;
xlabel('X');
ylabel('Y');
title('Computed Path');
grid on;

plot(startPose(1), startPose(2), 'o');
plot(goalPose(1), goalPose(2), 'o');

for i = 1:size(poses, 1)
    plot(pathX(1:i), pathY(1:i), 'b-');
    pause(0.1)
end
Custom Message Support for ROS 2 Services
ROS 2 also enables the creation of custom message types for services, providing flexibility in exchanging information between nodes based on your application’s specifications and design. For instance, if you require a service message type to handle the addition of 3 integers at once, you can achieve this by defining a custom service message. The request section of this custom service type would then contain 3 integers, compared to the 2 integers in the previous example.
The ROS Toolbox supports custom message generation for services, detailed in ROS 2 Custom Message Support. To generate ROS 2
custom messages, you can use the ros2genmsg
function to read ROS 2 custom message definitions in the specified folder path. The
designated folder should contain one or more ROS 2 packages containing service message
definitions in .srv files. Additionally, you can create a shareable
ZIP archive of the generated custom messages. This archive can be utilized to register
the custom messages on another machine by using ros2RegisterMessages.
In MATLAB, you typically don't write .srv files directly.
Instead, you create custom messages using ROS 2 package tools and then use them in
MATLAB.
See Also
ros2message | ros2svcclient | ros2svcserver