Install Polyspace as You Code Plugin in Eclipse
The Polyspace® as You Code plugin in the Eclipse™ based IDEs allows you to run Polyspace on the file that you are currently viewing and see analysis results such as bugs and coding standard violations. You must install the Polyspace as You Code analysis engine to run the analysis. The plugin allows you to point to this analysis engine from Eclipse and show results produced by the Polyspace analysis.
Note
If you install the Polyspace as You Code Eclipse plugin on Linux®, see Configure Eclipse for Supported Java Version on Linux.
You can install the plugin in one of two ways:
While running the Polyspace as You Code installer, select the option to install the plugin. The installer installs the Polyspace as You Code analysis engine and the plugin.
If you install only the analysis engine while running the Polyspace as You Code installer, use the contents of the
polyspaceroot\polyspace\plugin\eclipse_paycpolyspacerootC:\Program Files\Polyspace as You Code\R2025b.
The rest of this topic describes the second approach where you skip the
installation of the plugin while running the installer and use the contents of the
polyspaceroot\polyspace\plugin\eclipse_payc
The Polyspace as You Code Eclipse plugin is not compatible with the Polyspace desktop plugin for Eclipse. Uninstall the desktop plugin before installing the Polyspace as You Code Eclipse plugin.
Interactive Installation
To install the plugin interactively:
In the Eclipse IDE, select Help > Install New Software.
In the Install window, click Add, and then click Local in the Add Repository popup.
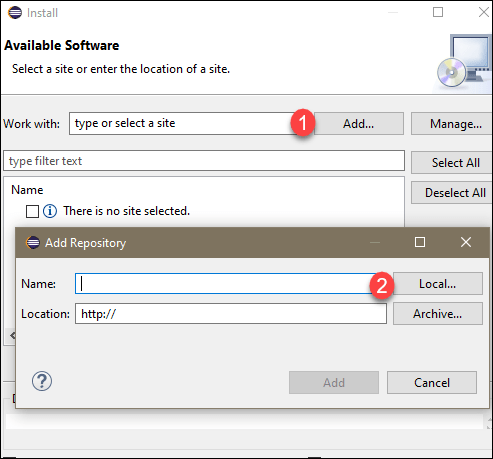
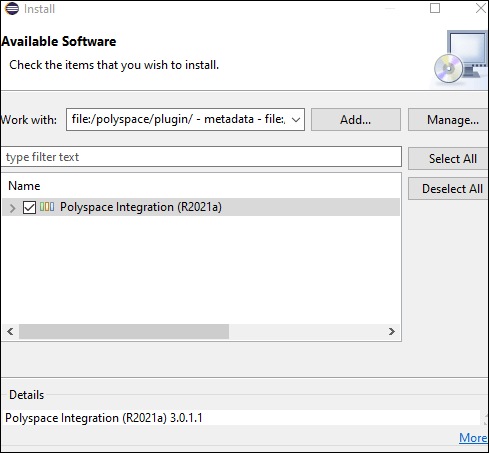
Navigate to the
polyspaceroot\polyspace\plugin\eclipse_paycMake sure that the Polyspace plugin is selected, then click Next and follow the prompts to complete the installation.
To uninstall the plugin, go to Help > About Eclipse IDE. In the About Eclipse IDE window, click Installation Details, select the Polyspace plugin on the Installed Software tab, and then click Uninstall and follow the prompts.
Command-line Installation
To install the plugin, open a terminal and navigate to your Eclipse installation folder, for instance C:\Program
Files\eclipse, and
enter:
eclipsec.exe -application org.eclipse.equinox.p2.director ^
-repository file:"/polyspaceroot/polyspace/plugin/eclipse_payc/" ^
-installIU com.polyspace.eclipse.feature -nosplash
polyspacerootC:/Program
Files/Polyspace as You Code. The -repository path
must be specified with forward slashes "/".To uninstall the plugin, enter:
eclipsec.exe -application org.eclipse.equinox.p2.director ^
-uninstallIU com.polyspace.eclipse.feature -nosplash
Configure Eclipse for Supported Java Version on Linux
The Polyspace as You Code Eclipse plugin does not support Java® versions 13 and later. If your Eclipse IDE uses an unsupported Java version, you see an error message when you start the IDE.
To configure your IDE to use a supported Java version:
Go to https://jdk.java.net/archive/, download the OpenJDK version 12 GA (build 12+33) for Linux, and then right-click the downloaded TAR file to extract its content.
Alternatively, at the command line, enter these commands:
wget https://download.java.net/java/GA/jdk12/33/GPL/openjdk-12_linux-x64_bin.tar.gz
tar xzvf openjdk-12_linux-x64_bin.tar.gz
Open file
eclipseRoot/eclipse.ini-vmline with the path to thebinfolder for the openJDK installation that you downloaded in step 1. TheeclipseRootfolder is your Eclipse IDE installation folder.For example, if you extracted the download from step 1 into folder
/local/tools, the section of youreclipse.inifile around the-vmline looks similar to this section:--launcher.defaultAction openFile --launcher.appendVmargs -vm /local/tools/jdk-12/bin
Restart your IDE to apply the changes.