Set Up a Tradeoff Calibration
A tradeoff calibration is the process of filling lookup tables by balancing different objectives.
Typically, there are many different and conflicting objectives. For example, a calibrator might want to maximize torque while restricting nitrogen oxides (NOX) emissions. It is not possible to achieve maximum torque and minimum NOX together, but it is possible to trade off a slight reduction in torque for a reduction of NOX emissions. A calibrator chooses the values of the input variables that produce this slight loss in torque instead of the values that produce the maximum value of torque.
A tradeoff also refers to the object that contains the models and tables. Thus, a simple tradeoff can involve balancing the torque output while restricting NOX emissions.
After you set up your variable items and models, follow these steps to set up your tradeoff calibration.
Add a Tradeoff
To add a tradeoff to your session, select File > New > Tradeoff. This automatically switches you to the Tradeoff view and adds an empty tradeoff to your session.
An incomplete tradeoff is a tradeoff that does not contain any tables. If a tradeoff
is incomplete, it is displayed as ![]() in the tree display. If a tradeoff is complete, it is
displayed as
in the tree display. If a tradeoff is complete, it is
displayed as ![]() in the tree display.
in the tree display.
After you add a tradeoff, you must add tables to your tradeoff.
Add Tables to a Tradeoff
Add a table by selecting Tradeoff > Add New Lookup Table or click
 in the toolbar.
You must select the top tradeoff node in the tree display to use the Tradeoff menu. This is automatically selected if your tradeoff has no tables yet (it is the only node). You must also add at least three variables (in the variable dictionary) to your project before you can add a table, because CAGE needs a variable to fill the table and two more variables to define each of the two normalizers.
A dialog box opens.
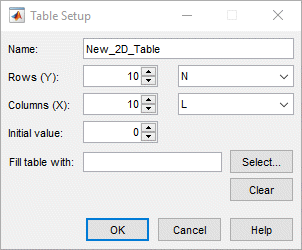
Enter the name for the table.
If your tradeoff already contains one or more tables, when you add additional tables they must be the same size and have the same inputs (and therefore have the same normalizers). So if your tradeoff has existing tables, you can only enter the new table name and the initial value.
For the first table in a tradeoff, you must set the normalizer inputs and sizes:
Edit the names for the X and Y normalizer inputs (the first two variables in the current variable dictionary are automatically selected here).
Enter sizes for each of the normalizers (Y input = rows, X input = columns)
Enter an initial value to fill the table cells, or leave this at zero.
Click Select to choose a filling item for a table. A dialog box opens where you can select from the models and variables in your session.
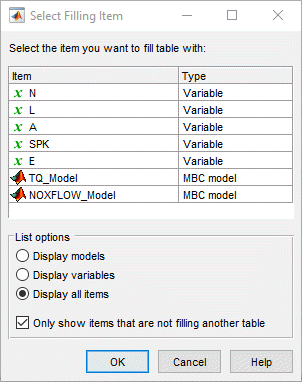
Depending on what kind of input you want, click the radio buttons to display models or variables or both. You can choose to also show items that are filling another table by clearing the check box.
Select the filling item for the table and click OK.
Click OK to close the Table Setup dialog box and create the table.
CAGE adds a table node to the tradeoff tree. You can still change the input for the table as follows. Double-click the new table in the list under Tables In Tradeoff, or click to select the table (it is selected automatically if it is the only table in the tradeoff) and then click Change Filling Item (
 ) in the toolbar.
The Select Filling Item dialog box appears where you can select inputs to fill the table.
Repeat this procedure for each new table you want to add. Each additional table in the tradeoff must have the same normalizers as the first table, so you do not have to select normalizer inputs and sizes repeatedly. For each new table, you only have to enter the name and initial value.
Add Existing Lookup Tables
Add a table by selecting Tradeoff > Add Existing Lookup Tables or click
 in the toolbar.
A dialog box appears where you can select from a list of tables in the current session.
Select a table and click OK. It may be helpful to first select the check box to only show suitable tables that can be added to the tradeoff.
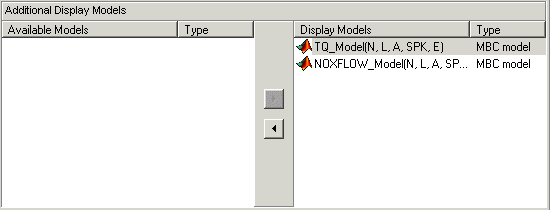
Display Models in Tradeoff
To display models when viewing tables in the tradeoff display:
Highlight the tradeoff node in the tree.
From the Available Models list, select the one you want to display.
Models that are filling a table are automatically displayed.
Click
 Add Model to Display List in the toolbar
or
Add Model to Display List in the toolbar
or  in the Additional Display
Models pane to move the selected model into the
Display Models pane. To quickly add all available
models to the display list, click the display button repeatedly.
in the Additional Display
Models pane to move the selected model into the
Display Models pane. To quickly add all available
models to the display list, click the display button repeatedly.Repeat steps 2 and 3 to add all the models you want to the display list.
Remove a Model
In the Display Models list, select the model that you want to remove.
Click
 in the toolbar, or
 in the Display
Models pane, to move the selected model into the
Available Models pane.
in the Display
Models pane, to move the selected model into the
Available Models pane.Repeat until you have cleared all the appropriate models.
Once you have displayed all the models that you want to work with, you are ready to calibrate your tables.