Generate Code for Wireless Sensor in Tire Pressure Monitoring Messaging System
This example shows how to generate code for individual embedded components in a distributed monitoring system. It also describes integrating target-specific external code for message protocol services, data acquisition from a physical environment, and nonvolatile memory (NVM) management on an embedded target.
The example focuses on how to generate C code for a sensor in a tire pressure monitoring system and follows this general workflow:
Review the distributed messaging system.
Access models and other project files.
Open the wrapper model for the sensor.
Locate Simulink® blocks that contain hooks for inserting external code.
Integrate custom target-specific driver and middleware code.
Build and generate C code from the sensor wrapper.
Inspect the generated makefile and build information.
Inspect the generated C code for the sensor.
For more information about the system-level modeling and core algorithms in the sensor and component models, see Wireless Tire Pressure Monitoring System with Fault Logging.
Review Distributed Messaging System

The messaging system highlighted in this example represents an automotive tire pressure monitoring system that uses identical pressure sensors at each wheel.
Sensors communicate wirelessly with the controller in the vehicle and publish periodic messages consisting of acquired pressure data and a unique device ID. The sensor device ID is stored in nonvolatile memory on the sensor and serves as the message topic ID. Device IDs are used to uniquely identify which sensors are associated with the tires installed in the vehicle, as the vehicle might be among many other cars in traffic and erroneous messages must be identified and rejected.
The controller receives the messages and inspects the sender device ID against a list of the relevant sensor IDs to determine which communications to examine and which ones to reject. The controller then evaluates payload pressure data from the relevant sensors for fault conditions. If the controller detects a fault condition, it indicates an error and aggregates the fault condition in a log that is stored in controller NVM.
The system-level model tirePressureMonitoringSystem contains multiple identical tire pressure sensors modeled by multi-instanced Model blocks that are routed to the controller. Messages are sent by using the Message Send block, which reads the value of an input signal and converts it to a message that carries the signal value. Since all four sensors in the vehicle execute the same algorithm, you deploy the same code to each sensor. The only difference among the sensors is the unique sensor ID, which is burned into the NVM of each sensor before code execution.
The models and deployment steps in this example support a manufacturing process similar to the following:
Engineers update the design of the core algorithm of the sensor (
SensorCoreAlgorithm) as needed and verify their design at the system level by simulating the system modeltirePressureMonitoringSystem.slx.Engineers isolate the sensor functionality for code generation by referencing the sensor core algorithm model in a wrapper model (
SensorCodeGenerationWrapper.slx).Engineers generate code from the
SensorCodeGenerationWrapper.slxmodel and provide the compiled code to the device manufacturer.The manufacturer then produces hundreds of identical sensors, each running the exact same code.
As the car is being assembled, the manufacturer flashes unique ID numbers into the NVM of each sensor.
As each sensor powers up, the sensor runs the exact same code as all the others, but that code reads the unique ID number from NVM, seeding it to send uniquely addressed messages.
The following sections in this example focus on steps 2 and 3 of the overall manufacturing process and explain how to generate deployable code for the sensor component in this distributed messaging system. For more information about modeling the sensor core algorithm or system-level simulation, see Wireless Tire Pressure Monitoring System with Fault Logging.
Access Models and Other Project Files
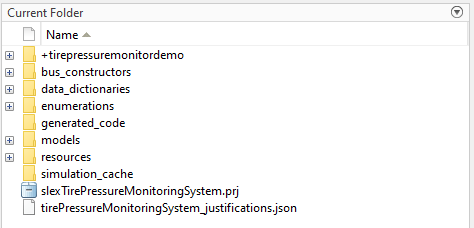
The models and support files for this example are contained in a Simulink project.
When you open the project, the project creates working folder slexTirePressureMonitoringSystem under your MATLAB current folder and runs the project initialization script.
After the project opens, your working folder contains the top-level items shown in this image.
Open Wrapper Model for Sensor
The wrapper model sensorCodeGenerationWrapper is a top-level model that isolates the sensor core model for code generation. In the current folder, navigate to models > sensor > wrappers, and open sensorCodeGenerationWrapper.slx.

The base algorithm for the sensor model converts pressure readings into messages that can be used with a messaging protocol and is implemented in sensorCoreAlgorithmModelReference, a reference to the sensorCoreAlgorithm model in the system-level model.
Locate Simulink Blocks that Contain Hooks for Inserting External Code
How you read NVM, acquire pressure data, and transmit messages depends on what operating system, tire pressure monitoring system (TPMS) sensor, and messaging protocol you are using. For this example, those system-dependent tasks require custom externally-written code.
MATLAB Function blocks in the wrapper model contain hooks for inserting the external code into the generated C code. This example uses the abstract class coder.ExternalDependency for code insertion.
In the sensor wrapper, the following blocks call public methods defined in the class SensorTargetSpecificCodeExternalDependency, a subclass of coder.ExternalDependency:
sensorReadPressureMATLABFunction— MATLAB Function block that supports reading pressure datasensorTransmitMATLABFunction— MATLAB Function block that supports publishing transmit messagesreadNVMInitializeFunction— Initialization block that runs at system startup and supports accessing NVM
For managing the sensor ID in NVM at startup, readNVMInitialization contains these blocks:
Event Listener block
MATLAB Function block
readNVMMATLABFunctionParameter Writer block
localDeviceIDParameterWriter
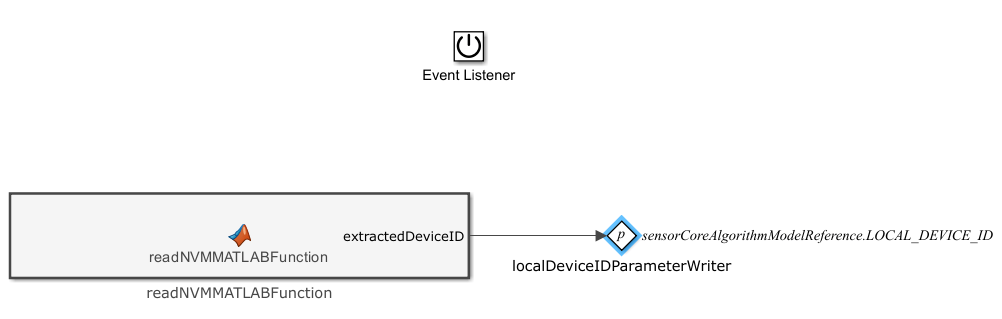
To explore hooks in readNVMInitialization:
In the sensor wrapper, open the Initialization block
readNVMInitialization. On start up, the Parameter Writer blocklocalDeviceIDParameterWriterinitializes the local sensor ID variablesensorCoreAlgorithmModelReference.LOCAL_DEVICE_IDto the value ofSENSOR_PARAMETERS_NVM_ADDRESS_AS_UINT32read from NVM.Open the MATLAB Function block
readNVMMATLABFunctionto view the code.
function extractedDeviceID = readNVMMATLABFunction(SENSOR_PARAMETERS_NVM_ADDRESS_AS_UINT32)
coder.extrinsic( 'warning' );
defaultDeviceID = deviceIDBusTypeDefaultConstructor( );
if( coder.target( 'Rtw' ) )
    extractedDeviceID = ...
        SensorTargetSpecificCodeExternalDependency.sensorReadNVMMatlabWrapper( SENSOR_PARAMETERS_NVM_ADDRESS_AS_UINT32, defaultDeviceID );
else
    warning( 'This block is intended only for code generation.' );
    extractedDeviceID = defaultDeviceID;
end
return;
end
The function readNVMMATLABFunction references the coder.ExternalDependency subclass SensorTargetSpecificCodeExternalDependency.
To view the class definition for SensorTargetSpecificCodeExternalDependency and code for creating the function readNVMMATLABFunction:
In your current folder, navigate to
models > sensor > target_specific_code > @SensorTargetSpecificCodeExternalDependency.Open
SensorTargetSpecificCodeExternalDependency.m.Scroll to the method definitions in
SensorTargetSpecificCodeExternalDependency.m.

Note that the coder.ceval statement invokes the external source code in sensor_read_nvm to the code generator.
You can repeat these steps to explore the MATLAB Function blocks for inserting custom code that acquires the pressure readings and transmits messages:
sensorReadPressureMATLABFunction, which uses the external source code sensor_read_pressuresensorTransmitMATLABFunction, which uses the external source code sensor_transmit_data
For more information about using coder.ExternalDependency for code integration, see Develop Interface for External C/C++ Code.
Integrate Custom Target-Specific Driver and Middleware Code
You customize this example by incorporating driver and middleware code specific to your system. You include your custom code in the generated code by updating the preexisting stub functions in the source and header files:
sensor_hand_code_source.csensor_hand_code_header.h
To include target-specific code:
In your current folder, navigate to
models > sensor > target_specific_code > source.Open
sensor_hand_code_source.c.Insert your custom code into the existing
sensor_read_nvm,sensor_read_pressure, andsensor_transmit_datastub functions.
/*
* The functions below are stubbed to allow compilation. However, the premise of the example is that these functions
* are target-specific and would not be compiled for desktop simulation.
*/
#include "sensor_hand_code_header.h"
void sensor_read_nvm( void * nvm_source_address, void * ram_destination_addresss, size_t single_element_size, size_t element_quantity_to_copy ) {
    return;
}
extern double sensor_read_pressure( void ){
double result = 0.0;
return( result );
}void sensor_transmit_data( void * message_source_address, size_t single_element_size, size_t element_quantity_to_send ){
return;
}The functions insert into the generated code by using the coder.ceval command in the MATLAB Function block definitions.
Build and Generate C Code from Sensor Wrapper
Open the Embedded Coder app and build the sensor wrapper. Simulink builds the models and support files and generates code.
Generated code for the sensor wrapper and referenced core algorithm is located under the generated_code folder in your current folder:
sensorCodeGenerationWrapper_ert_rtw— Generated code for the sensor wrapper, including the generated makefilesensorCodeGenerationWrapper.mkslprj— Generated code for shared utilities, including the code for the sensor core algorithmsensorCoreAlgorithm
Inspect Generated Makefile and Build Information
Embedded Coder generates the customized makefile sensorCodeGenerationWrapper.mk by modifying a template makefile with specifics of the Simulink models and further modifications introduced by using the coder.ExternalDependency subclass.
Specifically, SensorTargetSpecificCodeExternalDependency.m invokes coder.ExternalDependency.updateBuildInfo to modify the build information object buildInfo and provide additional information required to link to external code. This information includes the external files defined in the class.
properties( ...
       ...
       )
    HEADER_FILE_SHORT_NAME = 'sensor_hand_code_header.h';
    SOURCE_FILE_SHORT_NAME = 'sensor_hand_code_source.c';
end
methods( ...
       ...
       )
    ...
    function [ ] = updateBuildInfo(buildInfo,buildContext)
         externalCodeRootDirectoryAbsolutePath = ...
             SensorTargetSpecificCodeExternalDependency.getHandCodeRootDirectoryAbsolutePath( );
headerFileDirectoryAbsolutePath = ...
fullfile(externalCodeRootDirectoryAbsolutePath,'include');buildInfo.addIncludePaths(headerFileDirectoryAbsolutePath);
         sourceFileDirectoryAbsolutePath = ...
             fullfile(externalCodeRootDirectoryAbsolutePath,'source');
buildInfo.addSourceFiles(SensorTargetSpecificCodeExternalDependency.SOURCE_FILE_SHORT_NAME);
buildInfo.addSourcePaths(sourceFileDirectoryAbsolutePath);
return;
end
When you build the wrapper model, the code generator adds external code to the makefile and build information.
Open sensorCodeGenerationWrapper.mk located in generated_code > sensorCodeGenerationWrapper_ert_rtw to review the external source files and objects, which include sensor_hand_code_source.c and sensor_hand_code_source.obj, respectively. An example of this in the makefile is:
...
## SOURCE FILES
SRCS = sensor_hand_code_source.c $(START_DIR)\sensorCodeGenerationWrapper_ert_rtw\sensorCodeGenerationWrapper.c $(START_DIR)\sensorCodeGenerationWrapper_ert_rtw\sensorCodeGenerationWrapper_data.c
MAIN_SRC = $(START_DIR)\sensorCodeGenerationWrapper_ert_rtw\ert_main.c
ALL_SRCS = $(SRCS) $(MAIN_SRC)
## OBJECTS
OBJS = sensor_hand_code_source.obj sensorCodeGenerationWrapper.obj sensorCodeGenerationWrapper_data.obj
MAIN_OBJ = ert_main.obj
ALL_OBJS = $(OBJS) $(MAIN_OBJ)
...
The absolute path for the external source file is defined in updateBuildInfo by using addSourcePathssensor_hand_code_source.c.
## INTERMEDIATE TARGETS
# SOURCE-TO-OBJECT
.c.obj :
   $(CC) $(CFLAGS) -Fo"$@" "$<"
...
{C:\<yourPath>\examples\slexTirePressureMonitoringSystem\models\sensor\target_specific_code\source}.c.obj :
   $(CC) $(CFLAGS) -Fo"$@" "$<"
The absolute path for the external include file is defined in updateBuildInfo by using addIncludePathssensor_hand_code_source.h is specified in the response file sensorCodeGenerationWrapper_comp.rsp, which is a text file that contains data to include as command-line arguments to the Windows compiler.
Open the file sensorCodeGenerationWrapper_comp.rsp, which is also located in generated_code > sensorCodeGenerationWrapper_ert_rtw, to review the include folders and confirm the folder path for the external target-specific header file. An example of the include arguments is:
...
-IC:/<yourPath>/examples/slexTirePressureMonitoringSystem66/models/sensor/target_specific_code/include
-IC:/<yourPath>/examples/slexTirePressureMonitoringSystem66/generated_code/sensorCodeGenerationWrapper_ert_rtw
...
The generated makefile and supplemental compiler command-line arguments instruct the make system utility to compile and link code generated from the model and the externally provided source and header files.
Inspect Generated C Code for Sensor
In the Embedded Coder app, you can inspect the entry-point functions containing your custom code and the sensor core algorithm in the generated code.
Under the C Code tab, open the Code pane to view the generated code.
Inspect the initialization function sensorCodeGenerationWrapper_initialize defined in sensorCodeGenerationWrapper.c. The initialization function:
Initializes memory pools and initial states used in connection with the referenced sensor core algorithm model
Calls custom code in
sensor_read_nvm, which initializes the parameter argumentLOCAL_DEVICE_IDwith the sensor IDSENSOR_PARAMETERS_NVM_ADDRESS_AS_UINT32read from NVM
/* Model initialize function */
void sensorCodeGenerationWrapper_initialize(void)
{
   /* states (dwork) */
   rtDW.sensorCoreAlgorithmModelReference_InstanceData.rtdw.sensorMeasurmentMessageOutputPort_SendData.SendData
     = Receive_SendData;
   rtDW.sensorCoreAlgorithmModelReference_InstanceData.rtdw.sensorMeasurmentMessageOutputPort_SendData.host
     = (NULL);
/* Assign pointer for instance parameters, Block: '<Root>/sensorCoreAlgorithmModelReference' */
rtDW.sensorCoreAlgorithmModelReference_InstanceData.rtm.sensorCoreAlgorithm_InstP_ref
= &rtInstP.sensorCodeGenerationWrapperrtsensorCoreAlgorithmModelReference; {
DeviceIDBusType s;
int32_T i; /* Start for slMsgMgr: '<Root>/slMsgMgr' */
sensorCodeGenerationWrapper_initMemPool
(&rtDW.slMsgMgr_MemPool_MeasurementMsgBusType,
&rtDW.slMsgMgr_memArray_MeasurementMsgBusType[0],
&rtDW.slMsgMgr_freeList_MeasurementMsgBusType[0], 2); /* Start for Receive: '<Root>/Receive' */
rtDW.Receive = rtP.Receive_InitialValue; /* Outputs for Atomic SubSystem: '<Root>/readNVMInitializeFunction' */
/* MATLAB Function: '<S1>/readNVMMATLABFunction' */
for (i = 0; i < 10; i++) {
s.device_id[i] = 0U;
} size_t elementSize;
elementSize = sizeof(s); /* ParameterWriter: '<S1>/localDeviceIDParameterWriter' incorporates:
* MATLAB Function: '<S1>/readNVMMATLABFunction'
*/
sensor_read_nvm((void *)rtP.SENSOR_PARAMETERS_NVM_ADDRESS_AS_UINT32,
&rtInstP.sensorCodeGenerationWrapperrtsensorCoreAlgorithmModelReference.LOCAL_DEVICE_ID,
elementSize, (size_t)1.0);/* End of Outputs for SubSystem: '<Root>/readNVMInitializeFunction' */ } }
Inspect the execution step function sensorCodeGenerationWrapper_step defined in sensorCodeGenerationWrapper.c. The step function:
Calls custom code in
sensor_read_pressure, which returns the acquired pressure data and stores it inreal_T rtb_pressureRuns the sensor model core algorithm
sensorCoreAlgorithmduring each execution cycleCalls custom code in
sensor_transmit_data(), which transmits the sensor payload data by using calls specific to your message protocol service

Inspect the sensor core algorithm sensorCoreAlgorithm defined in sensorCoreAlgorithm.c. The sensor core algorithm constructs a message from the unique sensor ID, LOCAL_DEVICE_ID , and the data acquisition payload, real_T rtb_pressure, as MeasurementMsgBusType structure elements for transmission.
Note that sensorCoreAlgorithm.c is generated from the shared reference model. You can double-click the sensorCoreAlgorithmModelReference block in the sensor wrapper model to open sensorCoreAlgorithm.c in the Code pane.
See Also
coder.ceval | coder.ExternalDependency | coder.ExternalDependency.updateBuildInfo | Parameter Writer | Send | Receive | Queue