Build Pikes Peak RoadRunner 3D Scene Using RoadRunner HD Map
This example shows how to build a RoadRunner 3D scene for Pikes Peak, Colorado, using MATLAB® functions. You can build a scene for the full road, or a section of Pikes Peak Road using a Keyhole Markup Language (KML) file containing its latitude-longitude coordinates and a Geostationary Earth Orbit Tagged Image File Format (GeoTIFF) file containing its elevation. Use Mapping Toolbox™ to import the data files for the road.
Import KML File for Pikes Peak
You can choose to build the RoadRunner HD Map for either a section of the road or the full road. Note that building a section of the road requires significantly less time than building the entire scene. In this example, you import the coordinates for the road centers into MATLAB from a KML file (Map data ©2022 Google), and then plot the data imported from the KML file to view the coordinates.
To build only a section of the road, specify buildFullRoad as false. To build the full road, specify it as true.
buildFullRoad = false;
Read the data from the KML file.
if buildFullRoad
    kmlData = readgeotable("PikesPeakFullRoadData.kml");
else
    kmlData = readgeotable("PikesPeakRoadSectionData.kml");
end
Plot the coordinates of Pikes Peak road.
geoplot(kmlData)
geobasemap topographic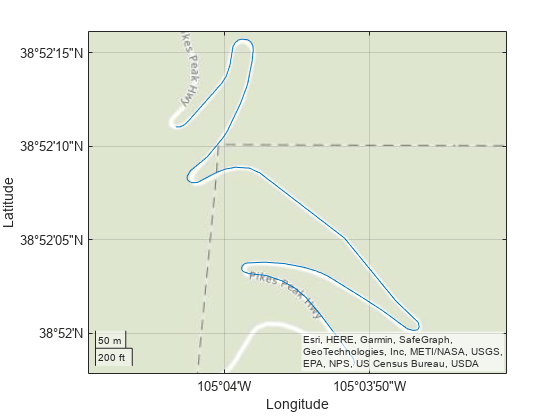
Import GeoTIFF File for Pikes Peak Elevation
To include elevation for Pikes Peak Road, download terrain data for the area from the United States Geological Survey National Map Services, using this link (United States Geological Survey National Map Services TNM Download). This data has been processed by cropping the USGS data to the Pikes Peak area.
Convert the geospatial table to a table of road centers to obtain the latitude and longitude coordinates for the road.
T = geotable2table(kmlData,["Latitude","Longitude"]);
[lat,lon] = polyjoin(T.Latitude,T.Longitude);
Query the elevations of the road coordinates from the terrain data.
filename = "PikesPeak.tif";
outputType = "OutputType";
type = "double";
[georefGrid,spatialRef] = readgeoraster(filename,outputType,type);
ctrElev = geointerp(georefGrid,spatialRef,lat,lon);
Create RoadRunner HD Map
Create the RoadRunner HD Map and set the geographic reference origin.
Create an empty RoadRunner HD Map.
rrMap = roadrunnerHDMap;
Compute the georeference origin as the center of the bounding quadrangle.
[latlim,lonlim] = geoquadline(lat,lon);
lat0 = mean(latlim);
lon0 = mean(lonlim);
Set the geographic reference for the region of interest.
rrMap.GeoReference = [lat0 lon0];
Upsample Road Data
Because the data points obtained from the KML file are sparse, and the road contains sharp curves, you must upsample the data to avoid modeling inaccurate road lanes. You can upsample the data by using helperRoadDimensions helper function. First, you must transform the imported latitude and longitude coordinates to xy-map coordinates using a projected CRS. Then, using the xy-map coordinates for the centers of the road, you must set the road width. In this example, Pikes Peak Road is a two-lane road, so you can assume a total road width of 7.4 meters based on the average lane width of 3.7 meters.
Read the Transverse Mercator projected CRS from the RoadRunner HD Map.
p = readCRS(rrMap);
Project the latitude and longitude coordinates to xy-coordinates.
[x,y] = projfwd(p,lat,lon);
Define the road centers and the road width.
rdCtrs = [x y ctrElev];
rdWidth = 7.4;
Upsample the data for the lane boundaries to obtain a better result for the road curves.
[lftBndry,rgtBndry,ctrBndry] = helperRoadDimensions(rdCtrs,rdWidth);
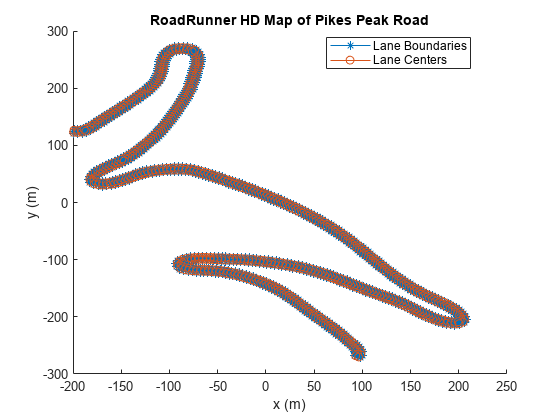
Create Road Network
Create the RoadRunner HD Map road network using the interpolated data, and modify the road to resemble Pikes Peak Road, which consists of two lanes and three lane boundaries. Then, apply a solid white marking to the outer lane boundaries and a double yellow marking between the two lanes for the entire length of the road.
To improve performance as the number of objects in the map increases, initialize the Lanes and LaneBoundaries properties of the HD Map.
rrMap.Lanes(2,1) = roadrunner.hdmap.Lane;
rrMap.LaneBoundaries(3,1) = roadrunner.hdmap.LaneBoundary;
Assign Lane property values. Use deal to match the input lists to the output lists.
[rrMap.Lanes.ID] = deal("Lane1","Lane2");
[rrMap.Lanes.TravelDirection] = deal("Backward","Forward");
[rrMap.Lanes.LaneType] = deal("Driving");
Average the coordinates of the left and right lane boundaries with the corresponding coordinates of the center lane boundary to obtain the lane centers.
lftLane = (lftBndry+ctrBndry)/2;
rgtLane = (rgtBndry+ctrBndry)/2;
[rrMap.Lanes.Geometry] = deal(lftLane,rgtLane);
Assign IDs and the corresponding coordinates to the three lane boundaries.
[rrMap.LaneBoundaries.ID] = deal("Left","Center","Right");
[rrMap.LaneBoundaries.Geometry] = deal(lftBndry,ctrBndry,rgtBndry);
Associate the lane boundaries to their lanes using their IDs. Note that both lanes share the center lane boundary.
leftBoundary(rrMap.Lanes(1),"Left",Alignment="Forward");
rightBoundary(rrMap.Lanes(1),"Center",Alignment="Forward");
leftBoundary(rrMap.Lanes(2),"Center",Alignment="Forward");
rightBoundary(rrMap.Lanes(2),"Right",Alignment="Forward");
Define the file path to the solid white lane marking asset.
solidWhiteAsset = roadrunner.hdmap.RelativeAssetPath(AssetPath="Assets/Markings/SolidSingleWhite.rrlms");Define the path to the solid double yellow lane marking asset. Add both lane markings to the HD Map.
doubleYellowAsset = roadrunner.hdmap.RelativeAssetPath(AssetPath="Assets/Markings/SolidDoubleYellow.rrlms");
rrMap.LaneMarkings(2,1) = roadrunner.hdmap.LaneMarking;
[rrMap.LaneMarkings.ID] = deal("SolidWhite","DoubleYellow");
[rrMap.LaneMarkings.AssetPath] = deal(solidWhiteAsset,doubleYellowAsset);
Specify that the markings span the entire length of their lane boundary. Create a reference and attribution for the solid double yellow marking.
markingSpan = [0 1];
markingRefSY = roadrunner.hdmap.MarkingReference(MarkingID=roadrunner.hdmap.Reference(ID="DoubleYellow"));
markingAttribSY = roadrunner.hdmap.ParametricAttribution(MarkingReference=markingRefSY,Span=markingSpan);
Create a reference and attribution for the solid white marking. Then, apply the solid white marking to the left and right lane boundaries and the solid double yellow marking to the center lane boundary.
markingRefSW = roadrunner.hdmap.MarkingReference(MarkingID=roadrunner.hdmap.Reference(ID="SolidWhite"));
markingAttribSW = roadrunner.hdmap.ParametricAttribution(MarkingReference=markingRefSW,Span=markingSpan);
[rrMap.LaneBoundaries.ParametricAttributes] = deal(markingAttribSW,markingAttribSY,markingAttribSW);
Set Geographic Boundaries
Setting the geographic boundaries for the RoadRunner HD Map centers the scene on the imported road and enables you to insert the road into the scene without using the World Settings Tool in RoadRunner.
Set the geographic bounds for the map as the minimum and maximum coordinate values of the center boundary.
geoBounds = [min(ctrBndry); max(ctrBndry)];
rrMap.GeographicBoundary = geoBounds;
Plot the lane centers and lane boundaries.
plot(rrMap)
title('RoadRunner HD Map of Pikes Peak Road')
xlabel('x (m)')
ylabel('y (m)')
Export RoadRunner HD Map and Import to RoadRunner
Save the RoadRunner HD Map to a file. Import it into RoadRunner by adding the file to a folder in the Library Browser and dragging it into the scene. For more information on importing an HD Map file into RoadRunner, see Import HD Map File into RoadRunner (RoadRunner). Build the scene using the Scene Builder Tool.
Specify an output filename based on the data used to construct the RoadRunner HD Map.
if buildFullRoad
    fileName = "PikesPeakFullRoad.rrhd";
else
    fileName = "PikesPeakRoadSection.rrhd";
end
Write the map to the file.
write(rrMap,fileName)
This figure shows a 3D scene of Pikes Peak Road built using RoadRunner Scene Builder.
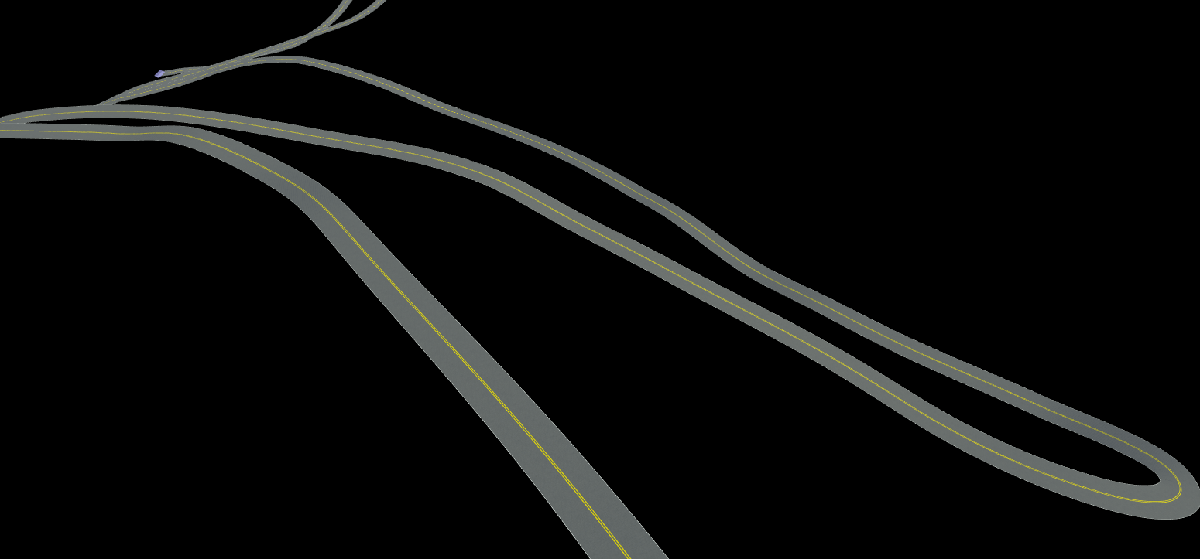
To visualize the terrain, you can import the PikesPeak.tif file into RoadRunner using the Elevation Map Tool (RoadRunner).
