Simulate RoadRunner Scenarios with Actors Modeled in Simulink
These examples show how to create a Simulink® model that represents the actor behavior of a RoadRunner actor. You can then model scenarios using actors with different kinds of actor behaviors represented by such models.
To simulate an actor behavior constructed in Simulink, you must first connect RoadRunner and MATLAB®, and then associate the actor behavior to an actor in RoadRunner.
Note
You cannot directly simulate an actor or a scenario containing the actor from the Simulink model that represents its behavior.
This topic provides basic instructions for creating this connection; for more detailed information, see Connect MATLAB and RoadRunner to Control and Analyze Simulations.
This example assumes that:
You have a RoadRunner license and the product is installed. For more information, see Install and Activate RoadRunner (RoadRunner).
You have a RoadRunner Scenario license and the product is installed.
You have created a RoadRunner project folder named
MyRoadRunnerProject. For more information, see RoadRunner Project and Scene System (RoadRunner).You have created and saved a RoadRunner scene named
MyExampleSceneand a scenario namedMyExampleScenariofor your project.
Author RoadRunner Actor Behavior Using Simulink
Create a model using the RoadRunner Scenario block, the RoadRunner Scenario Reader block, and the RoadRunner Scenario Writer block.
RoadRunner Scenario block — Establish the model interface with a scenario.
RoadRunner Scenario Reader block — Read the world state, including actor pose, velocity, color, and supervisory actions.
RoadRunner Scenario Writer block — Write an actor state to the scenario and report errors and warnings.
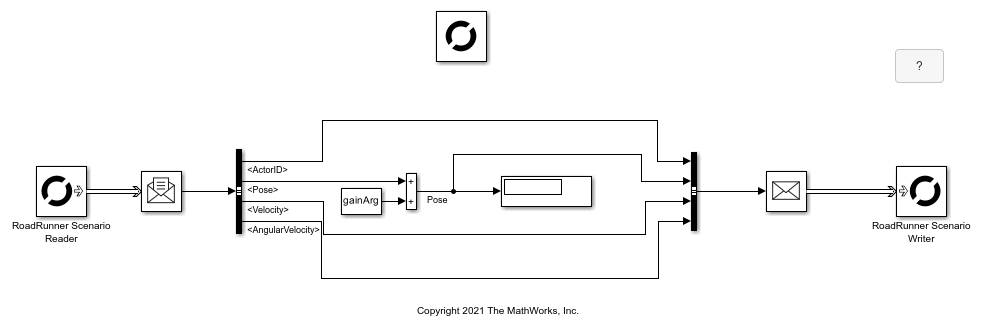
This example shows the Simulink model SimulinkVehicle.slx that contains these three blocks. The model reads ActorID, Pose, Velocity, and AngularVelocity values. Then, a constant value gainArg is added to the Pose value. The values from the gainArg parameter moves the vehicle on the RoadRunner road. The updated values are then sent back to the actor in the scenario.

In the model, bus object definitions are manually loaded using the function below as model preload function.
load(fullfile(matlabroot,'toolbox','driving','core','drivingdata','rrScenarioSimTypes.mat'));
Author RoadRunner Actor Behavior Using User-Defined Actions or Events in Simulink
To receive and process user-defined actions or events from RoadRunner Scenario in Simulink, you must prepare the following files:
A MAT file that maps parameters of a user-defined action or event in RoadRunner Scenario to the fields of a bus object.
A Simulink model that reads user-defined action or event parameters from a MAT file and modifies actor behavior or scenario flow accordingly.
Create a Bus Object for a User-Defined Action or Event
Use the Type Editor (Simulink) to construct
a bus object for a user-defined action or event. The bus object must replicate the
parameter information of a user-defined action or event as specified in RoadRunner Scenario. Add Simulink.BusElement objects to the bus that
correspond to each parameter. You can then define properties such as data type,
dimension, and complexity.
Note
User-defined action or event parameters support all data types supported by RoadRunner scenarios. For more information, see Parameter Data Types (RoadRunner Scenario).

After defining the bus object, you must export the bus object definition to a MAT file. For more information about creating a MAT file from a bus object, see Type Editor (Simulink).
Process User-Defined Actions Using Simulink
Create a Simulink model that reads a user-defined action from a MAT file and uses it to update actor behavior.
This example shows the Simulink model hUDA_SL.slx, which contains the following blocks.
RoadRunner Scenario — Associate Action Name as entered in RoadRunner Scenario with the name of the MAT file (Bus object name).
RoadRunner Scenario Reader — Read the user-defined action at runtime. Set Topic Category to
Actionand Action Type toUser-Defined. Enter the name of the action in the Action Name box; the corresponding MAT file is read during scenario simulation. Use a second RoadRunner Scenario Reader block to input the actor parameters of the associated vehicle in RoadRunner Scenario.RoadRunner Scenario Writer — Convey completion of a user-defined action to a scenario simulation by publishing an Action Complete event. Set Topic Category to
Eventand Event Type toAction Complete. Upon receiving an Action Complete event, the simulation proceeds to the next action phase with the changed actor behavior. Use a second RoadRunner Scenario Writer block to update the behavior of the respective vehicle.
model_name = 'hUDA_SL.slx';
open_system(model_name);

Associate Actor Behavior in RoadRunner and Simulate Scenario
In your RoadRunner scenario, select the Library Browser and then the
Behaviorsfolder.To create a new behavior, right-click an empty space in the list of behaviors, pause on New, then select Behavior. Enter a name for your new behavior, such as
MyNewBehavior. This animation shows how to complete these steps.
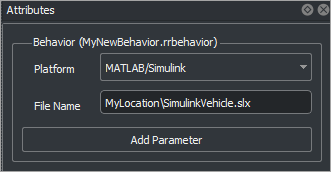
On the Attributes pane, set Platform to
MATLAB/Simulink. As the File Name, use the location of your fileSimulinkVehicle.slxorhUDA_SL.slx.If your Simulink model file is in your working folder, you can enter the name of your file together with its extension such as
.slx.You can also use the full path to enter the location of your file, for example
MyLocation\SimulinkVehicle.slx.

This action creates a new behavior that you can attach to actors in your scenario.

Add a new
CompactCarto your scenarioMyExampleScenario.To associate the Simulink model behavior to a RoadRunner actor, select
CompactCar. Then, in the Attributes section, in the Behavior box, addMyNewBehaviortoCompactCarby clicking and dragging the behavior icon to the box. Save your scenario.
Specify the path to your RoadRunner installation folder using these commands, replacing
MyInstallationFolderwith the path to your RoadRunner installation. You need to run the commands in this step only the first time you are setting up the connection between RoadRunner and your MATLAB installation.RRInstallationFolder = "MyInstallationFolder"; s = settings; s.roadrunner.application.InstallationFolder.PersonalValue = RRInstallationFolder; s.roadrunner.application.InstallationFolder.TemporaryValue = RRInstallationFolder;Note
Specify the full path to the folder containing the
AppRoadRunner.exeexecutable. The default location of this executable on Windows® isC:\Program Files\RoadRunner R2022b\bin\win64, whereC:\Program Files\RoadRunner R2022bis your RoadRunner installation folder. The folder could be different on your computer.To open the RoadRunner project
MyRoadRunnerProjectfrom MATLAB, use this command.rrApp = roadrunner('MyProjectLocation');Open the scene
MyExampleScene.openScene(rrApp, 'MyExampleScene');Open the scenario
MyExampleScenario.openScenario(rrApp, 'MyExampleScenario');Get the simulation object to control simulation from MATLAB.
rrSim = createSimulation(rrApp);
Start the simulation from the command line.
set(rrSim, 'SimulationCommand','Start');
Tip
When debugging cosimulations using the MATLAB or Simulink debugger, the simulation might time out. Check the simulation timeout setting using this code.
By default, the simulation times out after 300 seconds, or 5 minutes. If you expect the simulation to take more than 5 minutes between simulation steps, set a higher timeout value using this code, which sets the timeout to 600 seconds (10 minutes) in the current MATLAB session.s = settings; s.roadrunner.application.Timeout.ActiveValue
s = settings;
s.roadrunner.application.Timeout.TemporaryValue = 600;
If the simulation times out, the current
ScenarioSimulationobject becomes invalid. If theScenarioSimulationobject is invalid, RoadRunner generates an error if you attempt to start the simulation. To restart the simulation, delete theScenarioSimulationobject and recreate it using this code. ReplacerrSimwith the name of yourScenarioSimulationobject andrrAppwith the name of yourroadrunnerobject.delete(rrSim) rrSim = createSimulation(rrApp);
For more information about simulating your scenario in RoadRunner or controlling a scenario simulation using MATLAB, see Overview of Simulating RoadRunner Scenarios with MATLAB and Simulink.
See Also
Topics
- Overview of Simulating RoadRunner Scenarios with MATLAB and Simulink
- Add Sensors to RoadRunner Scenario Using Simulink
- Simulate RoadRunner Scenarios with Actors Modeled in MATLAB
- Add Sensors to RoadRunner Scenario Using MATLAB
- Publish Ground Truth and Sensor Data from RoadRunner Scenario to ROS 2 Network (ROS Toolbox)
- Publish Actor Behavior as Proto File, Package, Action Asset or Event Asset