Prototyping with Sonar Proximity Sensor
This example shows how to prototype with ThingSpeak™ using a Wi-Fi® connected Arduino® board.
You read and write channel data with the ThingSpeak Communication Library. In this example, an adjustable threshold is read from ThingSpeak to create a proximity detector. The hardware consists of an Arduino MKR100 with a sonar sensor and an indicating LED to show when an object is present.
Prototyping a sensor project can require multiple reflashing of the code to fine-tune calibration parameters, such as those for a temperature sensor. A hardware adjustment adds complexity, reduces reliability, and can be difficult to reach when your project is deployed. Instead, you can read calibration parameters from ThingSpeak and change the parameters in real time. You can improve the quality of your measurements when you adjust a tuning parameter stored on ThingSpeak.
Supported Hardware
Arduino MKR1000
Arduino Uno, Mega, Due, or Leonardo with a wireless network or Ethernet connection
Particle Photon (with some code and schematic adjustments)
In this example, a sonar sensor monitors a stapler and posts the measurement to your channel. The sonar sensor works by sending a sound pulse and measuring the time it takes for the pulse to return from an object. The system uses the distance threshold read from ThingSpeak and compares the threshold to the measured distance. The LED is on when the stapler is present.

After you complete this example, you will see the proximity data and the settings in your channel. The ThingSpeak channel view shows the following proximity data and settings:
Threshold is set to 15 cm
Ten measurements are taken for each average
Read flag is set to force reading calibration parameters
Data shows somebody ”borrowed” the stapler at 11 A.M., returning it later to a new position

Required Hardware
Arduino MKR1000 or other Arduino with Ethernet or wireless network connection
HC-SR04 sonar sensor
Jumper wires (at least 4)
LED
Small resistor (100 Ω – 1 kΩ)
USB cable
Channel Setup
1) Create a ThingSpeak channel, as shown in Collect Data in a New Channel. Store the data in the first field, and store the device settings in successive fields. The device settings include the distance threshold, number of measurements to average, and a flag to control whether the device updates settings on each loop.
2) Enable fields 1, 2, 3, and 4 in the Channel Settings view. To distinguish between the fields, provide a descriptive name for each field. This image shows a single channel configured to collect data in the first field and store the calibration parameters in fields 2, 3, and 4.

3) Note the appropriate read and write API keys from the API Keys tab in the Channel Settings view (circled in the image).
4) Populate your calibration fields using a browser window. You can copy the text from the API Keys tab or modify this text with your write API key. Enter each URL directly into the address bar of your browser, changing YOUR WRITE API KEY to the write API key for your channel.
a. Set the threshold for detecting an object (50 cm is a good starting point):
https://api.thingspeak.com/update?api_key=YOUR WRITE API KEY&field2=THRESHOLD
b. Set the number of measurements to average:
https://api.thingspeak.com/update?api_key=YOUR WRITE API KEY&field3=NUMTOAVERAGE
c. Set the control flag so the device checks for new settings periodically:
https://api.thingspeak.com/update?api_key=YOUR WRITE API KEY&field4=1
The browser returns the number of entries in the channel. If you just created the channel, you see a 1, 2, and 3 when you populate the three required calibration fields.
Schematic and Connections
1) Connect VCC to 5 V on the MKR-1000.
2) Connect the sensor ground to the Arduino ground.
3) Connect the Trig pin to Arduino pin 8.
4) Connect the Echo pin to Arduino pin 12.
5) Connect a resistor to Arduino pin 5, and connect the resistor to an indicator LED. Connect the anode of the LED to the ground.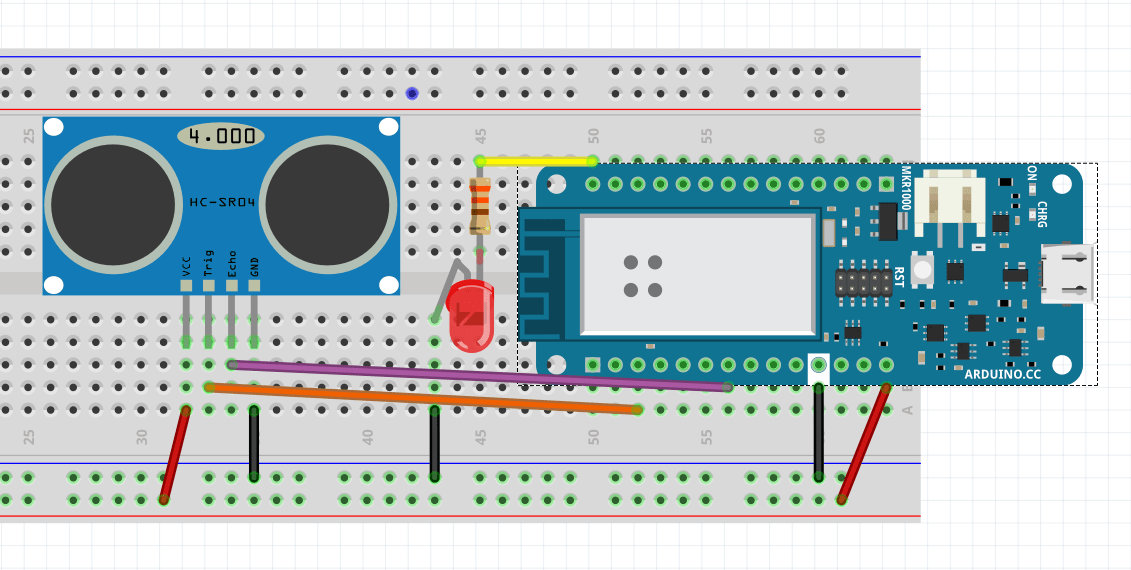

Program Your Arduino
1) Download the latest Arduino IDE.
2) Add the ThingSpeak Library for Arduino and ESP8266 to the library manager. Select Sketch > Include Library > Manage Libraries. Select ThingSpeak to add it to your sketch.
3) Add the WiFi101 library in the library manager. Note: Make sure to install version 0.13 of the library. There is a bug in version 0.14 that causes posts to fail. Select Sketch > Include Library > Manage Libraries. Select WiFi101 to add it to your sketch.
4) Create the application. Open a new window in the Arduino IDE and save the file. Add the code provided in the Code section. Be sure to edit the wireless network information, channel ID, and API keys.
5) After you successfully upload your program, you can monitor the output using the serial monitor. If an object is present at a distance closer than the set threshold, then your device posts the distance to your channel. Try experimenting with the number of measurements to average and see how your measured fluctuations change. Once you set parameters, you can change the value of the read flag from 1 to 0. Once your device reads this flag as 0, it stops checking ThingSpeak for parameters, saving power and bandwidth.
Code
1) Include libraries and initialize the control pins.
#include <ThingSpeak.h>
#include<WiFi101.h>

#define triggerPin 8
#define echoPin 12
#define LEDpin 6
2) Define and initialize the variables. Be sure to edit the wireless network information, channel ID, and API keys. Find your channel ID at the top of the main page for your channel.
// Network information
const char* ssid = "SSID";
const char* password = "xxxxxxxxxx";

// ThingSpeak information
char* writeAPIKey = "XXXXXXXXXXXXXXXX";
char* readAPIKey = "YYYYYYYYYYYYYYYY";
const long channelID = 000000;
const unsigned int firstReadFieldNumber = 2;
const unsigned int secondReadFieldNumber = 3;
const unsigned int switchField = 4; // Field number (1-8) to use to change status of device.  Determines if data is read from ThingSpeak.

// Other constants
const unsigned long postingInterval = 60L * 1000L;   // Post data every 60 seconds

// Global variables
unsigned long lastConnectionTime = 0;
long lastUpdateTime = 0;
float distanceThreshold = 0;
bool getInfo = 1;  // Set this to zero if you don’t want to read data from ThingSpeak anymore (i.e. calibration complete)
int points = 7;
WiFiClient client;
3) Initialize pins for input and output, and read the calibration parameters for the first time in the setup routine.
void setup() {
  Serial.begin (9600);
  pinMode(triggerPin, OUTPUT);
  pinMode(LEDpin, OUTPUT);
  pinMode(echoPin, INPUT);
  connectWifi();
  Serial.println("Start");

  // Get the initial parameters from ThingSpeak.
  distanceThreshold = readTSData(channelID,firstReadFieldNumber,readAPIKey);
  points = readTSData(channelID,secondReadFieldNumber,readAPIKey);
}
4) Each time the main loop executes, take multiple measurements. If the data has not been written to ThingSpeak for a while, write the data to the output channel. Also, if the read flag was last read as true, check the calibration data and flags in each cycle.
void loop() {

  float  distance=0;

  // Make sure there is an Internet connection.
  if(WiFi.status() != WL_CONNECTED){

    connectWifi();
    }

     for (uint16_t loops = 0; loops < points; loops++){
      distance += getDistance(triggerPin,echoPin);  //make a measurement, store the sum of all measurements
      delay(5);
     }

     distance = distance/points;

    if (distance < distanceThreshold){
      digitalWrite(LEDpin,HIGH);
      }

     else{

      digitalWrite(LEDpin,LOW);
      }


     Serial.println("Ave: "+ String(distance)+ " cm");

    if (millis() - lastUpdateTime >=  postingInterval) {

      lastUpdateTime = millis();

           if (!(getInfo==0)){

            distanceThreshold = readTSData(channelID,firstReadFieldNumber,readAPIKey);
            points = readTSData(channelID,secondReadFieldNumber,readAPIKey);
            getInfo = (bool)readTSData(channelID,switchField,readAPIKey);
            }

       if (distance < distanceThreshold){

      // Write data to ThingSpeak channel.
       writeTSData(channelID, 1, distance, writeAPIKey);
       }

      }

    delay(500);    // Provide some delay between measurements.

}
5) Use these functions to read and write data to and from ThingSpeak.
int writeTSData(long TSChannel,unsigned int TSField,float data,char* ReadAPIKey){
  int  writeSuccess = ThingSpeak.writeField(TSChannel, TSField, data, writeAPIKey); //write the data to the channel
  return writeSuccess;
}

// Use this function if you want multiple fields simultaneously.
/*
int writeTDData(long TSChannel,unsigned int TSField1,float data1,unsigned int TSField2,data2,char* ReadAPIKey){
  ThingSpeak.setField(TSField1,data1);
  ThingSpeak.setField(TSField1,data2);

  writeSuccess = ThingSpeak.writeFields(TSChannel, writeAPIKey);
  return writeSuccess;
}
*/

float readTSData(long TSChannel,unsigned int TSField,char* ReadAPIKey){

  float data = 0;

  data = ThingSpeak.readFloatField(TSChannel,TSField,ReadAPIKey);
  Serial.println(" Data read from ThingSpeak "+String(data));
  return data;
}
6) Use getDistance to get a single measurement from the sensor.
float getDistance(int tPin,int ePin){

  long duration, distance;

  digitalWrite(tPin, LOW);  // Reset the trigger pin.
  delayMicroseconds(2);
  digitalWrite(tPin, HIGH);  // Start a measurement.
  delayMicroseconds(10); //
  digitalWrite(tPin, LOW);   // Complete the pulse.
  duration = pulseIn(ePin, HIGH);  // Wait for a reflection pulse.
  distance = (duration/2) / 29.1;     // Calculate the appropriate distance using the estimated speed of sound.

  // This section is useful when debugging the sensor.
/*
  if (distance >= 200 || distance <= 0){
    Serial.println("Out of range");
  }
  else {
   Serial.print(distance);
   Serial.println(" cm");
  }
  */
  return distance;
}
7) Connect your device to a wireless network using the connectWiFi function.
int connectWifi(){

    while (WiFi.status() != WL_CONNECTED) {
       WiFi.begin(ssid, password);
       delay(2500);
       Serial.println("Connecting to WiFi");
    }

    Serial.println("Connected");
    ThingSpeak.begin(client);
  }