Controlling LEGO MINDSTORMS EV3 Robot Using Raspberry Pi Sense HAT
This example shows how to read the Accelerometer on Raspberry Pi® Sense HAT and use this data to control the movement of a LEGO® MINDSTORMS® EV3 robot.
Introduction
The Raspberry Pi Sense HAT is an add-on board for Raspberry Pi hardware. It has an 8X8 RGB LED Matrix, a five-position joystick and includes the following sensors:
Humidity sensor
Pressure sensor
IMU sensor (Accelerometer, Gyroscope, and Magnetometer).
LEGO MINDSTORMS EV3 is a Linux® based educational robot kit developed by the LEGO group. The Simulink® Support Package for LEGO MINDSTORMS EV3 Hardware enables you to create and run Simulink models on LEGO MINDSTORMS EV3 hardware. The support package includes a library of Simulink blocks for configuring and accessing LEGO MINDSTORMS EV3 sensors and actuators.
We will develop two Simulink models,
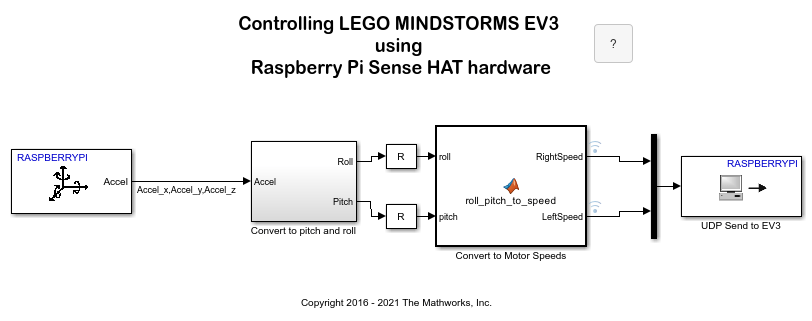
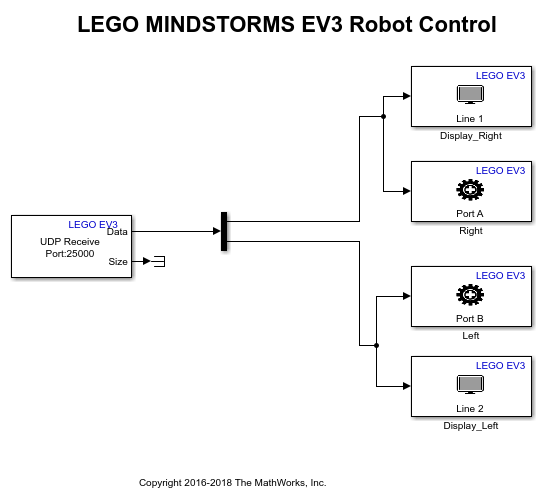
raspberrypi_sensehat_ev3robot— In this model, we will read the Accelerometer on-board Sense HAT. We will determine the motor speeds for the EV3 robot by using the acceleration data read from the Sense HAT Accelerometer. A network connection would be setup between the Raspberry Pi device and the EV3 robot for data exchange.ev3_robot— In this model, we would use the communication blocks of LEGO MINDSTORMS EV3 to receive the data sent by Raspberry Pi. The data received will be used to drive the motors of the EV3 robot.
This example would help you learn the following :
Set up network connection between Raspberry Pi hardware and LEGO MINDSTORMS EV3 robot
Configure and run a Simulink model for Raspberry Pi to read the Accelerometer on-board Sense HAT and use the acceleration data to determine the motor speed of the EV3 robot.
Configure and run a Simulink model for LEGO MINDSTORMS EV3 robot to receive data sent from Raspberry Pi hardware and use it to drive the EV3 robot motors.
Prerequisites
We recommend completing the Get Started with Simulink Support Package for Raspberry Pi Hardware and the Getting Started with LEGO MINDSTORMS EV3 Hardware examples.
Required Hardware
To run this example you will need the following hardware:
Raspberry Pi hardware
Raspberry Pi Sense HAT
LEGO MINDSTORMS EV3
Two LEGO MINDSTORMS EV3 Large Motors
EV3 WiFi® Dongle
Working Principle of Robot Movement Control
In this section, we will discuss how the acceleration data can be used to control the movement of the robot.
The 'pitch' and 'roll' value corresponding to a given position of Sense HAT can be mathematically determined from the acceleration measured from the Accelerometer on-board Sense HAT. We map the 'pitch' and 'roll' movement of the Sense HAT to the movement of the EV3 robot. The 'pitch' would represent the forward and reverse movement of the motor whereas the 'roll' would represent the sideward movement of the robot.

The mathematical equations required to convert the 'pitch' and 'roll' values to linear speed of the robot are realized using a MATLAB® function block in the Simulink model for configured for Raspberry Pi.
A communication link for data exchange is set up between Raspberry Pi and the EV3 brick. The linear motor speed derived from the pitch and roll values is sent over UDP from Raspberry Pi to EV3. EV3 will receive this data and use it as input to drive the two motors.
Task 1 - Familiarize with Controlling EV3 Using Host Model
Complete the Control LEGO MINDSTORMS EV3 Robot from Host Computer example to get familiarity with setting up a communication link between EV3 and a Host model for data exchange.
The ev3_robot_hostcontrol Simulink model used in this example shows usage of Dashboard widgets in a Simulink model running on a Host machine to control the movement of a EV3 robot. The communication between EV3 and the Host is over UDP.
Task 2 - Install Simulink Support Package for Raspberry Pi
You need Simulink Support Package for Raspberry Pi to run Simulink model on Raspberry Pi hardware.
1. Install Simulink Support Package for Raspberry Pi.
Click the link to Download and Install Simulink Support Package for Raspberry Pi.
2. Complete the Get Started with Simulink Support Package for Raspberry Pi Hardware example in Simulink Support Package for Raspberry Pi you just installed.
Task 3 - Familiarize with Sense HAT Accelerometer
Auto-Rotate Image Displayed on Raspberry Pi Sense HAT LED Matrix example shows usage of the Accelerometer on the Raspberry Pi Sense HAT. The acceleration data is used to auto-rotate an image displayed on the LED matrix of Sense HAT.
Complete this example to get familiarity with the usage of Accelerometer.
Task 4 - Set Up LEGO MINDSTORMS EV3 Robot
In this task, we will build a EV3 robot and connect the EV3 brick to the same network as the Host PC.
1. Build a two-wheeled robot. You can build a robot similar to the one described in the printed building instructions in the education core set.
2. Set up a connection between EV3 brick and your host machine. Please refer to Task 1 and 2 in Getting Started with LEGO MINDSTORMS EV3 Hardware example.
Task 5 - Configure Network Connection
In this task, you will set up network connection between Raspberry Pi board and LEGO MINDSTORMS EV3. The communication protocol used in this example is UDP.
1. Connect Raspberry Pi board to the network with Ethernet cable through Ethernet port. Make sure that both the Raspberry Pi board, Host PC and the EV3 robot are connected to the same network.
2. Verify the connection between your Raspberry Pi board and LEGO MINDSTORMS EV3.
Execute the following command on the MATLAB command prompt:
r = raspberrypi
This command returns an object with IP address info for the Raspberry Pi board.
Run command system(r, 'sudo ping [EV3_IP_Address] -c 10') with the LEGO MINDSTORMS EV3 IP address found in step 2 of Task 3 to verify the connection. e.g.
system(r, 'sudo ping 192.168.1.2 -c 10')
Task 6 - Run Models on Raspberry Pi Hardware and LEGO MINDSTORMS EV3 Robot
1. Open the raspberrypi_sensehat_ev3robot Simulink model.
2. Update Send to EV3 block with the IP address of your EV3 hardware.
3. In the Hardware tab of the Simulink model, click Build, Deploy & Start to run the model on Raspberry Pi hardware.
4. Open the ev3_robot Simulink model.
5. In the Hardware tab of the Simulink model, click Build, Deploy & Start button of to run the model on LEGO MINDSTORMS EV3 hardware.
6. Control the EV3 robot using the Sense HAT connected to the Raspberry Pi hardware.
Other Things to Try
Improve the control system on the EV3 robot. Try incorporating a PID controller.
See the Drive with PID Control example and improve the control algorithm on the EV3 robot.
You can also select a web site from the following list:
Americas
- América Latina (Español)
- Canada (English)
- United States (English)
Europe
- Belgium (English)
- Denmark (English)
- Deutschland (Deutsch)
- España (Español)
- Finland (English)
- France (Français)
- Ireland (English)
- Italia (Italiano)
- Luxembourg (English)
- Netherlands (English)
- Norway (English)
- Österreich (Deutsch)
- Portugal (English)
- Sweden (English)
- Switzerland
- United Kingdom (English)