View and Link Requirements in Simulink
You can use the Requirements Perspective to view, author, edit, and link requirements to Simulink model elements without leaving the Simulink Editor.
This tutorial shows how to view, create, and navigate links between Simulink® blocks by using the Requirements Perspective.
Open Project Files
Open the CruiseRequirementsExample project, which contains requirements, models, and tests for an automobile cruise control system. Then, open the crs_controller model.
openProject("CruiseRequirementsExample");
open_system("models/crs_controller")
Open Requirements Perspective
In the Simulink model, open the Requirements Perspective by clicking the Perspectives icon ![]() in the lower-right corner, then click Requirements.
in the lower-right corner, then click Requirements.

The Requirements pane shows only the requirement sets associated with the model. In the crs_controller model, it lists the crs_req_func_spec requirement set.

Inspect the requirement with the index 2 by selecting it in the Requirements pane. The Property Inspector displays details about the requirements and highlights the linked subsystem in the model.
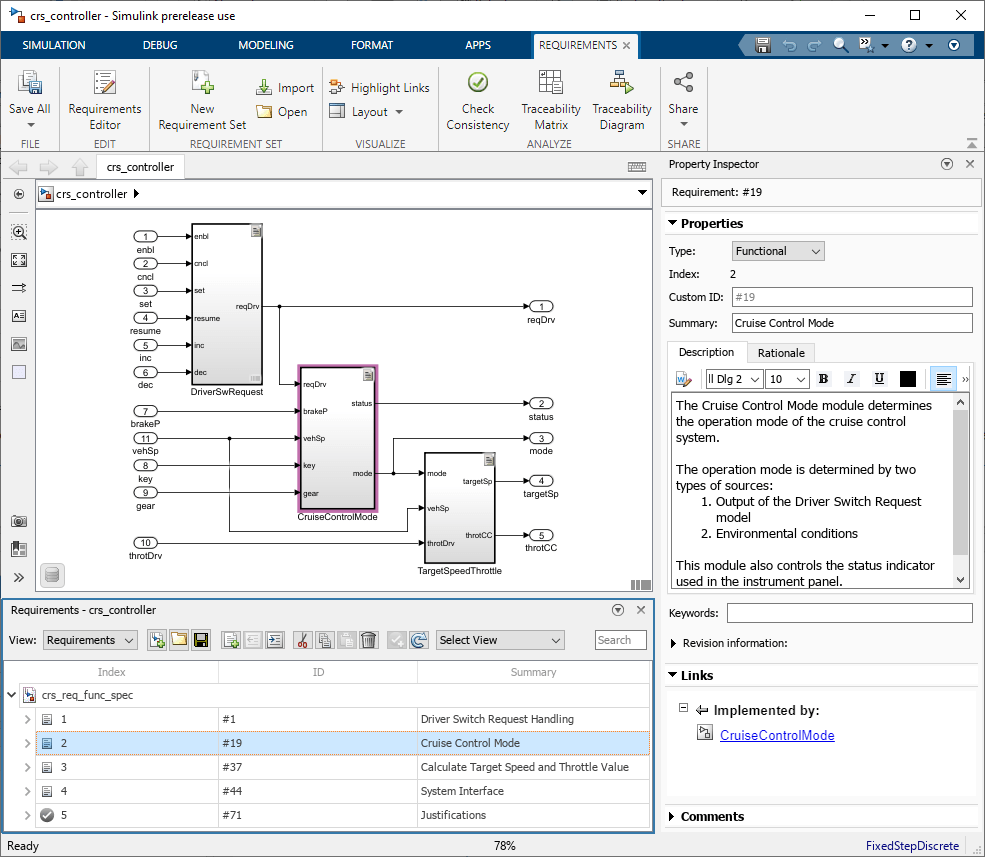
Similarly, selecting the CruiseControlMode subsystem in the model highlights the Cruise Control Mode requirement in the Requirements pane.
Create Links
In the Requirements pane, find the requirement that has the summary Enable switch detection by entering the summary in the search bar.

In the Simulink model, locate the enbl block, which connects to the input port of the DriverSwRequest subsystem.

Create a link between the Enable switch detection requirement and the enbl block by selecting the requirement and dragging it onto the block. Create the link with the default annotation by clicking the white space in the Simulink Editor. You can also create the link by selecting the requirement, right-clicking the block and select Requirements > Link to Selection in Requirements Browser. The linked block displays a Requirement icon ![]() .
.
Display Requirement Annotations
You can use requirement annotations to display details about linked requirements directly in the Simulink Editor. Display the annotation for the linked requirement by selecting the Requirement icon ![]() and clicking Show. The annotation displays the requirement ID, summary, and the link type.
and clicking Show. The annotation displays the requirement ID, summary, and the link type.

To display the requirement description in the annotation, double click the annotation.
Navigate Between Linked Requirements and Blocks
You can navigate between the linked requirement and the block by using hyperlinks in the Simulink Editor. To navigate to the linked requirement from the block, select the Requirement icon ![]() on the
on the enbl block and click Enable Switch Detection.

The software highlights the linked requirement in the Requirements pane. Alternatively, you can navigate to the requirement from a requirement annotation by right-clicking the annotation and selecting Select in Requirements Browser.
Navigate from the requirement to the enbl block. In the Requirements pane, select the requirement. In the Property Inspector, under Links, click enbl.

The software highlights the enbl block in the Simulink Editor.
Related Topics
You can also select a web site from the following list:
Americas
- América Latina (Español)
- Canada (English)
- United States (English)
Europe
- Belgium (English)
- Denmark (English)
- Deutschland (Deutsch)
- España (Español)
- Finland (English)
- France (Français)
- Ireland (English)
- Italia (Italiano)
- Luxembourg (English)
- Netherlands (English)
- Norway (English)
- Österreich (Deutsch)
- Portugal (English)
- Sweden (English)
- Switzerland
- United Kingdom (English)