Detect and Track Objects Using Deep Learning on Android Device
This example shows how to use the Simulink® Support Package for Android® Devices to deploy a deep learning algorithm that detects and tracks an object on your Android device such as a phone or tablet. This algorithm uses the ResNet-18-based YOLOv2 neural network to identify the object captured by the camera. You can experiment with different objects around you to see how accurately the network detects images on your Android device.
Prerequisites
For more information on how to use the Simulink Support Package for Android Devices to run a Simulink model on your Android device, see Getting Started with Android Devices.
Download and install ARM® Compute Library using the Hardware Setup screen. This example uses ARM Compute Library version 20.02.1. To configure the ARM Compute Library in the Simulink model, see the section Configure ARM Compute Library Parameters in this example. For more information on the Hardware Setup screen, see Install Support for Android Devices.
Required Hardware
Android device such as a phone or tablet
USB cable
Capture Ground Truth Data for Training
Capture a video of an object that you want to detect and track. You can also follow the training procedure in this example by using a video of your choice. You can capture the video of an object for a longer duration of time in different viewing angles and lighting conditions to obtain a training data set that has better detection and identification results.
After you capture the video, transfer the MP4 file to your host machine.
Export Ground Truth Data for Labeling Using Video Labeler App
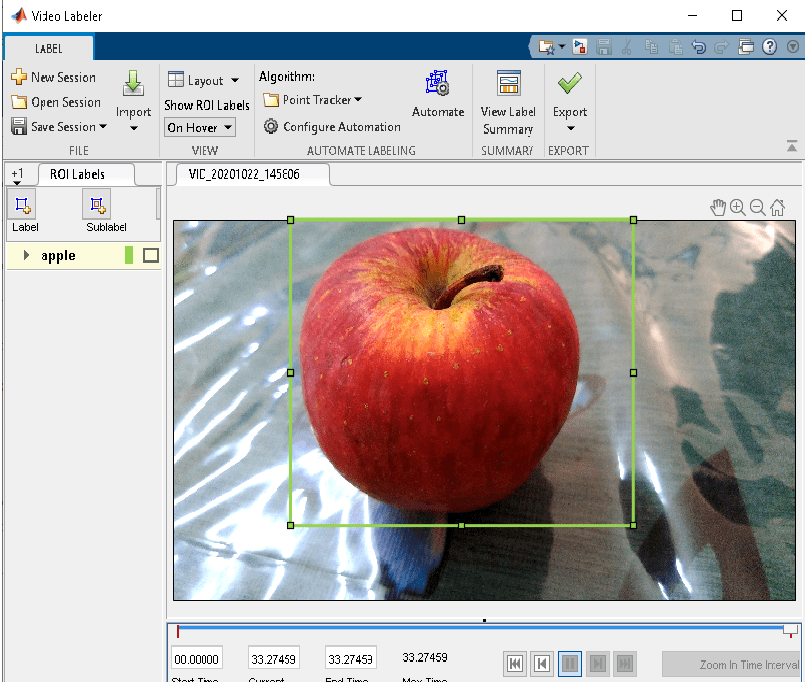
The ground truth data contains information about the data source, label definitions, and marked label annotations for a set of ground truth labels. You can export this data using the Video Labeler (Computer Vision Toolbox) app into a MAT file.
To open the Video Labeler app, run this command in the MATLAB® Command Window:
videoLabeler
Follow these steps in the Video Labeler app:
1. In the File section, click Import.
2. Select Add Video and select the video of the object.
3. In the ROI Labels pane, click Label. Create a Rectangular label, name it, and click OK. In this example, the object has the name apple.

4. Use the mouse to draw a rectangular ROI in the video.
5. In the Automate Labeling section, click Select Algorithm and select the Point Tracker algorithm. Then click Automate. The algorithm instructions appear in the right pane, and the selected labels are available to automate.
6. In the Run section, click Run to automate labeling for the video.
7. When you are satisfied with the algorithm results, in the Close section, click Accept.
8. Under Export Labels, select To File to export the labeled data to a MAT file, appledetect.mat.
For detailed information on how to use the Video Labeler app, see Video Labeler (Computer Vision Toolbox) and Get Started with the Video Labeler (Computer Vision Toolbox).
9. Save the appledetect.mat file in the working directory of the example.
Train YOLOv2 Object Detector
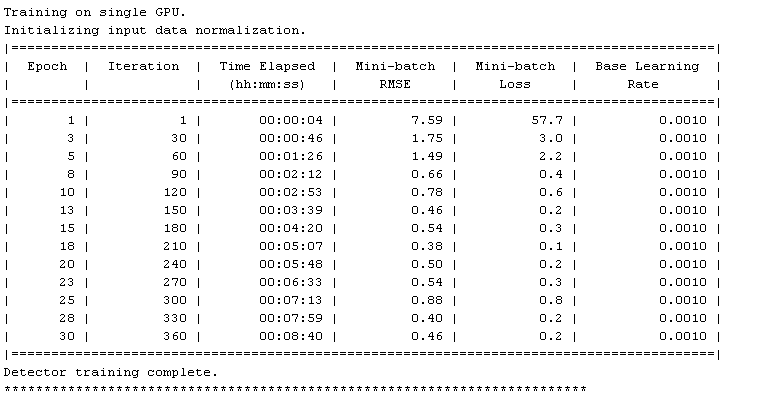
Train the YOLOv2 object detector with the video captured from the camera. The appledetect.mat file contains the exported ground truth data. Use this file to train the YOLOv2 object detector.
The deepresnet18.m file uses a pretrained ResNet-18 neural network as a base of YOLOv2 detection network for the feature extraction of an object. You can find this file in the example folder structure. Make sure that the deepresnet18.m file is present in the same working directory of the example. Open this file and configure the following parameters:
1. Specify the name of the MAT file exported using the Video Labeler app in the labelData parameter. In this example, the MAT file is saved as appledetect.mat.
2. Specify the size of the input image for training the network in the imagesize parameter. In this example, the image size is set to [224, 224, 3].
3. Specify the number of object classes the network has to detect in the numClasses parameter. In this example, the parameter is set to 1 to detect and track one apple.
4. Specify the pretrained ResNet-18 network layer as the base network for feature extraction of the object. In this example, ResNet-18 is the base for the YOLOv2 object detector.
5. Specify the network layer to use for feature extraction. In this example, the ResNet-18 neural network extracts features from the res3b_relu layer. This layer outputs 128 features and the activations have a spatial size of 28-by-28.
6. Specify the size of the anchor boxes in the anchorBoxes field. In this example, the parameter is set to [64,64].
7. Create the YOLOv2 object detection network using the yolov2Layers (Computer Vision Toolbox)
8. You can also analyze the YOLOv2 network architecture using the analyzeNetwork (Deep Learning Toolbox)
9. Configure the options for training the deep learning ResNet-18 neural network using the trainingOptions (Deep Learning Toolbox)
10. After loading the appledetect.mat file, create an image datastore and a box label datastore training data from the specified ground truth file using the objectDetectorTrainingData (Computer Vision Toolbox)
11. After combining the datastores, train the YOLOv2 network using the trainYOLOv2ObjectDetector (Computer Vision Toolbox)

12. After the YOLOv2 detector training is complete, save the MAT file. In this example, it is saved as detectedresnet.mat. Save this MAT file in the current working directory of the example.
Code Verification and Validation Using PIL
You can configure the Simulink model to run processor-in-the-loop (PIL) simulation on Android devices. You can test and verify whether the Simulink model and the generated code run on your Android device as expected. In this example, you can verify if the deep learning algorithm detects and tracks the object accurately or not. For more information on code verification and validation with PIL, see Code Verification and Validation Using PIL Simulation on Android.
Open the androidObjectClassificationsPIL Simulink model.

Connect your Android device to the host computer.
Follow these steps to run the Simulink model in PIL simulation.
1. In the Image From File (Computer Vision Toolbox) block, select the image of an object you want to detect and track. Use the appleImage.png file for this example.
2. On the Modeling tab of the Simulink model, select Model Settings.
3. In the Configuration Parameters dialog box, in the left pane, select Code Generation > Verification.
4. In the Advanced Parameters section, set Create block to PIL.
5. Click Apply > OK.
6. In the Simulink model, right-click the MATLAB Function block and select C/C++ Code > Deploy this Subsystem to Hardware. A new PIL version of the MATLAB Function subsystem block is created in a new model.
7. Copy this block and replace it with the MATLAB Function block in the Simulink model.

8. On the Simulation tab of the Simulink model, click Run.
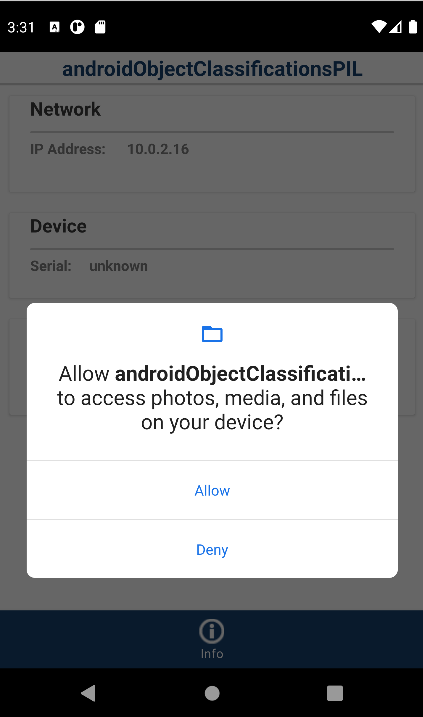
9. Select Allow once a permission dialog box displays on your Android device. The deep learning algorithm requires permission to access the media files on your device.

10. The Video Viewer (Computer Vision Toolbox) window opens automatically. Observe that the apple is detected in the image.

Once you confirm that the output in Video Viewer meets your expectation, you can proceed with configuring the androidObjectClassification Simulink model and deploying it on your Android device.
Configure Simulink Model and Calibrate Parameters
This example uses a preconfigured Simulink model from the Simulink Support Package for Android Devices.
Open the androidObjectClassification Simulink model.

1. Connect the Android device to the host computer using the USB cable.
2. On the Modeling tab of the Simulink toolstrip, select Model Settings.
3. In the Configuration Parameters dialog box, select Hardware Implementation. Verify that the Hardware board parameter is set to Android device.
4. From the Groups list under Target hardware resources, select Device options.
5. From the Device list, select your Android device. If your device is not listed, click Refresh.
Note: If your device is not listed even after you click Refresh, ensure that you have enabled the USB debugging option on your device. To enable USB debugging, enter androidhwsetup in the MATLAB Command Window and follow the instructions on the screen.
The Android Camera block captures the video of the object using its rear camera. You can configure the following parameters in the Block Parameters dialog box of the Camera block.
1. Set Resolution to Back. To get a list of device specific resolutions, connect your configured device to the host machine and click Refresh.
2. Set the Sample time to 0.25 seconds.
The Transpose block transposes the R, G, and B data from the Android Camera block from row major to column major. It then feeds the transposed R, G, and B data to the Matrix Concatenate block. This block concatenates the R, G, and B image data to create a contiguous output signal, Imin. You can configure the following parameters in the Block Parameters dialog box of the Vector Concatenate block.
1. Set Number of inputs to 3. This value indicates the R, G, and B image data input.
2. Set Mode to Multidimensional to perform multidimensional concatenation on the R, G, and B image data input.
3. Set Concatenate dimension to 3 to specify the output dimension along which to concatenate the input array of R, G, and B image data.
The deeplearning function block uses the YOLOv2-based convolutional neural network (CNN) saved as a MAT file. Pass Imin as an input to the detector network. If the object is detected, Imout contains the bounding box information of the detected object.
Pass the name of the MAT file generated from training the YOLOv2 object detector to the deeplearning function block. In this example, use the MAT file detectedresnet.mat.
The ImagetoRGB function block again transposes the image data to R, G, and B image values. These R, G, and B image data values are the inputs to the Android Video Display block in the Simulink model.
The Video Display block displays the video of the object on your Android device.
Configure ARM Compute Library Parameters
Select a version of ARM Compute Library from the Configuration Parameters dialog box.
1. On the Hardware tab of the androidObjectClassification Simulink model, select Configuration Parameters > Code Generation. In the Target selection section, set Language to C++.
2 Select Code Generation > Interface. In the Deep Learning section, set these parameters.
a. Set Target library to ARM Compute.
b. Set ARM Compute Library version to 20.02.1. This example supports the latest version of ARM Compute Library.
c. Set ARM Compute Library architecture to armv7.
3. Click Apply > OK.
Deploy Simulink Model
1. On the Hardware tab of the Simulink model, in the Mode section, select Run on board and then click Build, Deploy & Start. The androidObjectClassification application launches automatically.

2. Place the object in front of the Android device camera and move the object. Observe the bounding box with the label around the detected object.
3. Move the object and track it on your Android device.
Other Things to Try
Train the YOLOv2 object detector to detect and track more than one object.
Use a neural network other than ResNet-18 for training the objects and observe the differences in the obtained results.
Use a different algorithm in the Video Labeler app and compare the results with the
Point Trackeralgorithm.Change the size of the input image provided in the
deeplearningfunction and observe the object detection image.
See Also
Video Labeler (Computer Vision Toolbox)
Get Started with the Video Labeler (Computer Vision Toolbox)
Code Verification and Validation Using PIL Simulation on Android