Display and Navigate Through Web Views
R2026bDisplay Web Views After Export
When you export a Web view using the Web View dialog box or from the Report Explorer Web View pane, the Web view appears in your system web browser.

Open Generated Web Views in Web Browser
To open a Web view file in a web browser, navigate to the folder that contains the Web
view files, then open the webview.html file. For details about where
the files are located and how they are packaged, see Web View Files. You might need to configure your browser to open Web
views.
You do not need to configure the built-in MATLAB® HTML Viewer to view Web views. To open a Web view using the built-in MATLAB HTML Viewer:
Navigate to the folder containing your Web view package.
In the Command Window, enter:
rptview webview.html

You need to run the Google Chrome® browser with an execution flag that allows the Web view file to access other local files in the same folder.
On Macintosh, open a terminal window and enter:
open /Applications/Google\ Chrome.app --args --allow-file-access-from-filesOn Linux®, open a terminal window and enter:
./chromium-browser --allow-file-access-from-files
On Windows®, follow these steps to create a custom shortcut:
Locate and copy an existing Google Chrome shortcut. For example, to locate a shortcut file on Windows 10, click the Start button and type
Chrome. Then right-click Google Chrome in the search results and select Open file location.Right-click the new shortcut, select Properties, then select the Shortcut tab.
In the Target field, add a space after the existing text and append:
--allow-file-access-from-files
Click OK.

Note
You must close all instances of Google Chrome for the settings to take effect.
Follow these steps to create a custom shortcut:
Locate and copy an existing Microsoft Edge® shortcut. For example, to locate a shortcut file on Windows 10, click the Start button and type
Edge. Then right-click Microsoft Edge in the search results and select Open file location.Right-click the new shortcut, select Properties, then select the Shortcut tab.
In the Target field, add a space after the existing text and append:
--allow-file-access-from-files
Click OK.

Note
You must close all instances of Microsoft Edge for the settings to take effect.
Follow these steps to configure Safari to allow the Web view file to access other local files in the same folder:
In the menu bar, click Safari.
Click Preferences, then click Advanced.
Select the Show Develop menu in menu bar. The Develop menu appears in the menu bar.

In the menu bar, click Develop.
Select Disable Local File Restrictions.

Note
If you open the Web view and the Safari browser displays the Unsupported Browser message, reload the page after you configure Safari.
Follow these steps to configure Firefox® to allow the Web view file to access other local files in the same folder:
In the address bar, enter
about:configand press Enter.If the browser displays the Proceed with Caution warning message, click Accept the Risk and Continue.

In the search box, enter
security.fileuri.strict_origin_policyand press Enter.Ensure the value of the property is
false. If necessary, click the Toggle button to set the value to
false.
Note
If you open the Web view and the Firefox browser displays the Unsupported Browser message, reload the page after you configure Firefox.
View Contents of Systems
To see a thumbnail of the contents of all of systems in the Web view, click the View All tab.
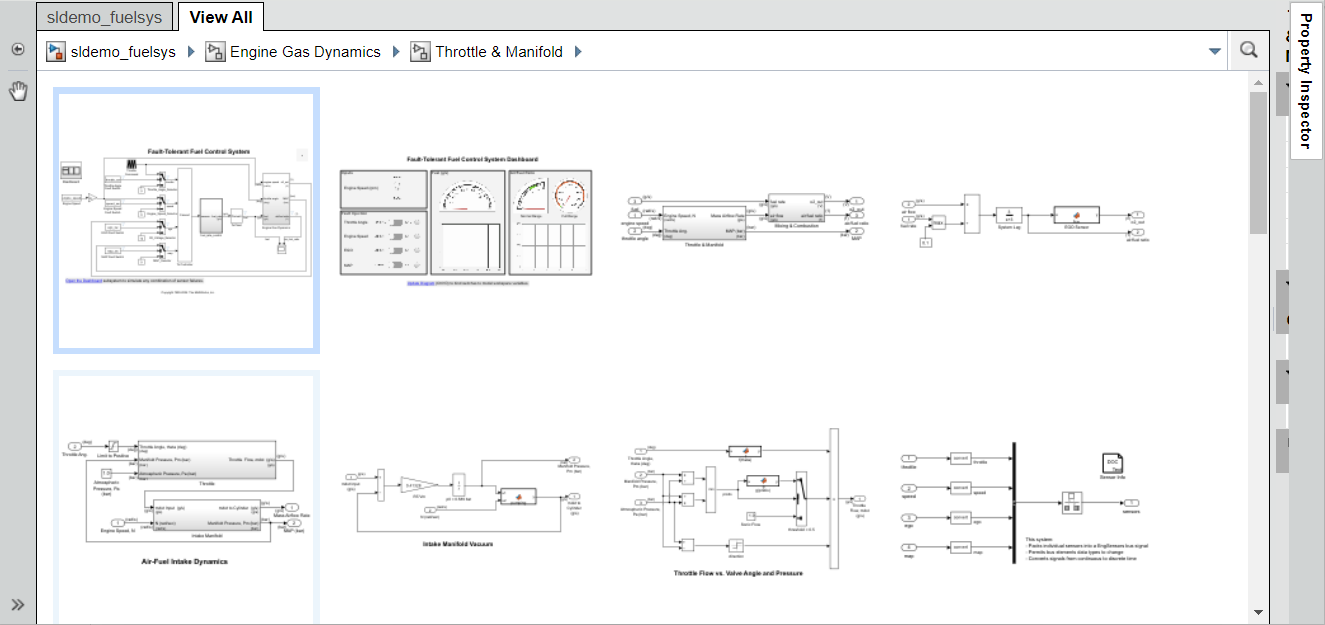
To view the contents of a specific system, use one of these approaches:
In the model viewer, double-click the system.
In the model browser, select a system. To expose this pane, click Hide/Show Model Browser
 .
.Click the View All tab and click the thumbnail of a system.
To open a system in a separate tab, press CTRL and click the system.
To exclude the View All
tab, set IncludeViewAllTab to "off" when you
generate the web view. (since R2026b)
Note
When you use color to differentiate sample times, web views display only the colors for referenced models. Web views do not display custom colors applied to referenced subsystems.
View Block Parameters and Signal Properties
Click a block or signal in the model to see its parameters or properties in the Property Inspector pane.
In R2024b: The Documentation tab displays the
MaskDescription and Description properties
for masked subsystems and the Description property for all other
blocks.

In R2026b: To exclude the Property
Inspector pane, set IncludePropertyInspector to
"off" when you generate the web view.
Access Optional Web View Information
To view the model coverage optional Web view information in a Web view, you must have Simulink® Coverage™ installed. To view the requirements optional Web view information in a Web view, you must have Requirements Toolbox™ installed. To access the information, click a highlighted block (for example, blocks with an orange border have requirements information). The information for that block appears in the Informer pane below the model.
Navigate Using Touch Screen or Trackpad
Since R2023b
Use these gestures to navigate the diagram canvas with a touch screen or trackpad.
| Navigation | Touch Screen Gesture | Trackpad Gesture |
|---|---|---|
| Zoom in |
| Move two fingers closer to each other |
| Zoom out | Move two fingers farther away | Move two fingers farther away |
| Pan |
|
|
| Pan and zoom in | Move two fingers closer to each other while moving them across the touch screen | N/A |
| Pan and zoom out | Move two fingers farther away from each other while moving them across the touch screen | N/A |


