Basic Image Import, Processing, and Export
This example shows how to read an image into the workspace, adjust the contrast in the image, and then write the adjusted image to a file.
Step 1: Read and Display an Image
Read an image into the workspace using the imread function. The example reads one of the sample images included with the toolbox, an image of a young girl in a file named pout.tif, and stores it in an array named I. The imread function infers from the file that the graphics file format is Tagged Image File Format (TIFF).
I = imread("pout.tif");Display the image using the imshow function. You can also view an image in the Image Viewer app, which presents an integrated environment for displaying images and performing some common image processing tasks. The Image Viewer app provides all the image display capabilities of imshow but also provides access to several other tools for navigating and exploring images, such as scroll bars, the Pixel Region tool, Image Information tool, and the Contrast Adjustment tool.
imshow(I)

Step 2: Check How the Image Appears in the Workspace
Check how the imread function stores the image data in the workspace using the whos function. You can also check the variable in the Workspace panel. The imread function returns the image data in the variable I, which is a 291-by-240 element array of uint8 data.
whos IName Size Bytes Class Attributes I 291x240 69840 uint8
Step 3: Improve Image Contrast
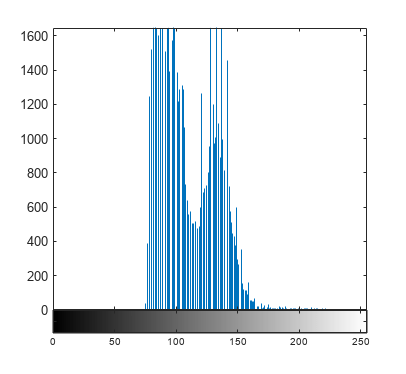
View the distribution of image pixel intensities. The image pout.tif is a somewhat low contrast image. To see the distribution of intensities in the image, create a histogram by calling the imhist function. Notice how the histogram indicates that the intensity range of the image is rather narrow. The range does not cover the potential range of [0, 255], and the image is missing the high and low values that would result in good contrast.
imhist(I)

Improve the contrast in an image using the imhist function, then display the result. Histogram equalization spreads the intensity values over the full range of the image. The toolbox includes several other functions that perform contrast adjustment, including imadjust and adapthisteq, and interactive tools such as the Adjust Contrast tool, available in the Image Viewer app.
I2 = histeq(I);
imshow(I2)

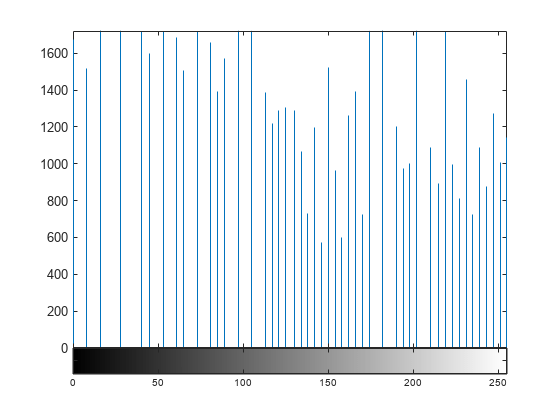
Call the imhist function again to create a histogram of the equalized image I2. If you compare the two histograms, you can see that the histogram of I2 is more spread out over the entire range than the histogram of I.
figure
imhist(I2)

Step 4: Write the Adjusted Image to a File
Write the newly adjusted image I2 to a file using the imwrite function. This example includes the extension ".png" in the filename, so the imwrite function writes the image to a file in Portable Network Graphics (PNG) format. You can specify other file formats.
imwrite(I2,"pout2.png");Step 5: Check the Contents of the Newly Written File
View information about the image in the file, such as its format, size, width, and height, by using the imfinfo function.
imfinfo("pout2.png")See Also
imread | imshow | imwrite | imfinfo