Adjust Image Contrast in Image Viewer App
Image contrast refers to the difference in brightness between the lightest and darkest parts of a grayscale image. An image lacks contrast when there is no sharp difference between the lowest and highest pixel values. Contrast adjustment works by manipulating the display range, or the range of pixel values that map to different display colors. Pixel values within the display range appear as shades of gray. Pixels values less than or equal to the display range minimum appear black. Pixel values greater than or equal to the display range maximum appear white.
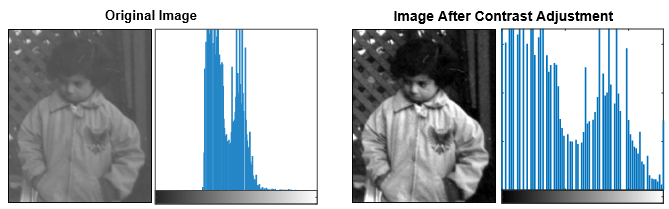
This figure shows an image before and after contrast adjustment. In the original image, the pixel values occupy fewer shades of gray, and the image has poor contrast. The adjusted image stretches the pixel values to occupy the full range of colors from black to white, and the image has higher contrast.
Load Image into Image Viewer
Load a grayscale image into the app by using the imageViewer
function, or by selecting Import Image from the app toolstrip. For more
information about opening images in the app, see Open Image Viewer App.
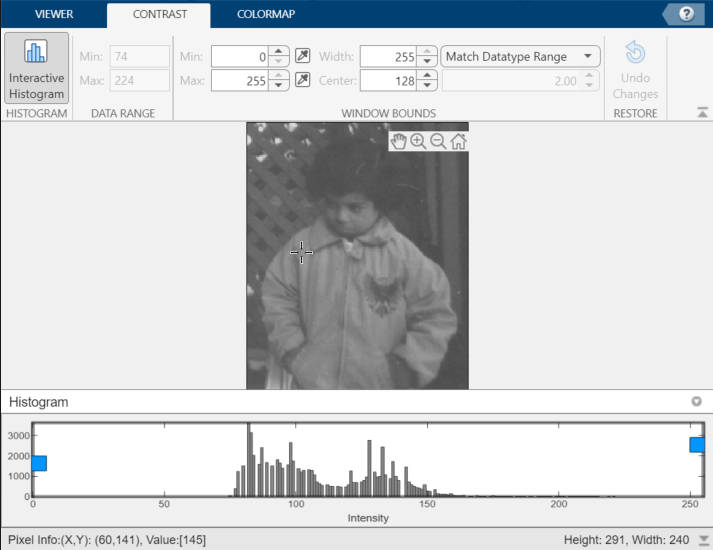
The Contrast tab of the app toolstrip displays information about the image contrast. The Data Range section displays the minimum and maximum pixel values of the imported image. The Window Bounds section displays the minimum, maximum, width, and center of the display range window, and has a drop-down list of preset options.
By default, the drop-down value is Match Datatype Range, and
the window bounds values match the default display range for the data type. The default
display range for integer data types is the full range of that data type. For example, the
default display range for uint8 is 0 to 255, such that
0 appears black and 255 appears white. The default
display range for the single and double data types is
0 to 1, such that 0 appears black and 1 appears
white.
This figure shows the default contrast information for a uint8 image
with a data range of 74 to 224. The histogram shows a cluster of values in the middle of the
default display range window.
Adjust Contrast and Brightness
To adjust the contrast of an image, modify the display range window using one of the methods listed in this table.
| Description | Image |
|---|---|
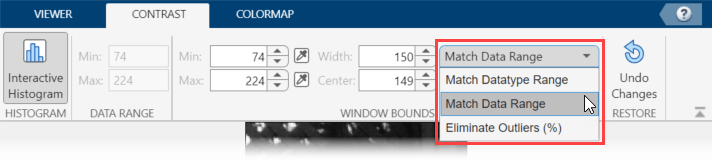
Scale the display range automatically.
If you select an automatic preset, the other fields in the Window Bounds section update to reflect the new display range window. |
|
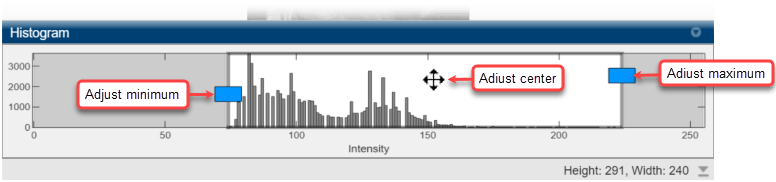
Interactively adjust the minimum and maximum values of the display range in the Histogram pane by dragging the left and right edges of the window. Change the center of the window by dragging the interior of the window. |
|
Enter specific values in the Window Bounds section of the app toolstrip. You can also define the minimum or maximum value by clicking the dropper button next to the corresponding field. When you do this and move the pointer over the image, the pointer becomes an eye dropper shape. Position the eye dropper shape over the pixel with the value that you want to be the minimum or maximum value and left-click. |
|

This animation shows how to increase the image contrast by selecting
Eliminate Outliers (%) from the Window
Bounds section of the app toolstrip. The display range window changes to 78 to
161. When you change the display range window, the image display updates in real time. You
can restore the default display range window by selecting Undo
Changes.
View Imported and Adjusted Image Values
As you modify the display range window, Image Viewer calculates adjusted
values for each pixel by linearly scaling the display window to the data type range. This is
similar to calling the imadjust function and specifying the window
bounds as the input contrast limits and the data type range as the output contrast limits.
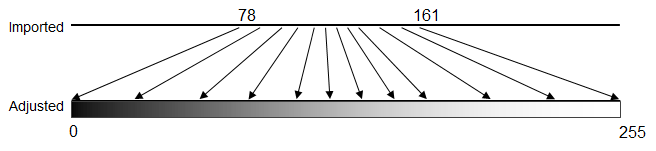
For example, this figure shows a graphical representation of mapping imported values between
78 and 161 to an adjusted value range of 0 to 255. Imported values less than or equal to 78
map to an adjusted value of 0. Imported values greater than or equal to 161 map to
255.
After you adjust the contrast, you can view both the imported and adjusted value for
each pixel. When you pause on the image, the bottom-left corner of the app window displays
information about the pixel that is under the cursor. After making contrast changes, the
information includes the imported and adjusted value for the pixel. If you zoom in far
enough on the image, with Show Pixel Values selected, Image
Viewer displays the imported value I and adjusted value
Adj overlaid on individual pixels. For more details on zooming to view
pixel values, see Get Pixel Information in Image Viewer App.
![]()
Export Contrast-Adjusted Image
You can export the contrast-adjusted image to a file or to a workspace variable. On the Viewer tab of the app toolstrip, select Export > Export Image, and select either To Workspace or To Image File. The app saves the adjusted pixel values using the same data type as the imported image.
See Also
Image Viewer | imcontrast | imadjust | stretchlim