Deploy and Classify Webcam Images on NVIDIA Jetson Platform from Simulink
This example shows how to deploy a Simulink® model on the NVIDIA® Jetson™ board for classifying webcam images. This example classifies images from a webcam in real-time by using the pretrained deep convolutional neural network, ResNet-50. The Simulink model in the example uses the camera and display blocks from the MATLAB® Coder™ Support Package for NVIDIA Jetson and NVIDIA DRIVE™ Platforms to capture the live video stream from a webcam and display the prediction results on a monitor connected to the Jetson platform.
This example uses an NVIDIA Jetson Orin Nano board. Your results may differ.
Prerequisites
Target Board Requirements
NVIDIA Jetson embedded platform.
Ethernet crossover cable to connect the target board and host PC. (if you cannot connect the target board to a local network)
USB webcam connected to the USB host port of the target.
A monitor connected to the display port of the target.
V4L2 and SDL (v1.2) libraries on the target.
GStreamer libraries on the target.
NVIDIA CUDA® toolkit and driver on the target.
NVIDIA cuDNN library on the target.
Environment variables on the target for the compilers and libraries. For more information, see Prerequisites for Generating Code for NVIDIA Boards.
Development Host Requirements
Environment variables for the compilers and libraries. For more information, see Third-Party Hardware and Setting Up the Prerequisite Products.
Connect to NVIDIA Jetson
The support package uses an SSH connection over TCP/IP to execute commands while building and running the generated CUDA code on the Jetson platforms. Connect the target platform to the same network as the host computer or use an Ethernet crossover cable to connect the board directly to the host computer. For information on how to set up and configure your board, see NVIDIA documentation.
To communicate with the NVIDIA hardware, create a live hardware connection object by using the jetson function.
hwobj = jetson("jetson-deviceaddress","username","password");
When connecting to the target board for the first time, you must provide the host name or IP address, user name, and password of the target board. On subsequent connections, you do not need to supply the address, user name, and password. The hardware object reuses these settings from the most recent successful connection to an NVIDIA board.
hwobj = jetson;
### Checking for CUDA availability on the target...
### Checking for 'nvcc' in the target system path...
### Checking for cuDNN library availability on the target...
### Checking for TensorRT library availability on the target...
### Checking for prerequisite libraries is complete.
### Gathering hardware details...
### Checking for third-party library availability on the target...
### Gathering hardware details is complete.
Board name              : NVIDIA Jetson Orin Nano Developer Kit
CUDA Version            : 11.4
cuDNN Version           : 8.6
TensorRT Version        : 8.5
GStreamer Version       : 1.16.3
V4L2 Version            : 1.18.0-2build1
SDL Version             : 1.2
OpenCV Version          : 4.5.4
Available Webcams       : Microsoft LifeCam Cinema(TM):
Available GPUs          : Orin
Available Digital Pins  : 7  11  12  13  15  16  18  19  21  22  23  24  26  29  31  32  33  35  36  37  38  40
When you create a hardware object, the software performs hardware and software checks, installs MATLAB IO server on the target board, and gathers information of the peripheral devices connected to the target. It displays this information in the MATLAB Command Window.
In case of a connection failure, the jetson function generates an error. If the connection has failed, the most likely cause is incorrect IP address or host name.
When there are multiple live connection objects for different targets, the code generator performs a remote build on the target board for which a recent live object was created. To choose a hardware board for performing a remote build, use the setupCodegenContext() method of the respective live hardware object. If only one live connection object was created, you do not need to call this method.
setupCodegenContext(hwobj);
Verify GPU Environment on Target Board
To verify that the compilers and libraries necessary for running this example are set up correctly, use the coder.checkGpuInstall function.
envCfg = coder.gpuEnvConfig('jetson');
envCfg.DeepLibTarget = 'cudnn';
envCfg.DeepCodegen = 1;
envCfg.HardwareObject = hwobj;
coder.checkGpuInstall(envCfg);
Identify Cameras Connected to Target Board
To find the list of cameras connected to the target, use the getCameraList function. If this function outputs an empty table, then try re-connecting the camera and execute the function again.
camlist = getCameraList(hwobj);
              Camera Name              Video Device     Available Resolutions    Pixel Formats
    _______________________________    _____________    _____________________    _____________

    "Microsoft LifeCam Cinema(TM):"    "/dev/video0"    "(View resolutions)"      "YUYV,MJPG"
The getCameraList function lists the optimum resolutions supported by the camera sensor. At these resolutions, the image acquisition pipeline works efficiently. Based on the requirements of your algorithm, you can pick any supported resolution.
camName = camlist.("Camera Name"){1};
camResolution = "[1280,720]";
Simulink Model for Deep Learning Classification
The Simulink model for classifying webcam images contains a Predict block to predict the scores and labels for each class, an NVIDIA Camera block to capture a live video stream, and an NVIDIA Display block to display the results from the classification. Additional processing operations are implemented by using MATLAB Function blocks.
open_system('ex_DLModel');The Camera block captures a snapshot for each time-step of the algorithm. To select the webcam and set the resolution of each snapshot, double click on the Camera block and set the Name and Image size as shown. The value of Image size must be a resolution supported by the webcam.
open_system('ex_DLModel/Camera')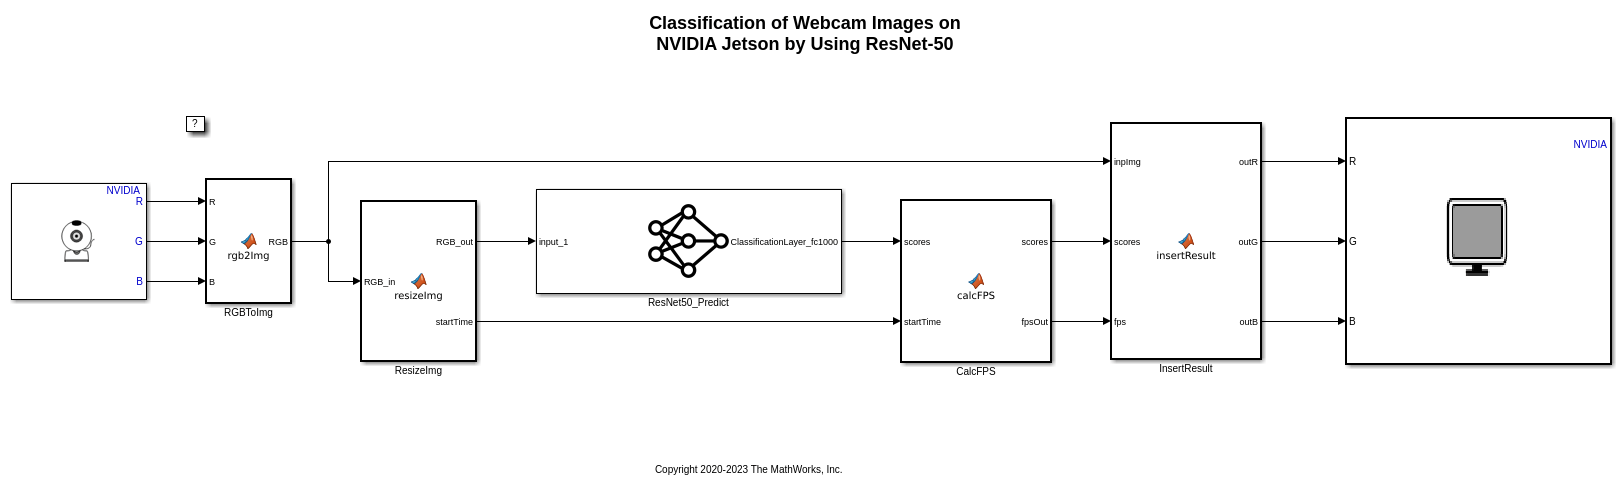
Alternatively, use the set_param function to set the parameters for the Camera block. This example uses the first camera from the output of the getCameraList function and the first supported resolution.
set_param('ex_DLModel/Camera','CameraName',camName);
set_param('ex_DLModel/Camera','ImageSize',camResolution);
The rgb2Img function block converts the R, G, and B component outputs from the Camera block to an RGB planar image. The resulting image is then provided as input to resizeImg function block that resizes the image to the input image size of the Resnet-50 network. The input image size of the Resnet-50 network is 224-by-224-by-3.
The predict block from Deep Learning Toolbox™ takes a single input image frame and runs prediction on the image by using the pretrained resnet50 convolutional neural network. ResNet-50 is a DAG network trained on more than a million images from the ImageNet database. The output contains the categorical scores of each class the image belongs to.
open_system('ex_DLModel/ResNet50_Predict')The output scores and the input image are passed to the insertResult function block. This block calculates the average frames per second (FPS) and annotates the input image with the top five prediction labels, their corresponding scores, and the computed average FPS.
function [outR,outG,outB] = insertResult(inpImg, scores)

%% FPS Calculation
persistent frameCount averageFPS previousTime
if isempty(previousTime)
    previousTime = datetime('now');
    frameCount = 0;
    averageFPS = 0;
else
    currentTime = datetime('now');
    timeDifference = seconds(currentTime - previousTime);
    currentFPS = 1/timeDifference;
    averageFPS = (frameCount*averageFPS + currentFPS)/(frameCount+1);
    frameCount = frameCount+1;
    previousTime = currentTime;
end

[scores,index] = sort(scores,'descend');

%% Insert prediction with scores in the image

%Pad Image
outImg = padarray(inpImg,[0,200],0,'pre');

index5 = index(1:5);
synsetData = coder.load('synsetWords.mat');
synsetData = synsetData.synsetArray;

outImg = insertText(outImg, [10 80],['FPS : ' sprintf('%0.2f',averageFPS) ], 'AnchorPoint','LeftBottom');

for i=1:5
   str = strtrim(synsetData(index5(i),:));
   outImg = insertText(outImg, [10 50+30*(i+1)],[str ': ' sprintf('%0.2f',scores(i)*100) '%'], 'AnchorPoint','LeftBottom');
end

outR = outImg(:,:,1)';
outG = outImg(:,:,2)';
outB = outImg(:,:,3)';
The resulting output image is provided to the NVIDIA Display block which opens a display window showing the output image on the target while running an application.
Configure the Model for Simulation and Deployment
To generate CUDA code, the model must be enabled with the following settings:
set_param('ex_DLModel','TargetLang','C++');
set_param('ex_DLModel','GenerateGPUCode','CUDA');
The model in this example is preconfigured to generate CUDA code.
For more information on generating GPU Code in Simulink, see Code Generation from Simulink Models with GPU Coder.
The Deep learning target library must be set as 'CuDNN' during code generation,
set_param('ex_DLModel', 'DLTargetLibrary','cudnn');
For more information, see GPU Code Generation for Deep Learning Networks Using MATLAB Function Block and GPU Code Generation for Blocks from the Deep Neural Networks Library.
The model configuration parameters provide options for build process and deployment.
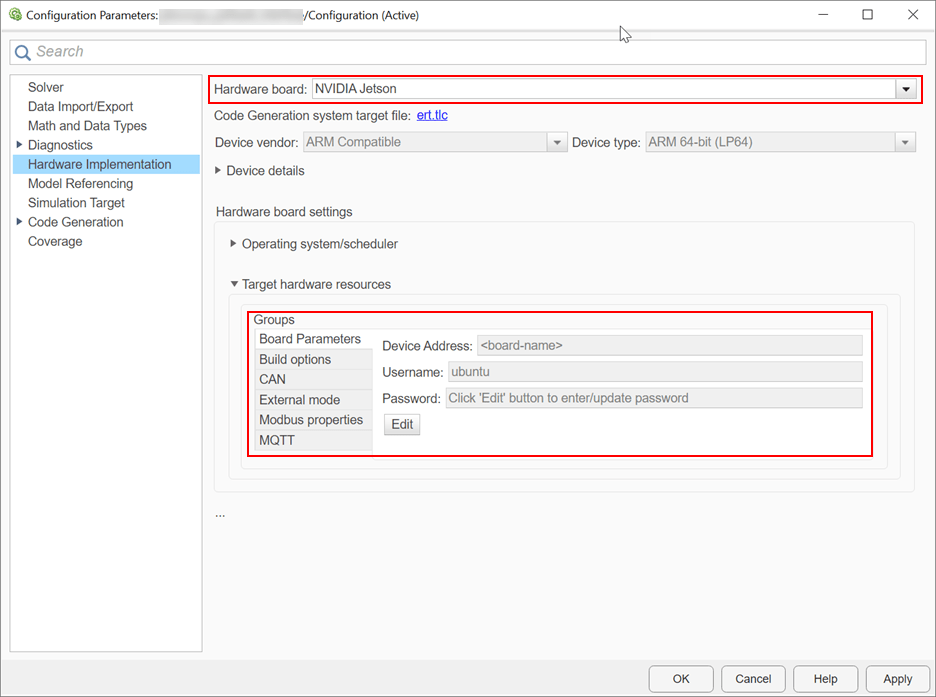
1. Open the Configuration Parameters dialog box, Hardware Implementation pane. Select Hardware board as NVIDIA Jetson (or NVIDIA Drive).
2. On the Target hardware resources section, enter the Device Address, Username, and Password of your NVIDIA Jetson target board.
3. Set the Build action, Build directory, and Display as shown. The Display represents the display environment and allows output to be displayed to the device corresponding to the environment.
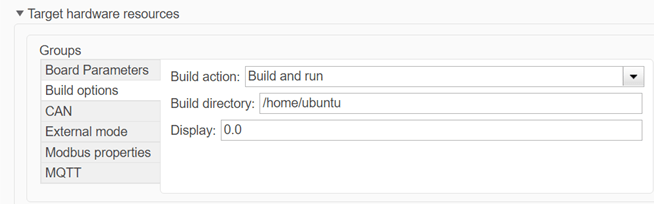
4. Click Apply and OK.
Generate and Deploy Model on Target Board
1. To generate CUDA code for the model, deploy the code to the target, and run the executable, open the Hardware tab on the Simulink Editor.
2. Select Build, Deploy & Start to generate and deploy the code on the hardware.

View Classification Results on the NVIDIA Jetson
When the application starts on the target, an SDL window opens and shows the classification results for each frame of the video stream captured by the webcam.

Stop Application
To stop the application on the target, use the stopModel method of the hardware object.
stopModel(hwobj,'ex_DLModel');
Things to Try
1. This example uses cuDNN as the deep learning code target library. This can be changed to NVIDIA TensorRT by running the following command. This requires the NVIDIA TensorRT - high performance deep learning inference optimizer and run-time library must be installed on the Jetson platform.
set_param('ex_DLModel', 'DLTargetLibrary','tensorrt');
2. This example sets the Hardware Implementation for NVIDIA Jetson. User can run this example with the NVIDIA Drive as target hardware.
3. The image resolution of the camera block can be changed based on the requirement.
Close Model
Run close_system to close the model.
close_system('ex_DLModel',0);